V1.0: created 10/28/21
V1.1: Removed KC Post related information 3/8/22
Introduction
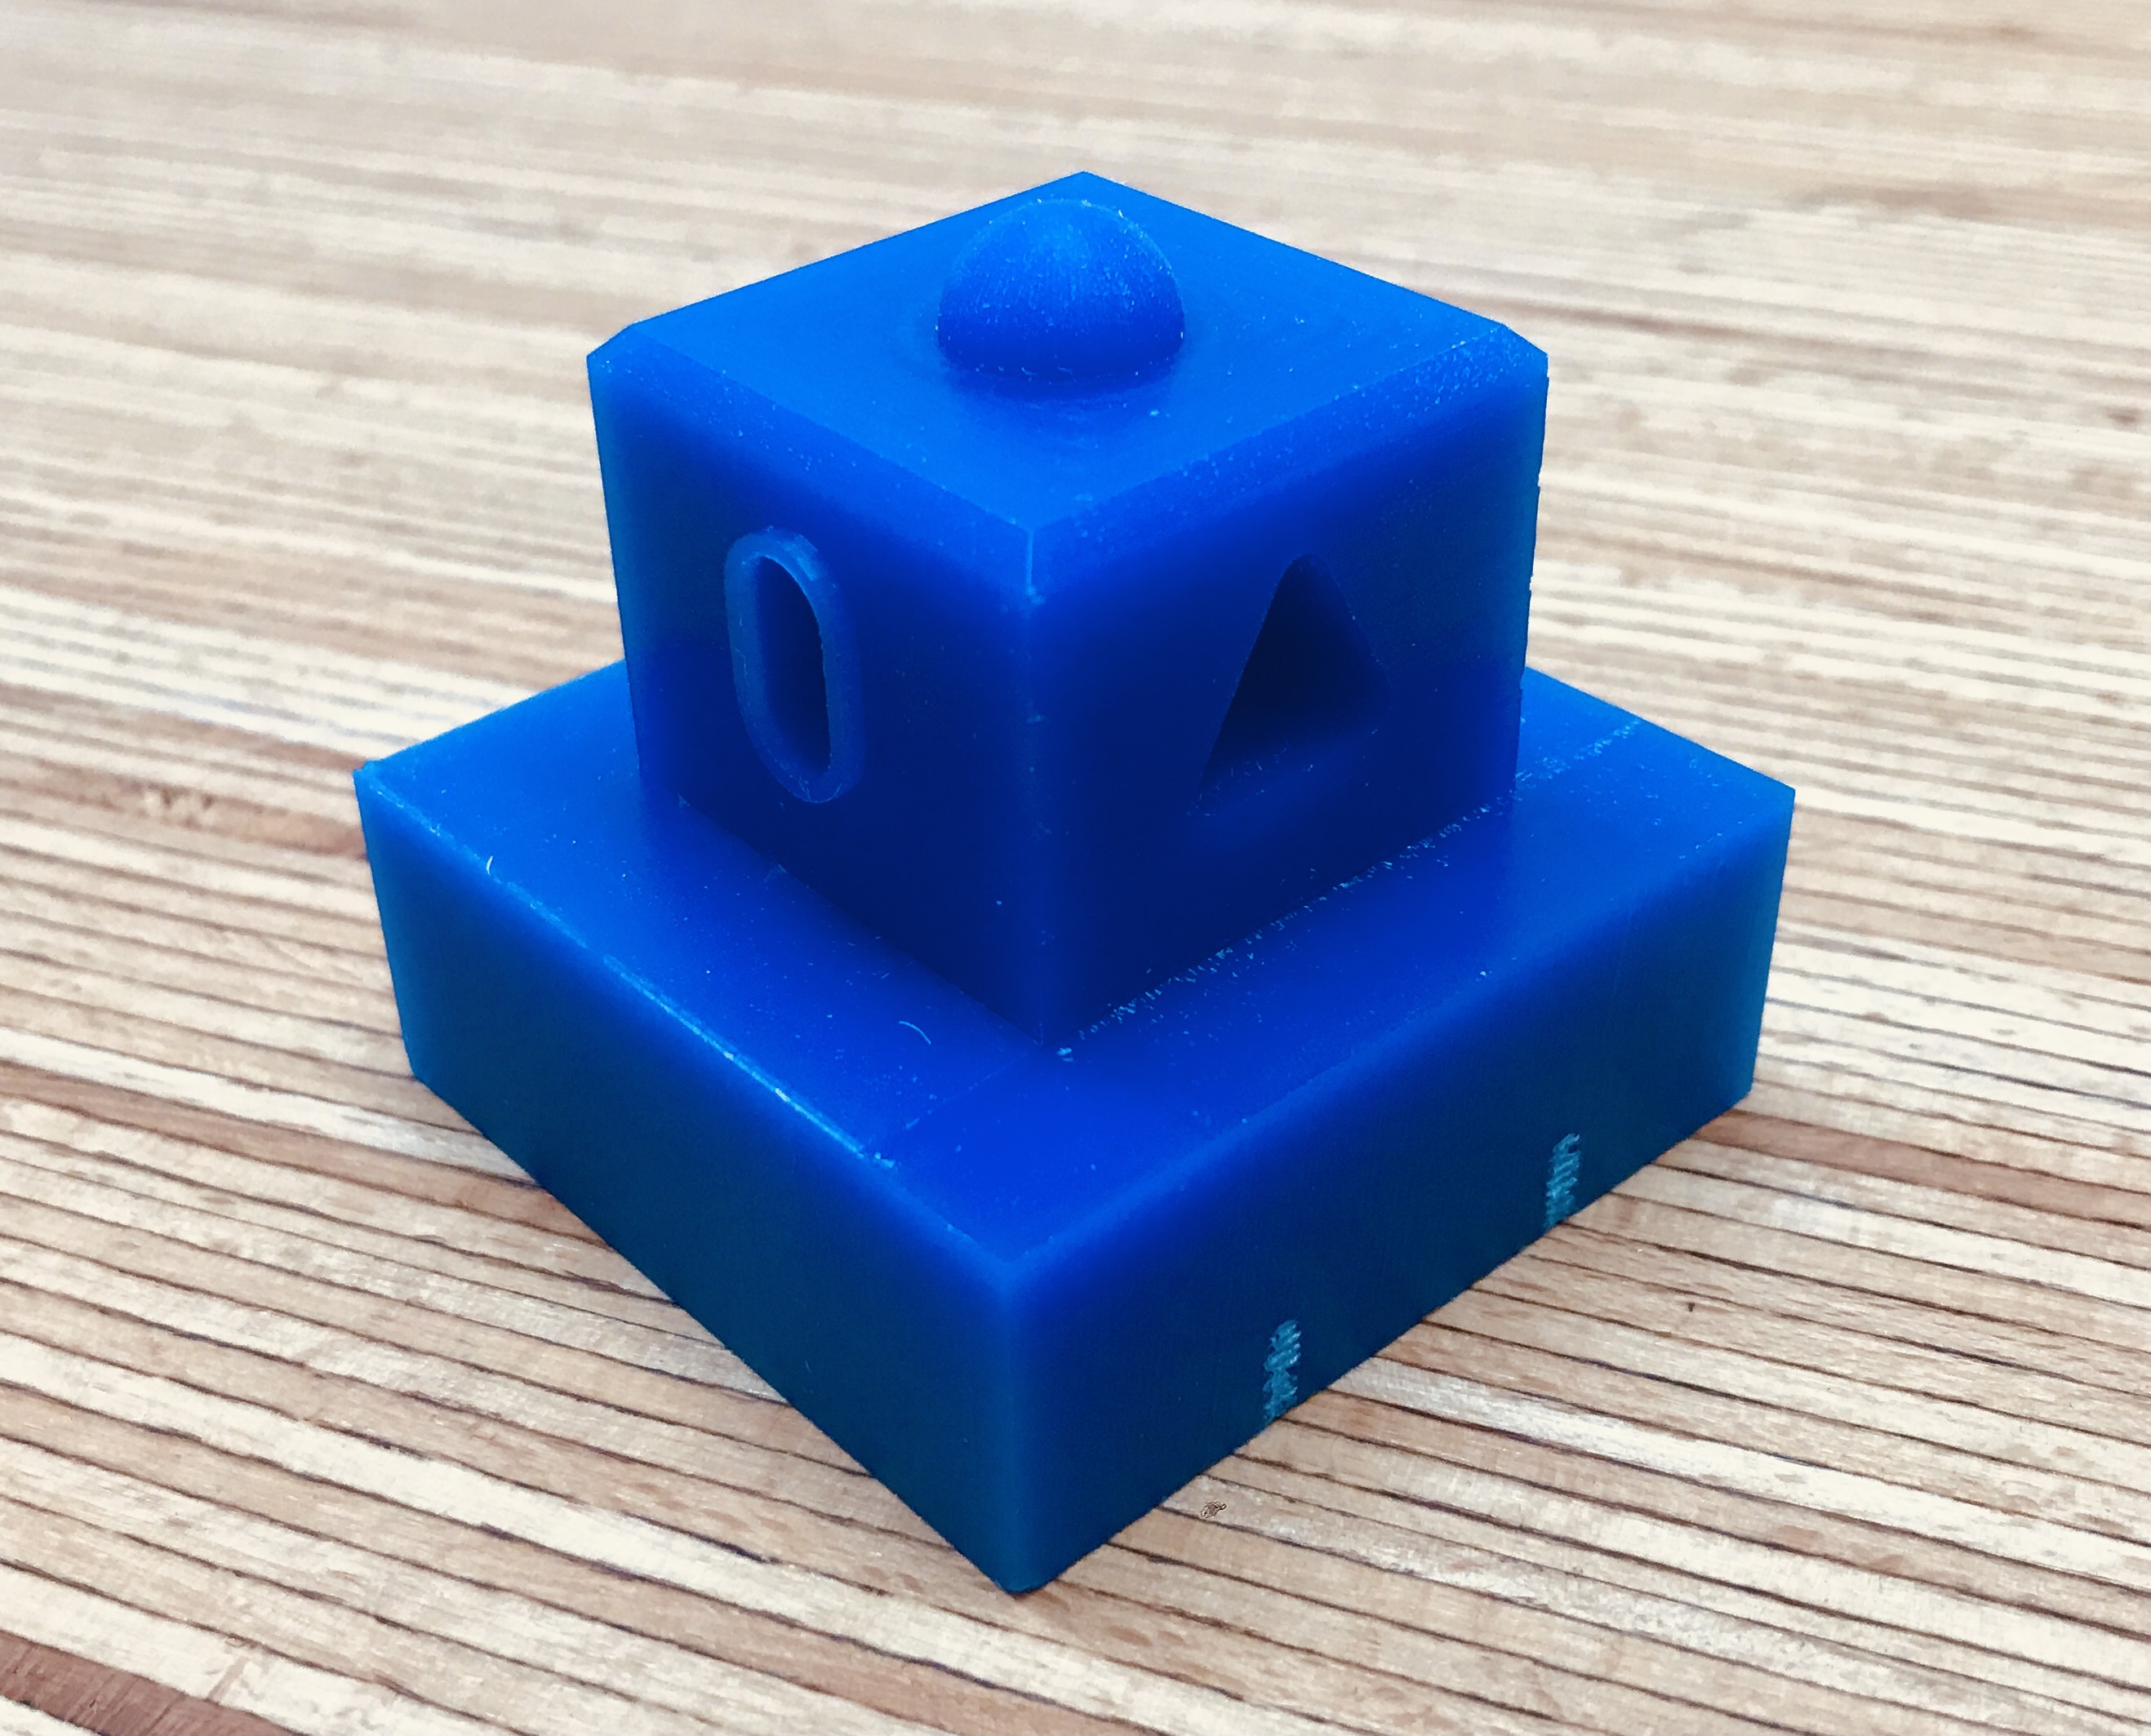
The purpose of this tutorial is to demonstrate how to set up a model in Fusion 360, how to program toolpaths, and how to set up and cut the part on your Pocket NC V2-10 or V2-50. This tutorial uses the Kinetic Control user interface released on 11/1/2021; if you are using an older software version, please refer to the “Rev-B” version of this tutorial posted under “Legacy Resources”. The part and tutorial are geared toward beginners, but more experienced users will also find value from the repetition and tips provided throughout. While the part appears basic, the tutorial walks through how to correctly set up and use 7 different toolpaths (four 2D toolpaths, two 3D toolpaths, and one multi-axis toolpath).
| Table of Contents |
|---|
Section 1: Model Setup
When setting up a part on the Pocket NC mill with Kinetic Control, users no longer need to include their workholding system in the CAM environment. Instead, we will use “touch-offs” to locate the stock on the machine itself for a more efficient and intuitive setup process.
| Note |
|---|
For this tutorial we will need the V2 First Part file which can be downloaded from the very bottom of this tutorial in Section 7. |
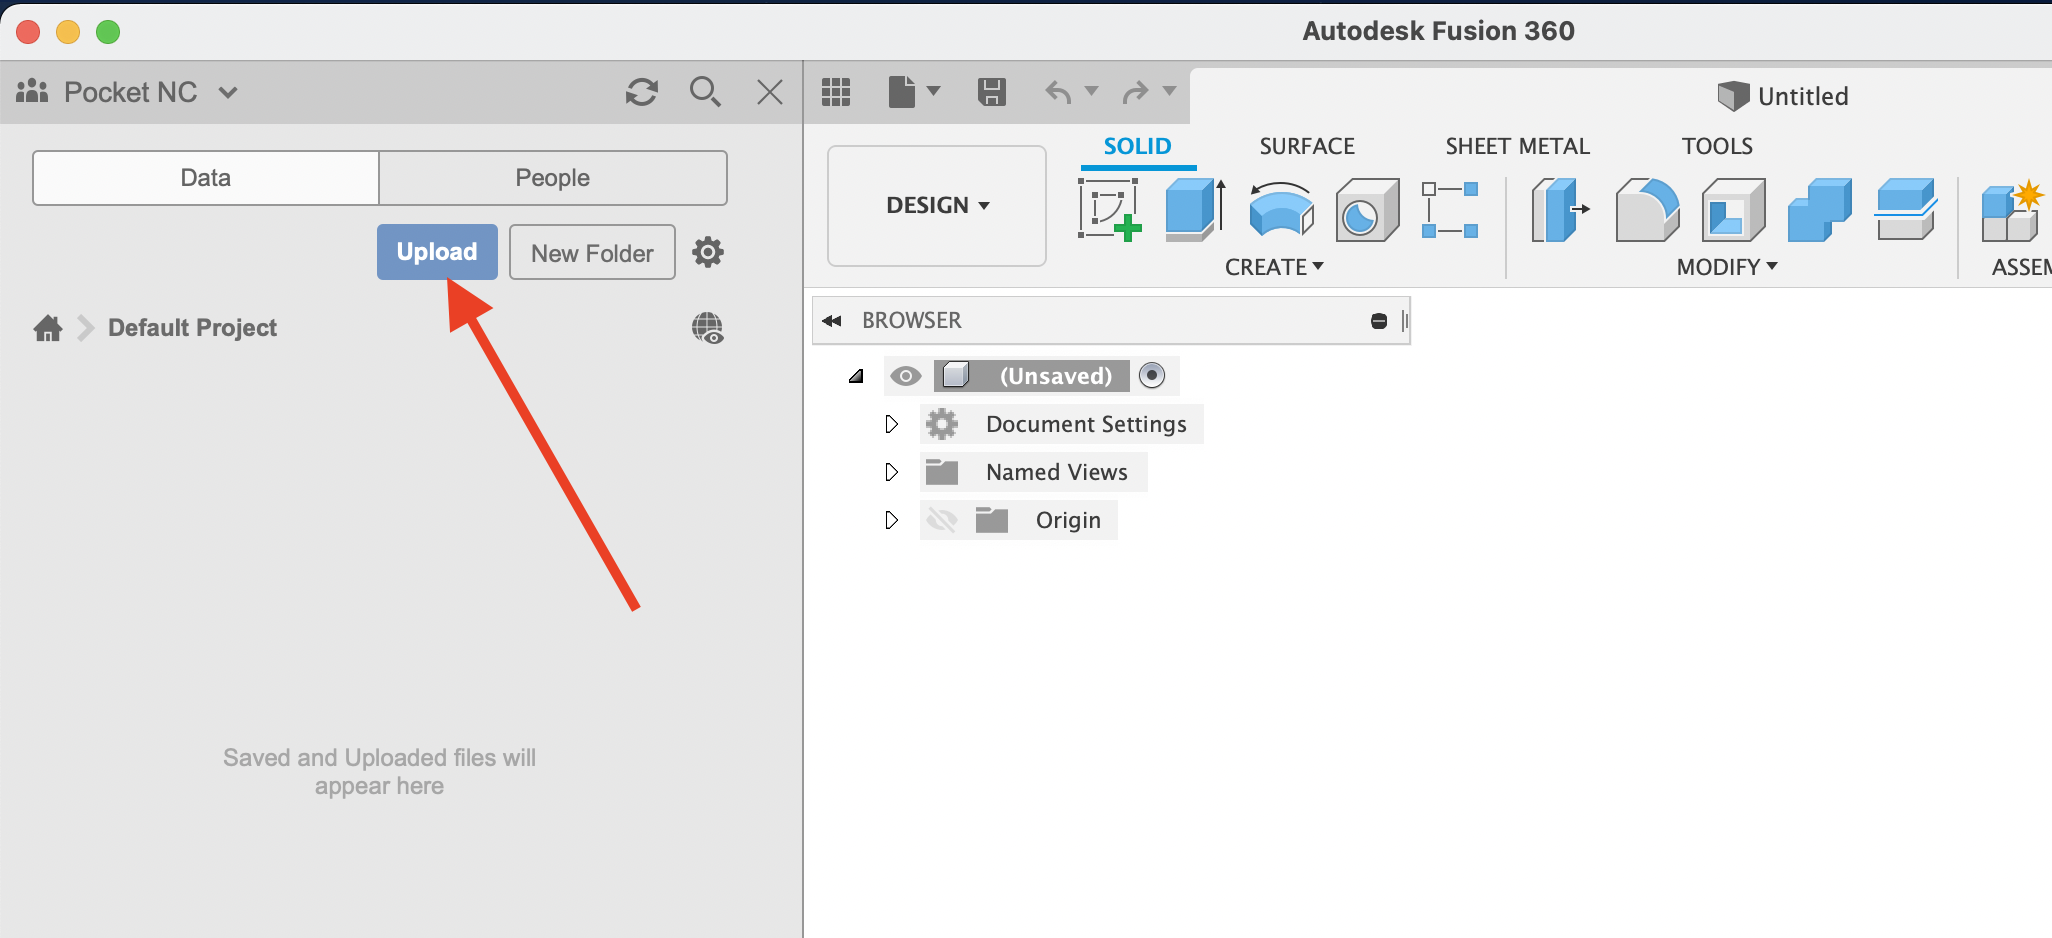
Because Fusion 360 is cloud based software, users will need to upload the model to Fusion. To do this, first open the data panel.
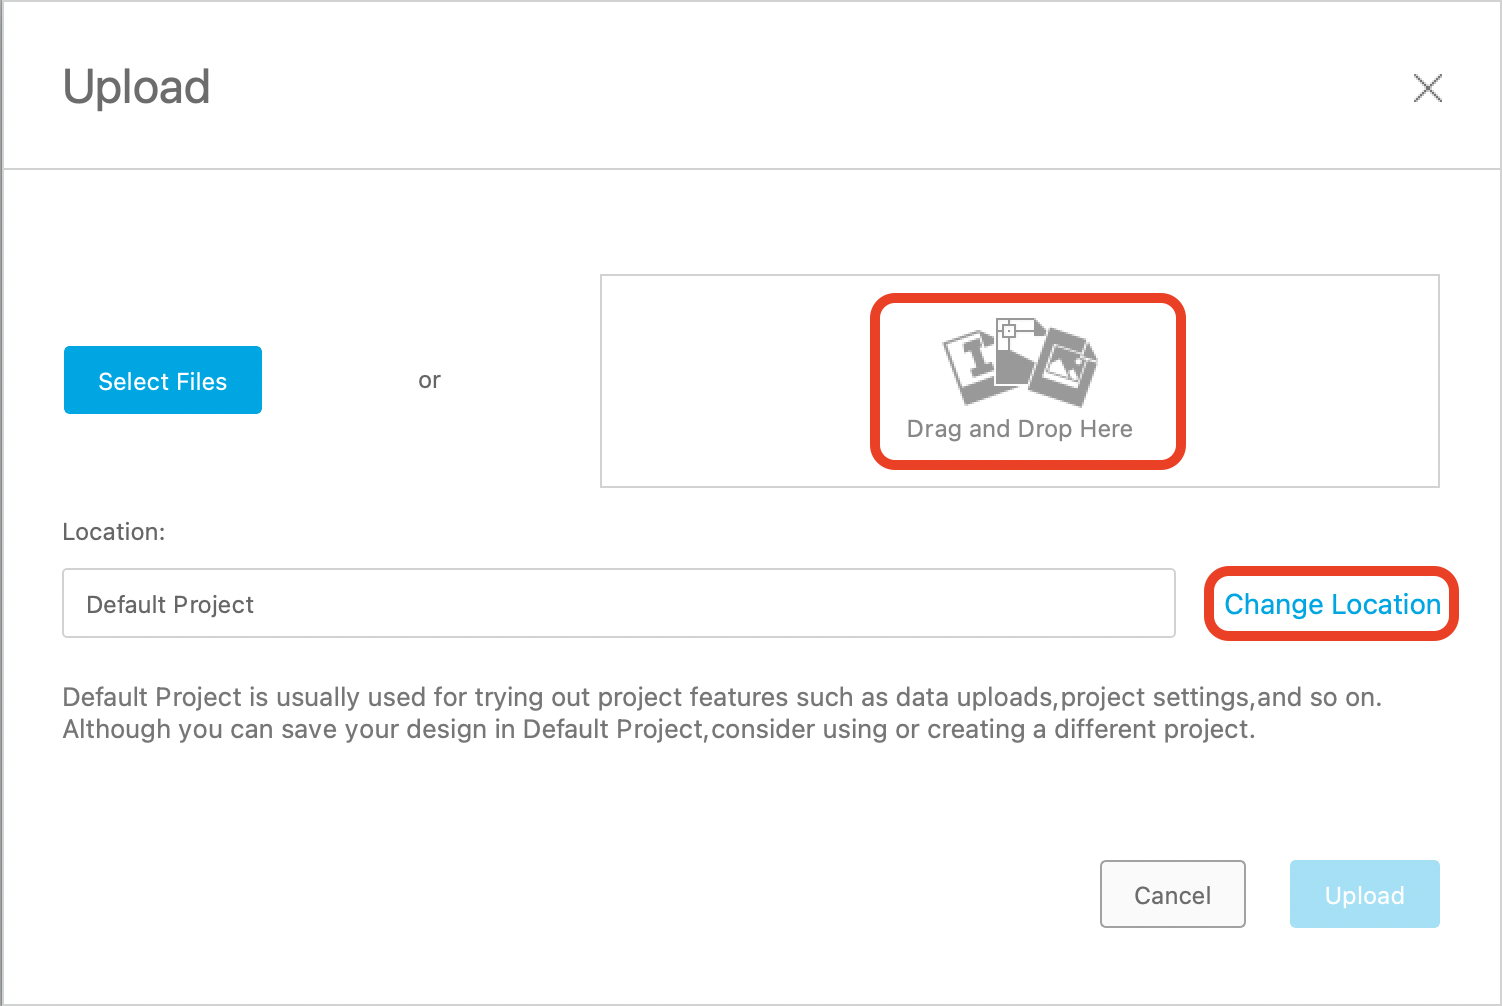
Then select upload and migrate to the file location where you saved the files locally. You can drag and drop or navigate through the file path.
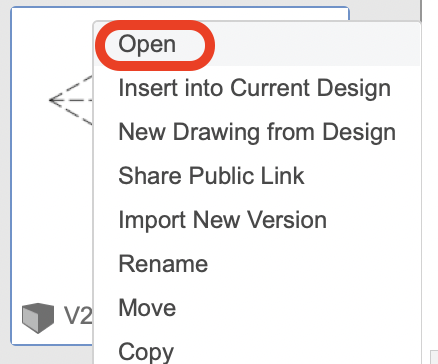
Files uploaded to Fusion will stay within the Data Panel and can be accessed any time in the future from that location. Once the file is uploaded, open the “V2 First Part” model by double clicking on it or right clicking the file and selecting open.
| Info |
|---|
Note: if you are familiar with older software versions, you will remember programing around the center-of-rotation using the B-table offset and including the vise and B-table in the file. We no longer need to do these steps as we will program our origin at a corner of the stock material and then physically locate that corner with the machine and create offsets later in this tutorial. |
Section 1.2: Part Geometry
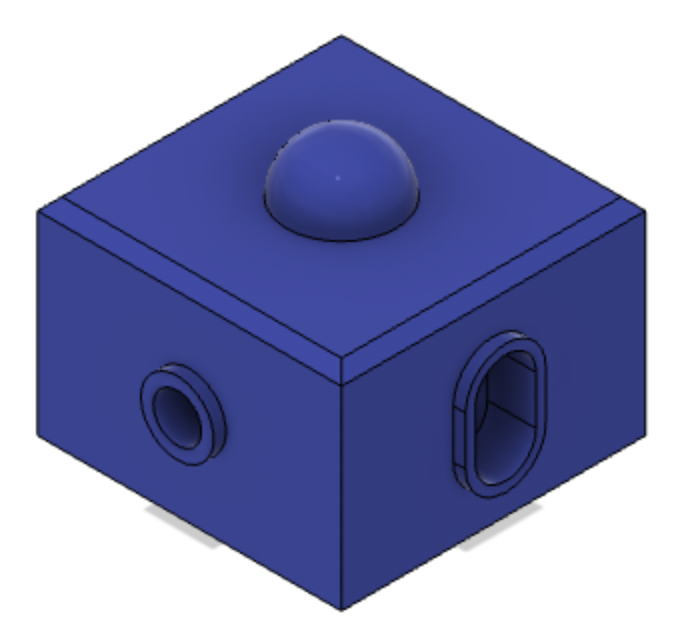
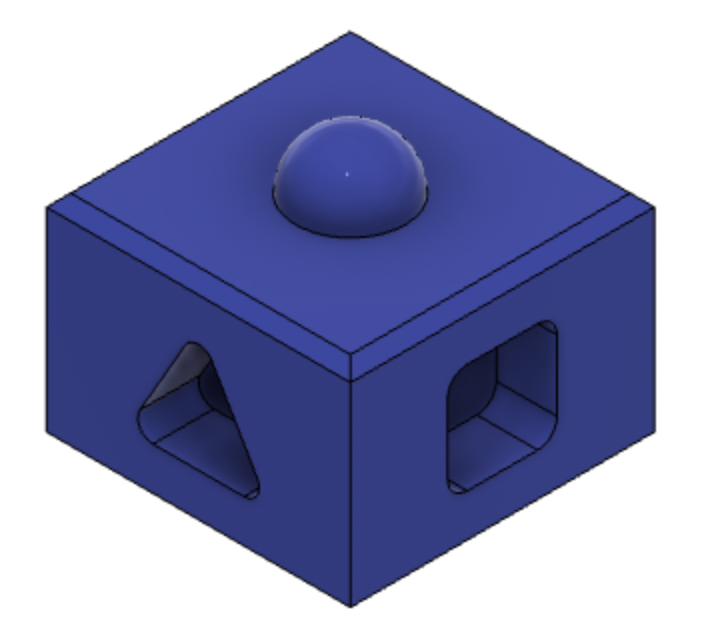
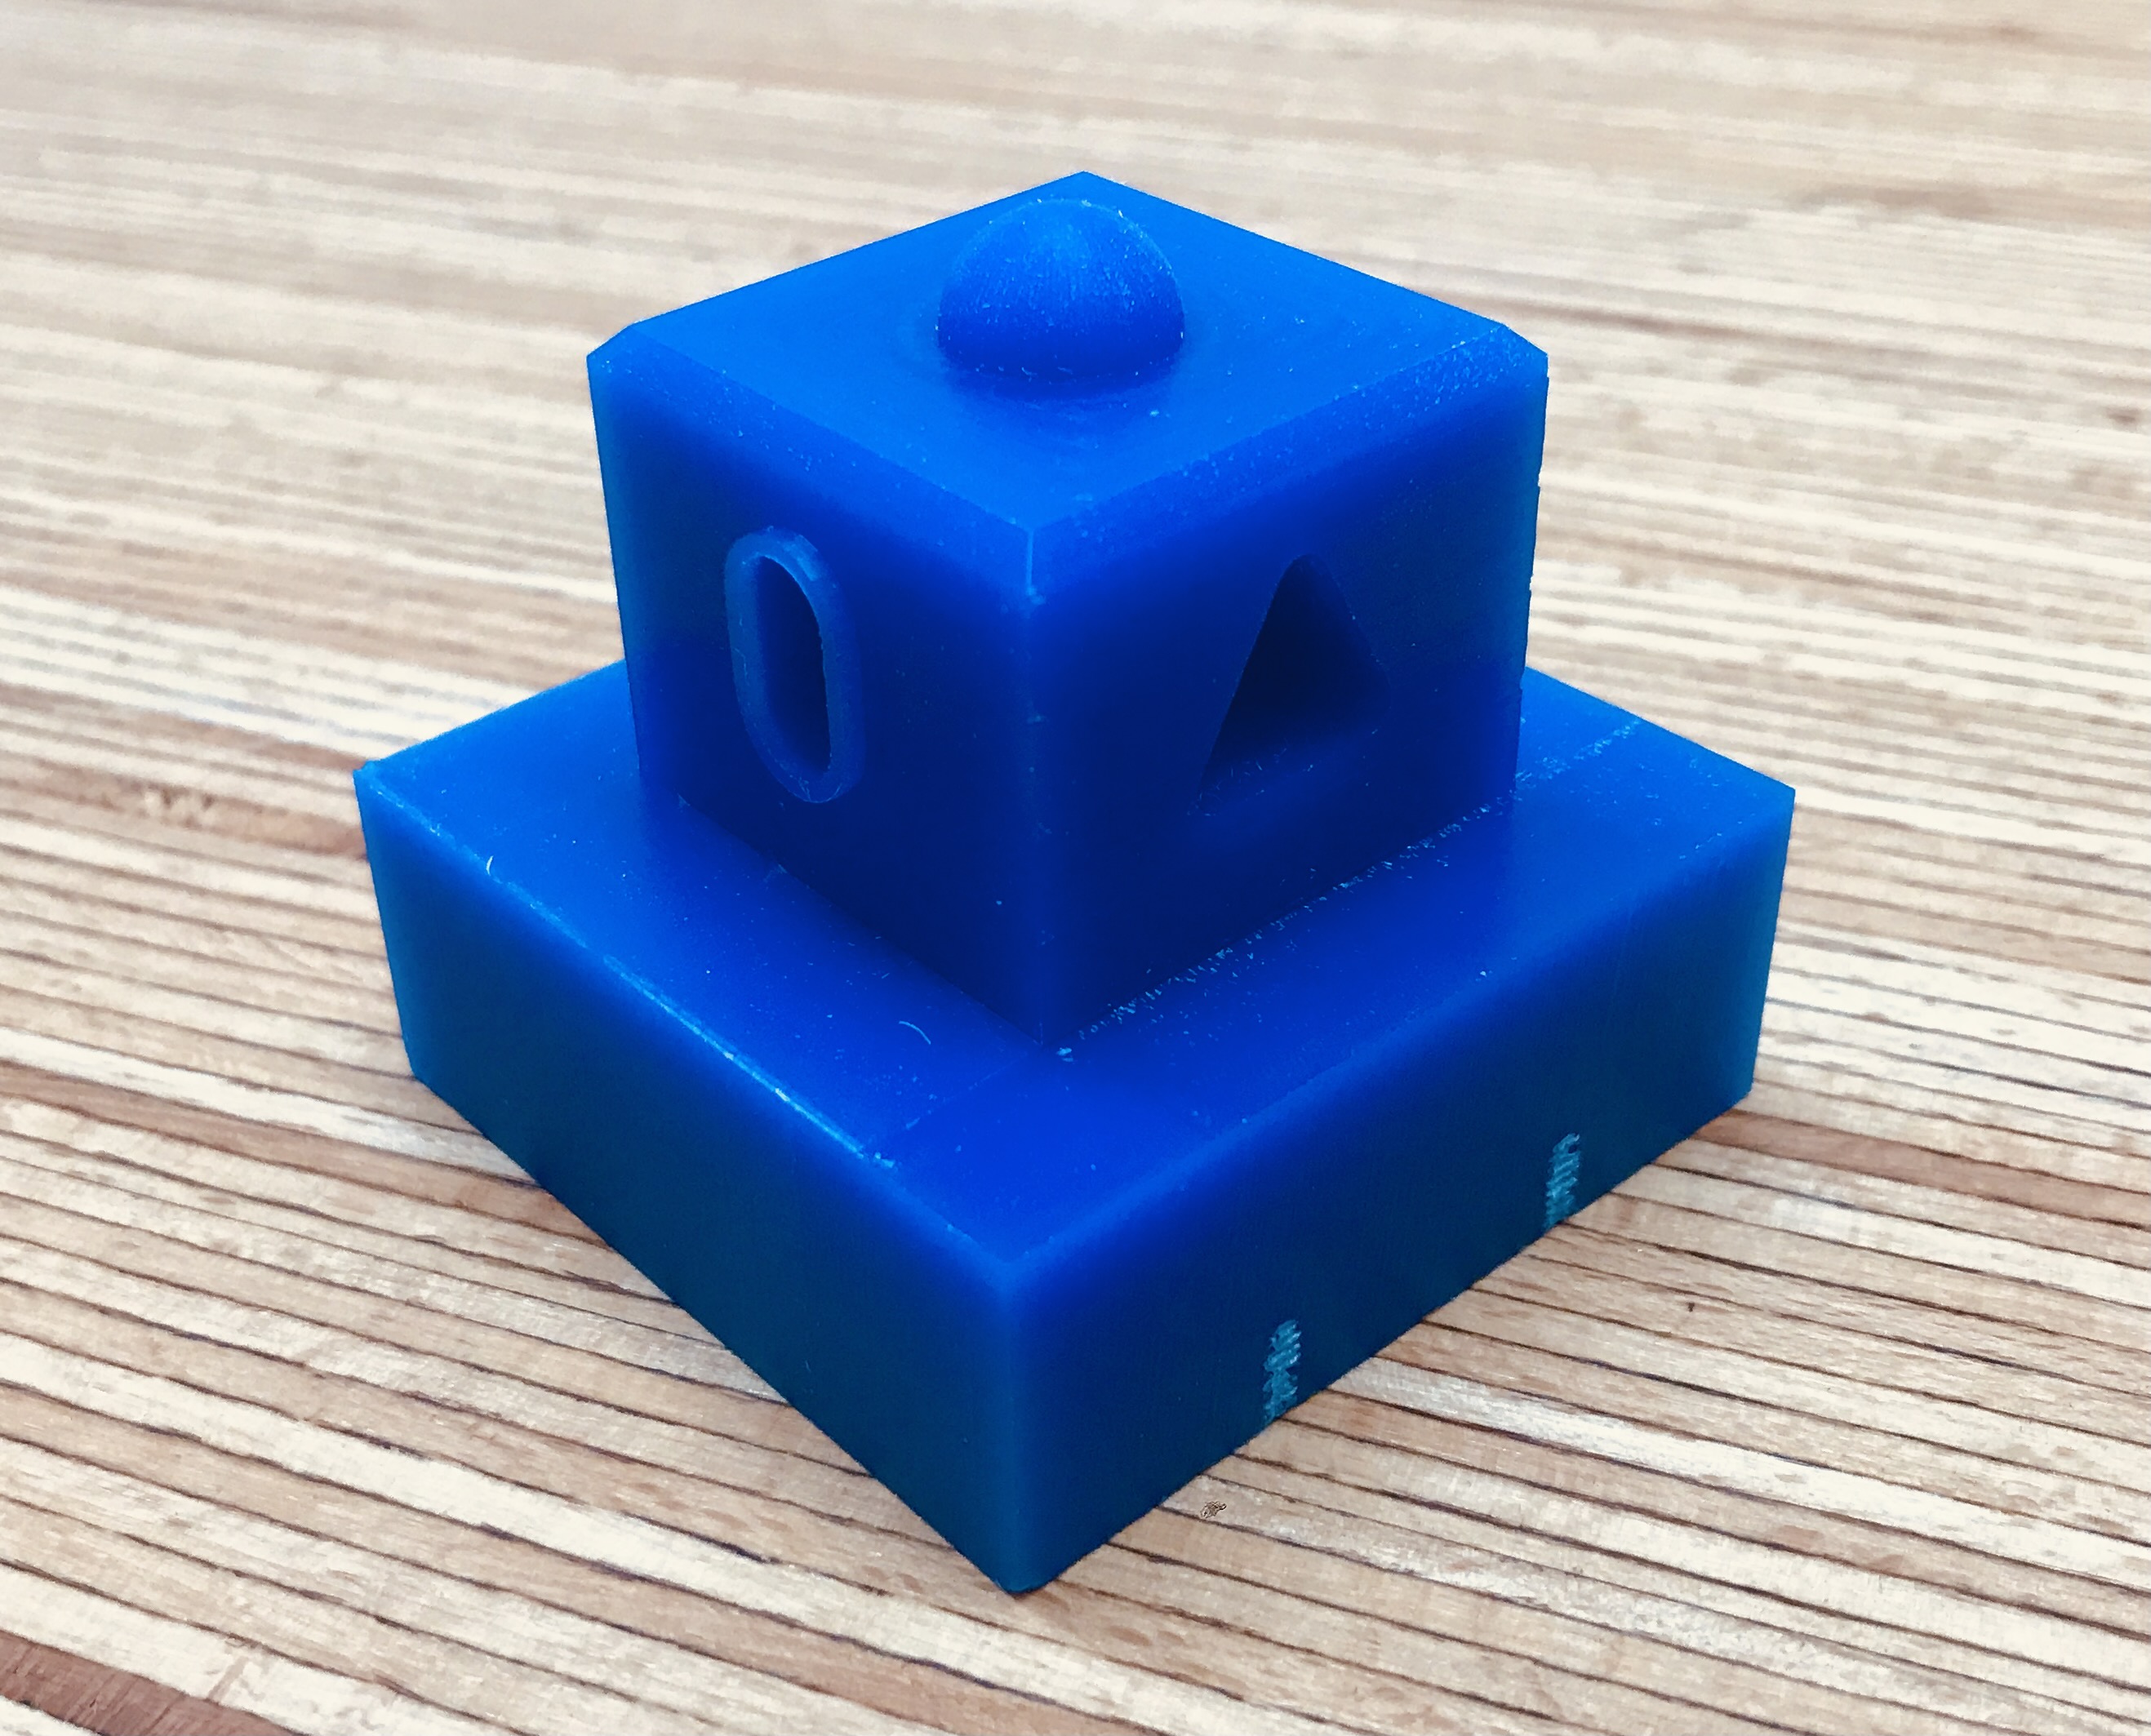
Open the V2 First Part by double clicking on it in the Data Panel. Familiarize yourself with the geometry of the part and try to think about how it will be machined. There are 5 faces that need to be machined, 3 shaped pockets, 1 round hole, and a hemisphere with a 45-degree chamfer on the top of the part.
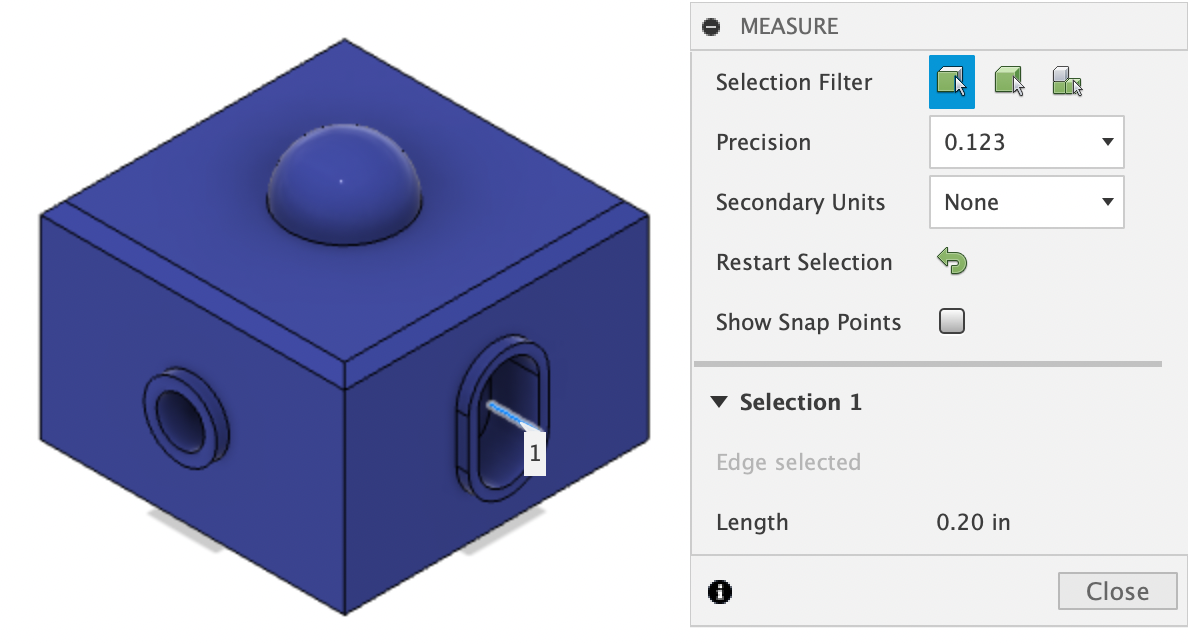
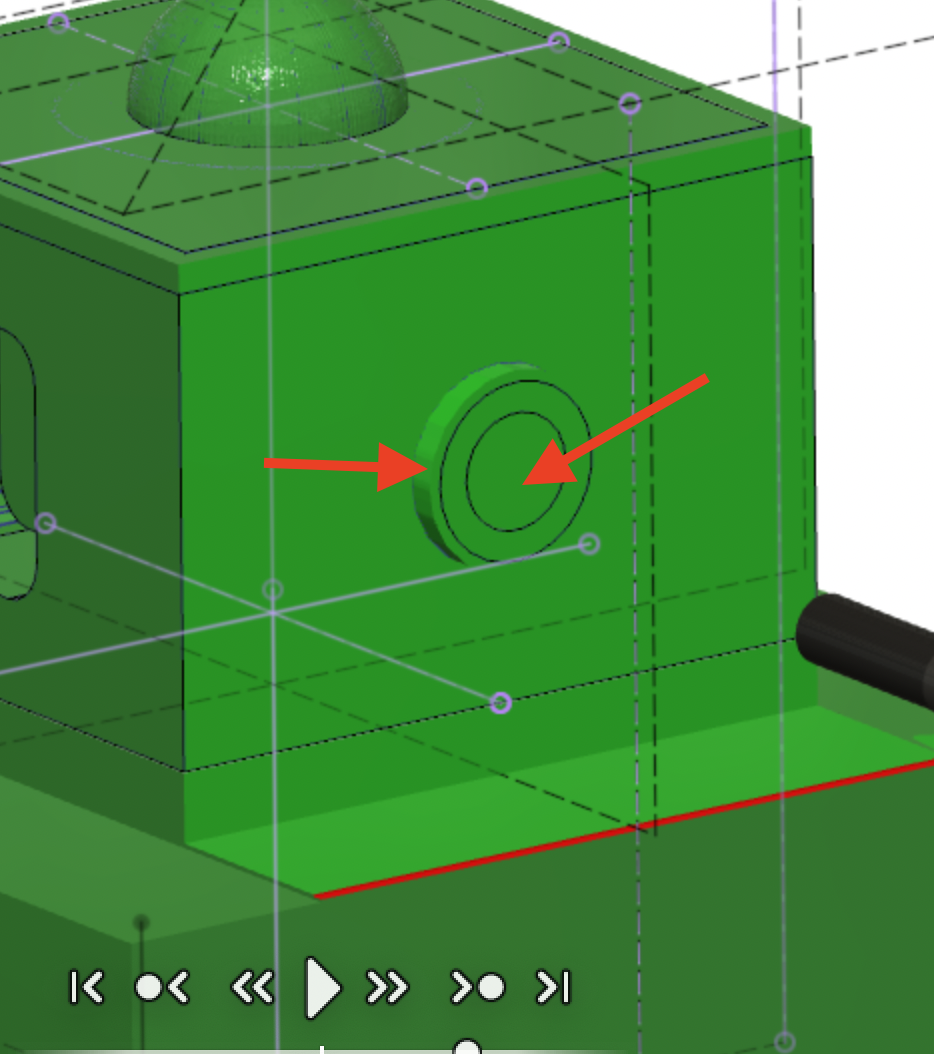
Note that the slotted pocket and circular hole on the part have bosses that make them .20 inches deep. This means that the tool used to make this part must have flutes at least .20 inches long or have a reduced shank if its flutes are shorter than .20 inches.
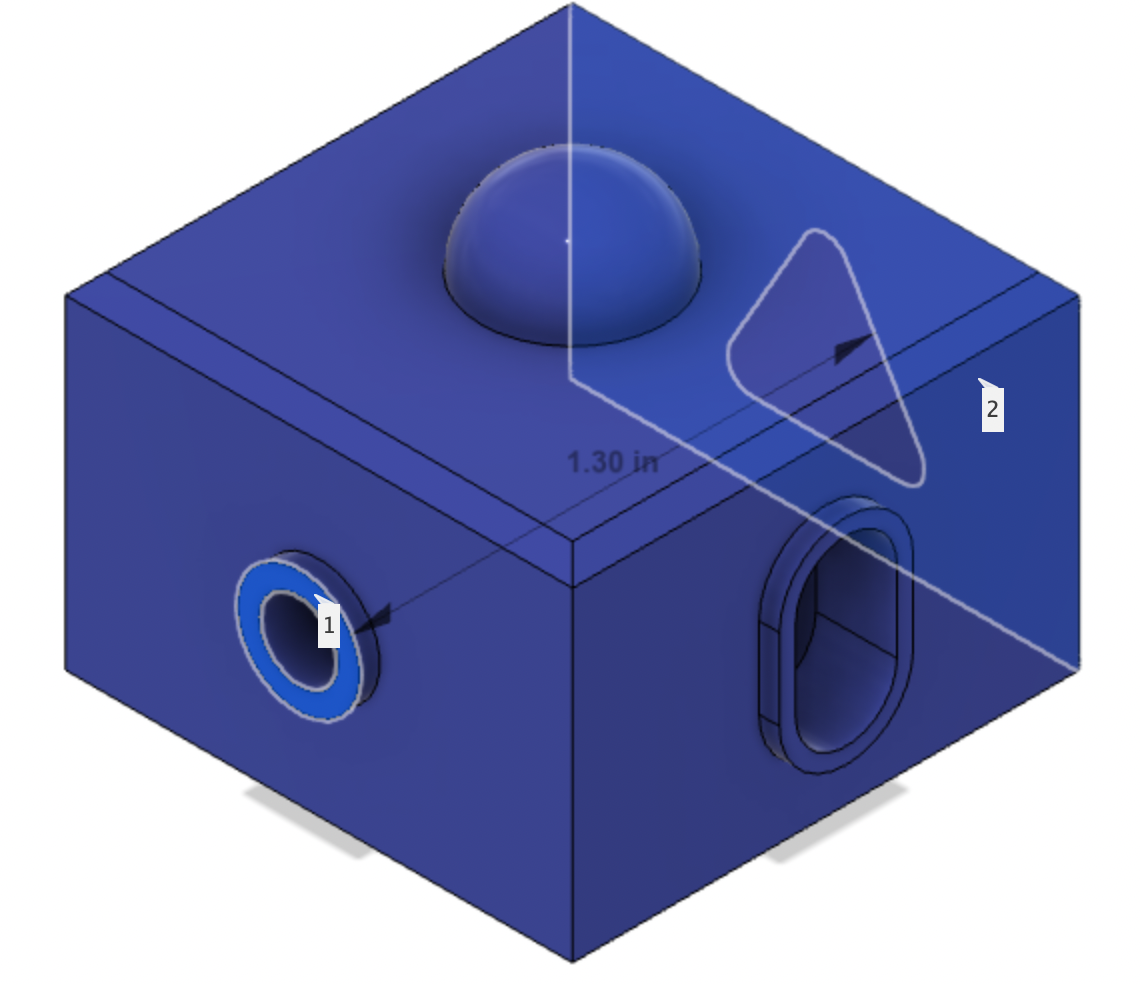
Also note that the part’s overall dimensions are 1.3” wide x 1.3” deep x 1.075” tall (to the top of the hemisphere). The part will be machined out of a 2” x 2” x 2” wax cube, so material will be removed from each side and there will be block of stock material remaining below the part - this will provide clearance for the vise.
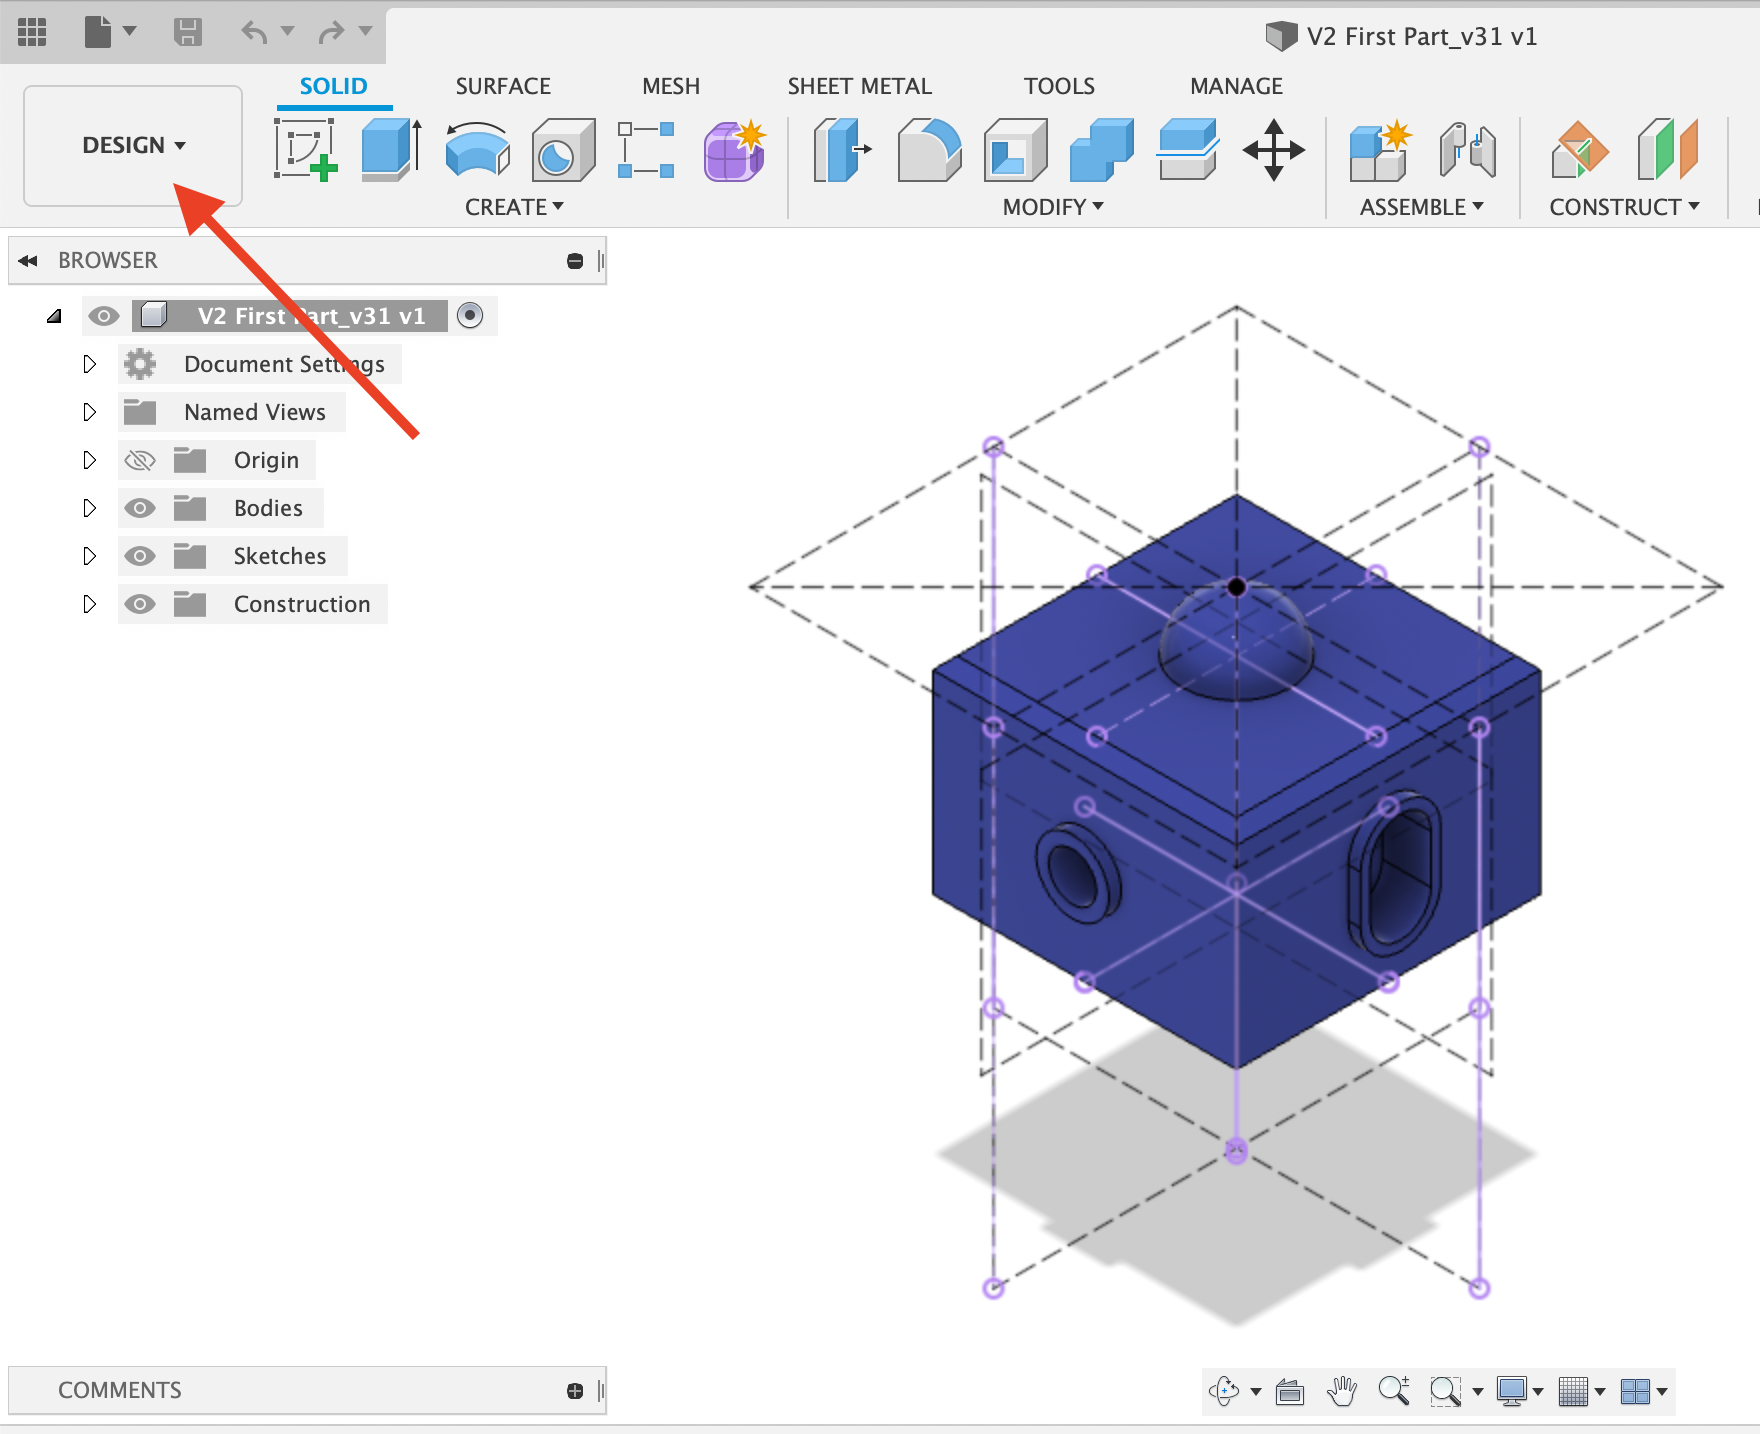
With the First Part model open, make sure that you are in the “Design” workspace. You should see “Design” in the upper left of the screen as seen as shown below.
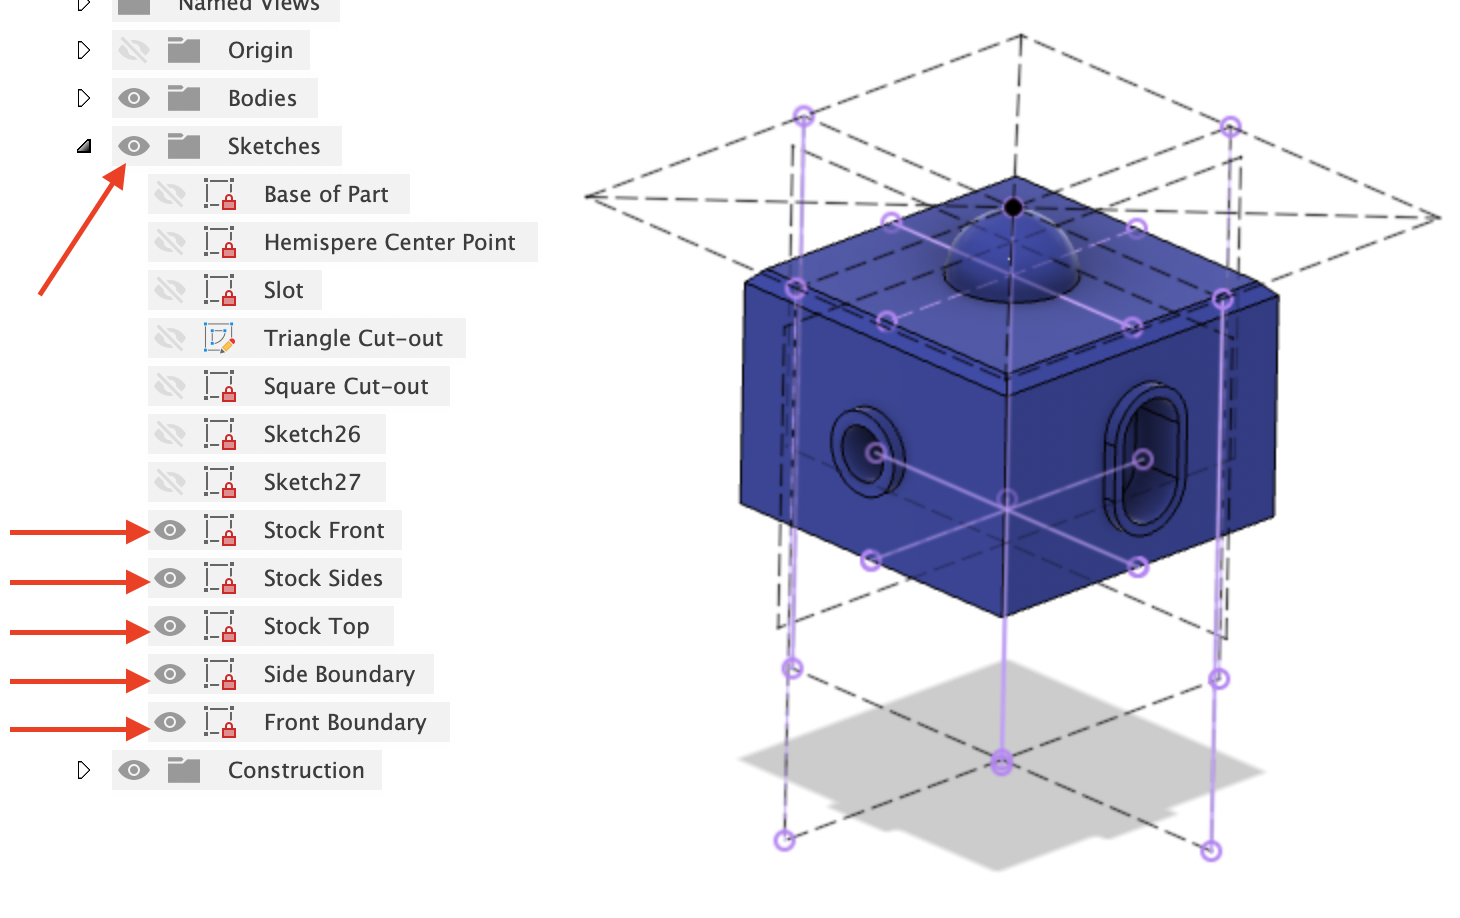
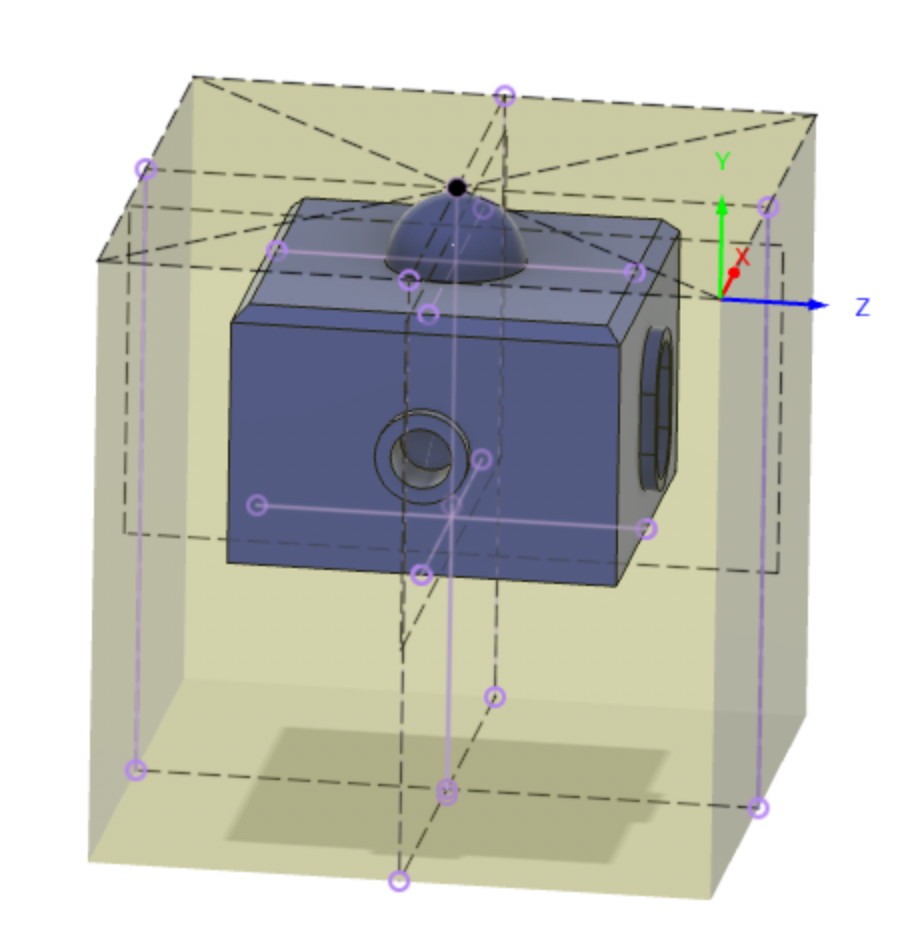
If not already visible, turn on the visibility for sketches in the part. These rectangles represent the full 2” x 2” x 2” stock cube of wax. To do this, expand the “Sketches” portion of the model tree. You will see 5 sketches labeled “Stock Front”, “Stock Sides”, “Stock Top”, “Side Boundary”, and “Front Boundary”. Click the eye symbol so that it is shaded and does not have a line through it. This turns on the visibility for these features. Also turn on the visibility for “Sketches” as a whole and save the changes. Your model tree and part should now look like the following:
Section 2: CAM Settings
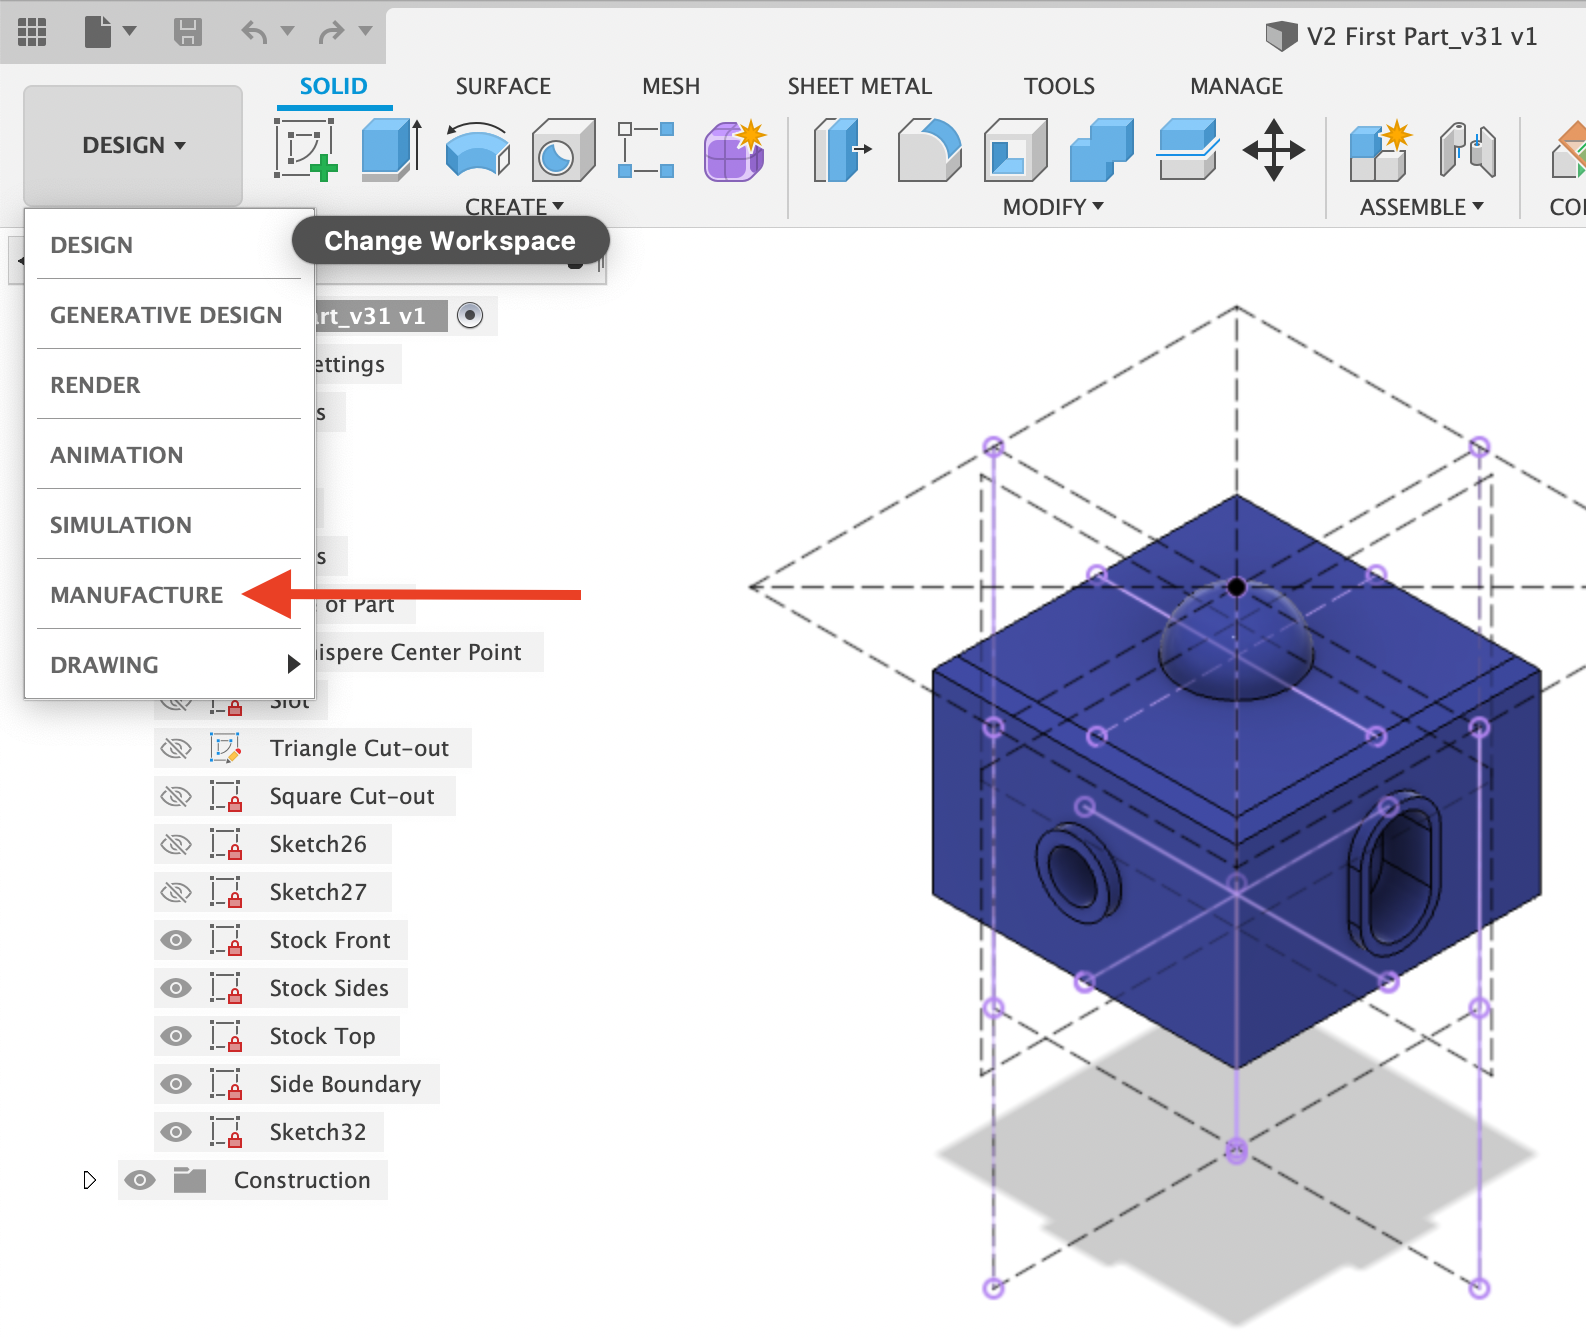
To begin CAM programming for the V2 First Part, migrate from the DESIGN environment to the MANUFACTURE environment in Fusion. To do this select the “Change Workspace” drop down tab at the top left of the screen, then select MANUFACTURE.
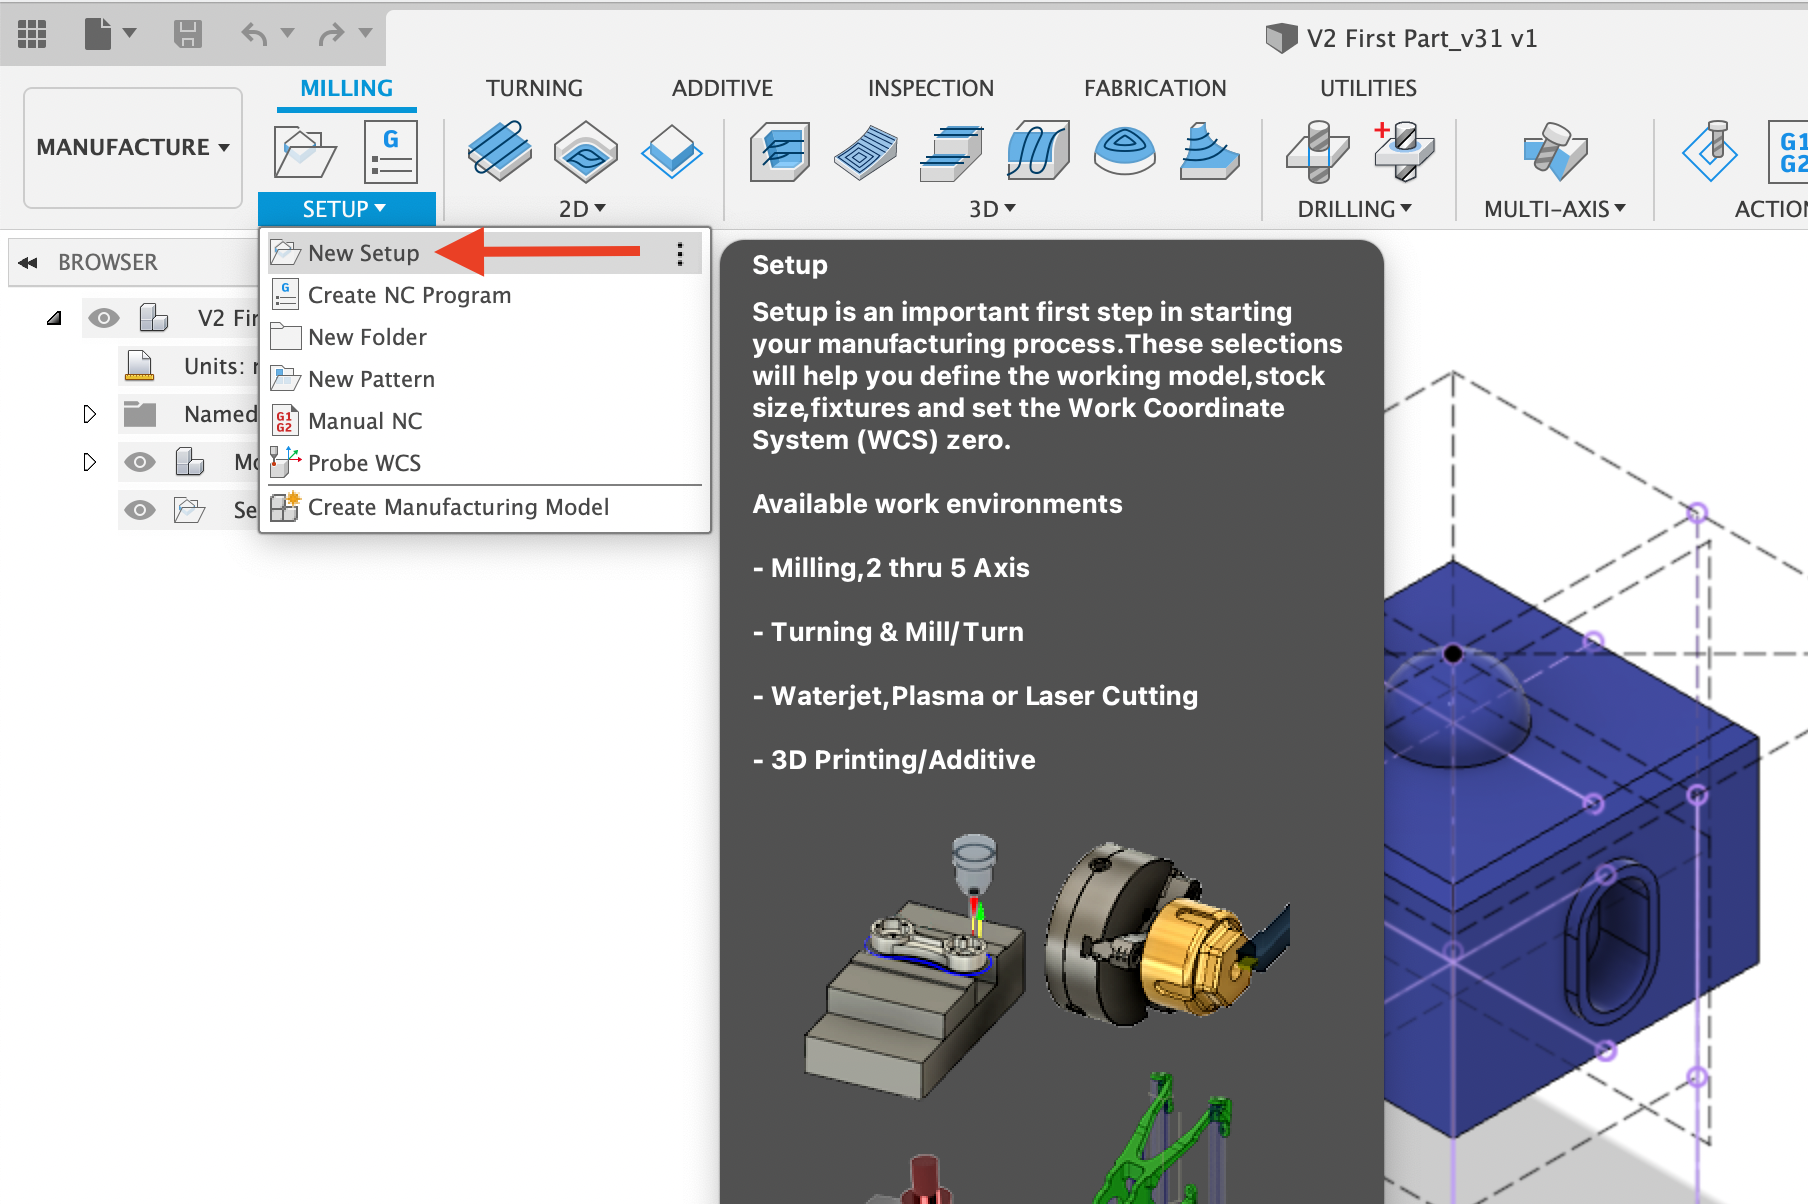
Before toolpaths can be created, a Setup must be created that includes origin location, stock material and a coordinate system. To create a Setup select the setup dropdown and “New Setup”.
The Setup is a tool for Fusion 360 to understand excess material, objects to avoid and the machine's initial position. (To edit an existing setup, right click on it and select edit).
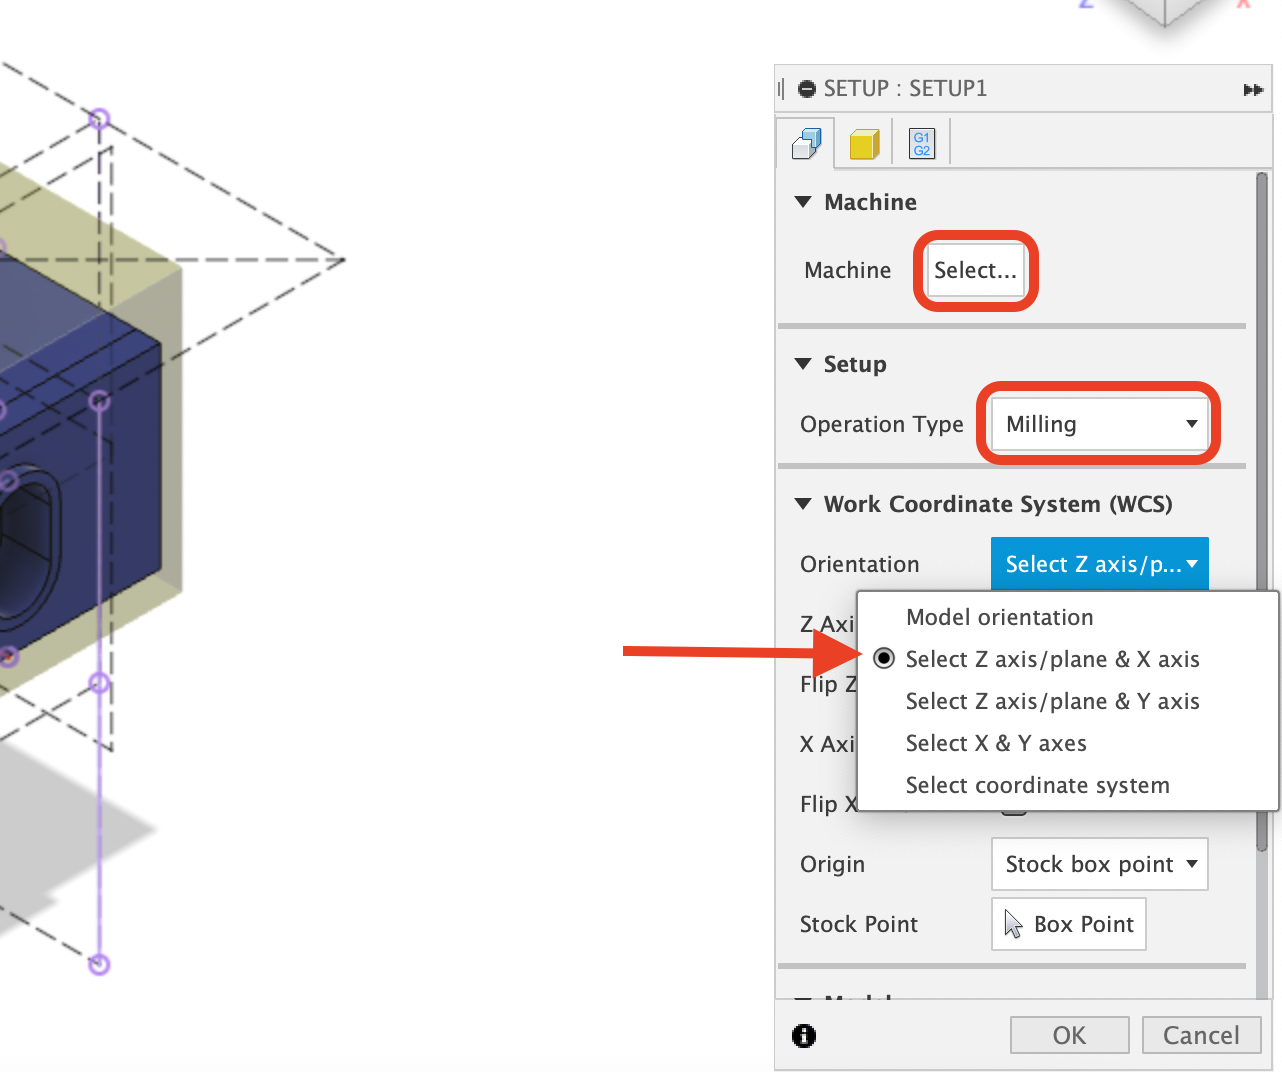
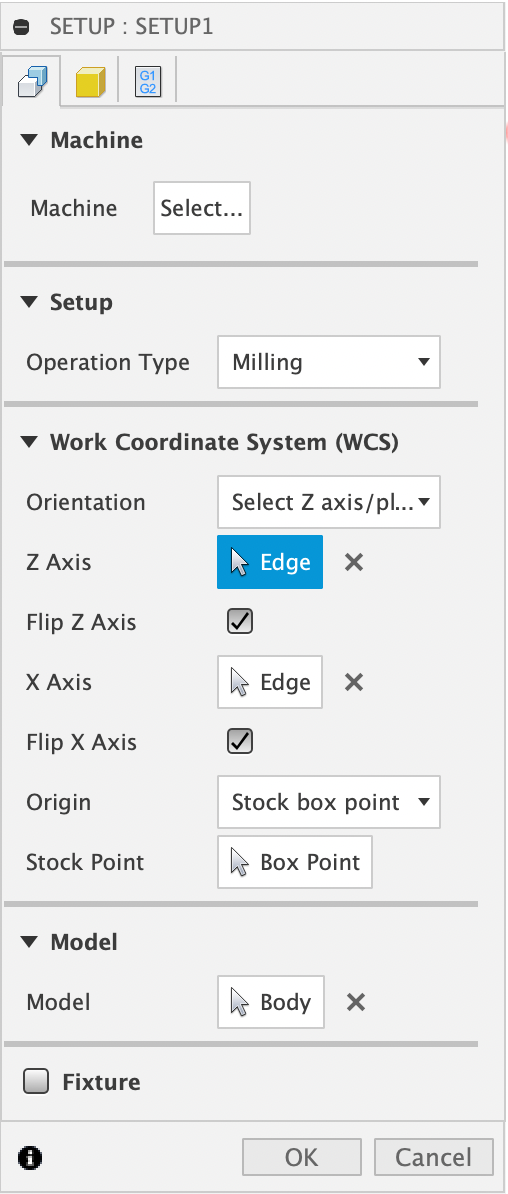
The first part of a setup is selecting the work origin and orienting the Work Coordinate System (WCS). To set up the WCS within the Fusion CAM environment, select the WCS dropdown next to “Orientation” and choose “Select Z axis/plane & X axis”. The “Machine” field should be left blank so that is says “Select…” and the “Operation Type” should be set at “Milling” as shown below:
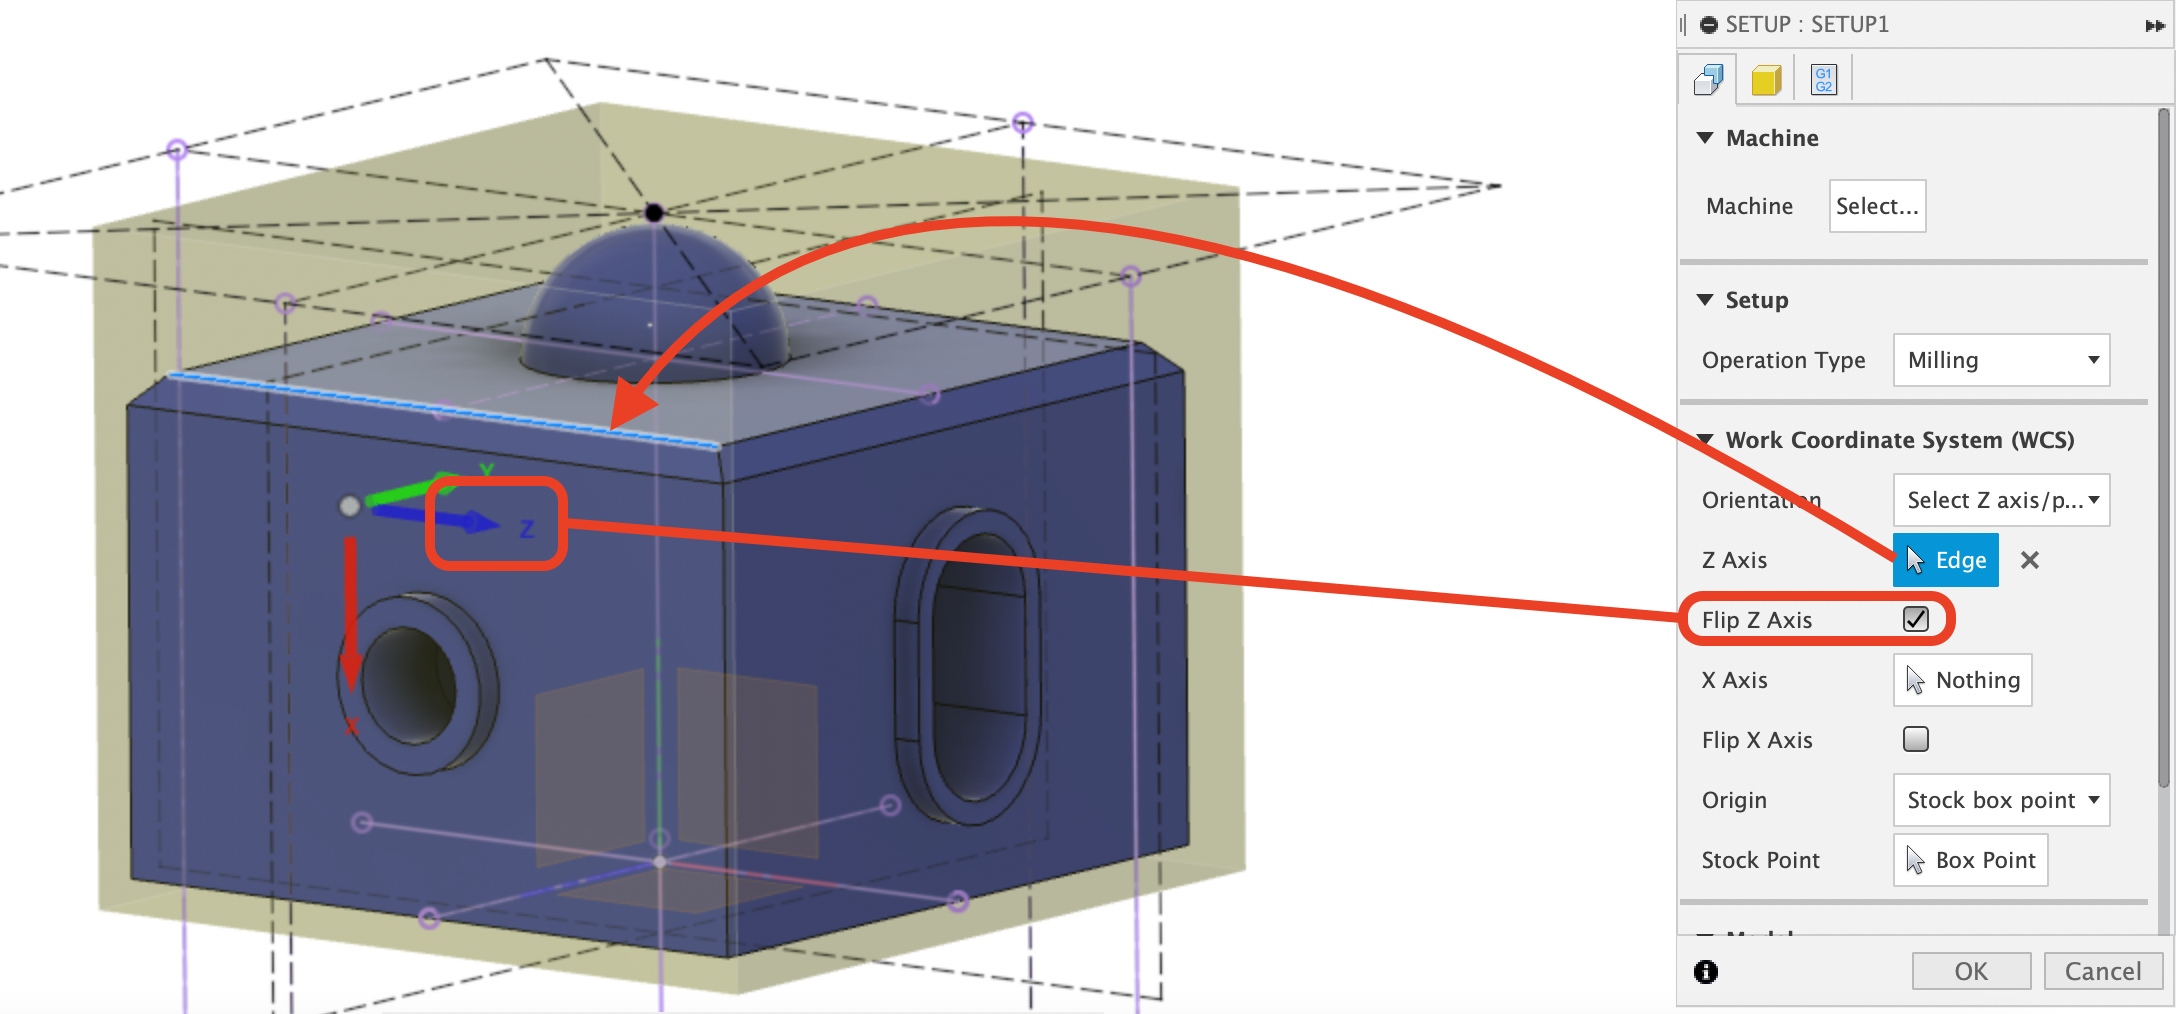
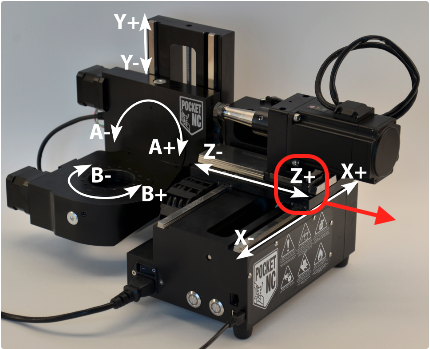
Two pieces of geometry will need to be selected to complete the “Orientation” field, one for the Z Axis and one for the X Axis. The Z-axis will always need to point towards the spindle to match the physical machine’s +Z direction. For this tutorial we will start with the oval side facing the spindle. To do this, select the box next to “Z Axis” with a mouse in it, then select geometry (a straight line) on the part that aligns with the axis of the spindle as shown below. If the blue Z-axis shown does not point away from the part and towards the spindle, select the box labeled “Flip Z Axis”:
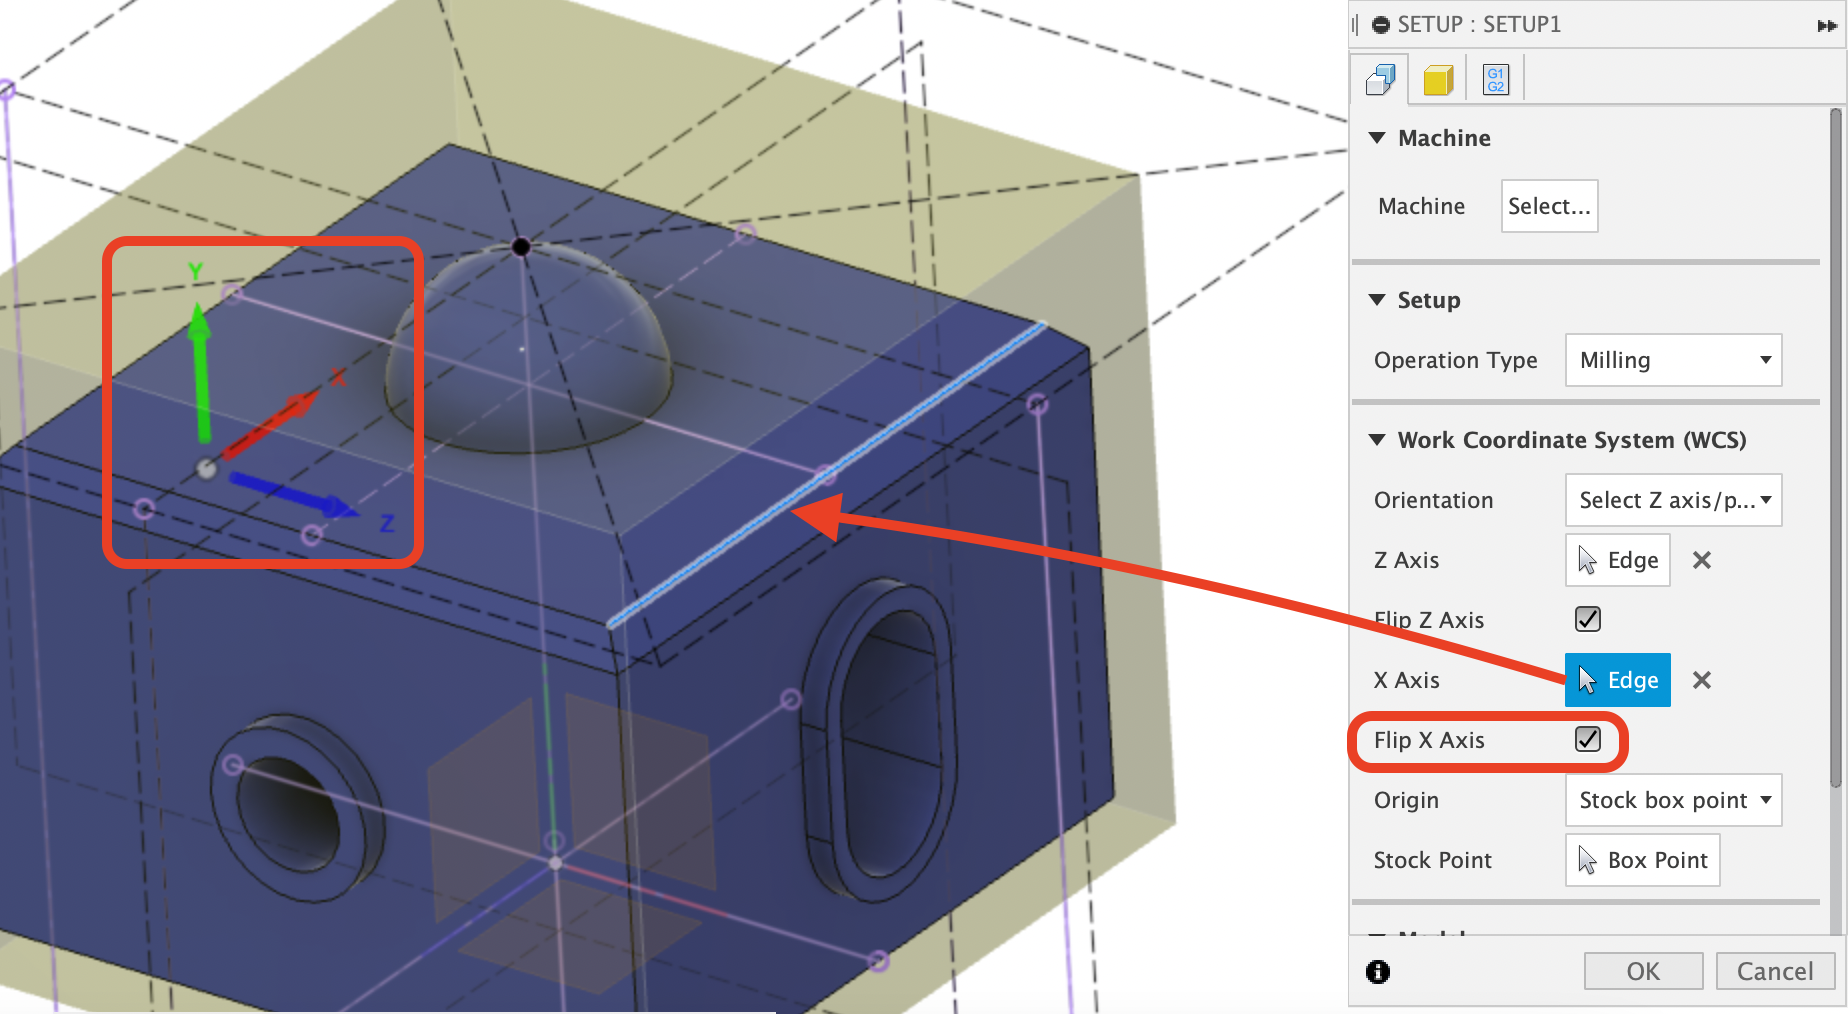
Repeat this operation for the X Axis, selecting a feature that runs front-to-back along the part. When finished you should have a WCS that looks like the image below with Y pointing up and X pointing rear. (On the Pocket NC, the Y Axis moves the table up and down, this must be reflected in the setup for the output code to work with the machine). If you need to change the directions of the axes, use the “flip _ Axis” check boxes to flip them.
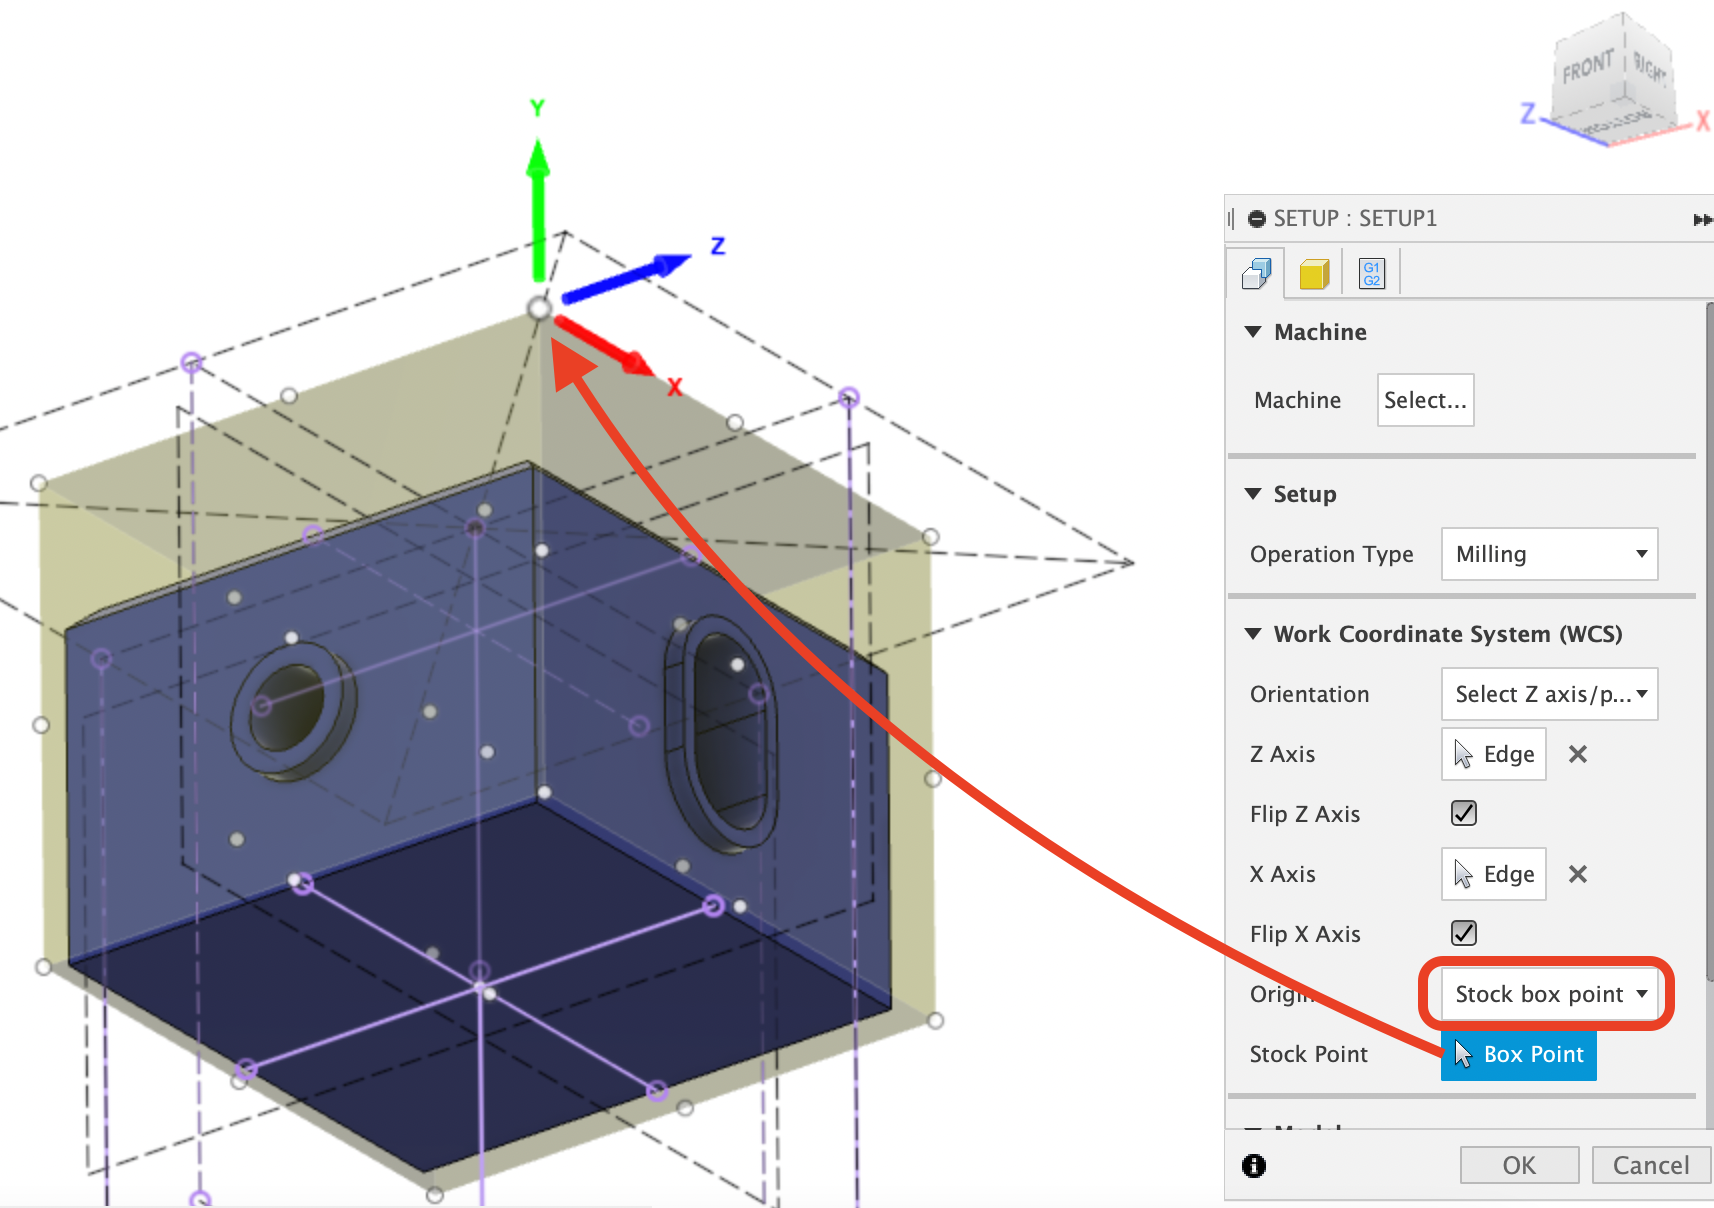
Next, you will select the origin for the toolpaths. The origin will be placed on a corner of the stock so that we can locate it in X, Y, and Z using the machine.
In the Setup menu change the Origin type to “Stock box point.” Then select a corner of the yellow box (which represents the stock material) that is at the top, faces the spindle, and will be positioned near the front of the machine where you can see it. Since we are planning to point the oval side towards the spindle, the corner shown below is the correct corner to choose:
We do not have any fixturing or other parts in our model, so we can leave the “Model” section as the default selection “Body”. We can also leave the “Fixture” box unchecked since we do not have a fixture modeled. (If we had fixturing in our model, we could turn on this selection and differentiate between the part and the fixture to help ensure we do not cut the fixture). The first tab of the Setup window should look like the following when complete:
Next, click on the “Stock” tab of the Setup settings window. This is where the size and position of the stock (the block of material out of which the part will be machined) are defined.
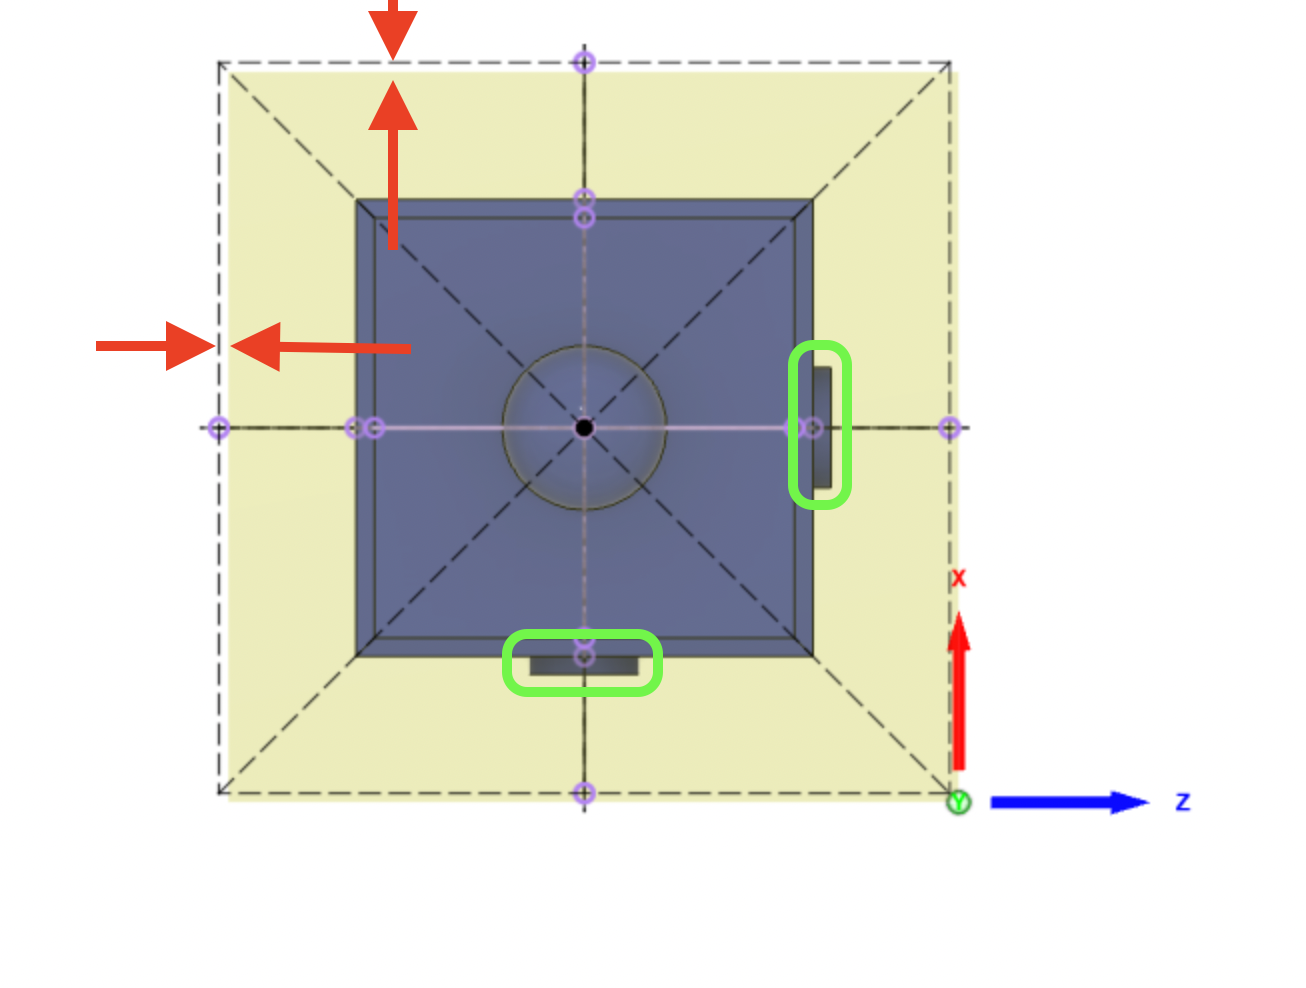
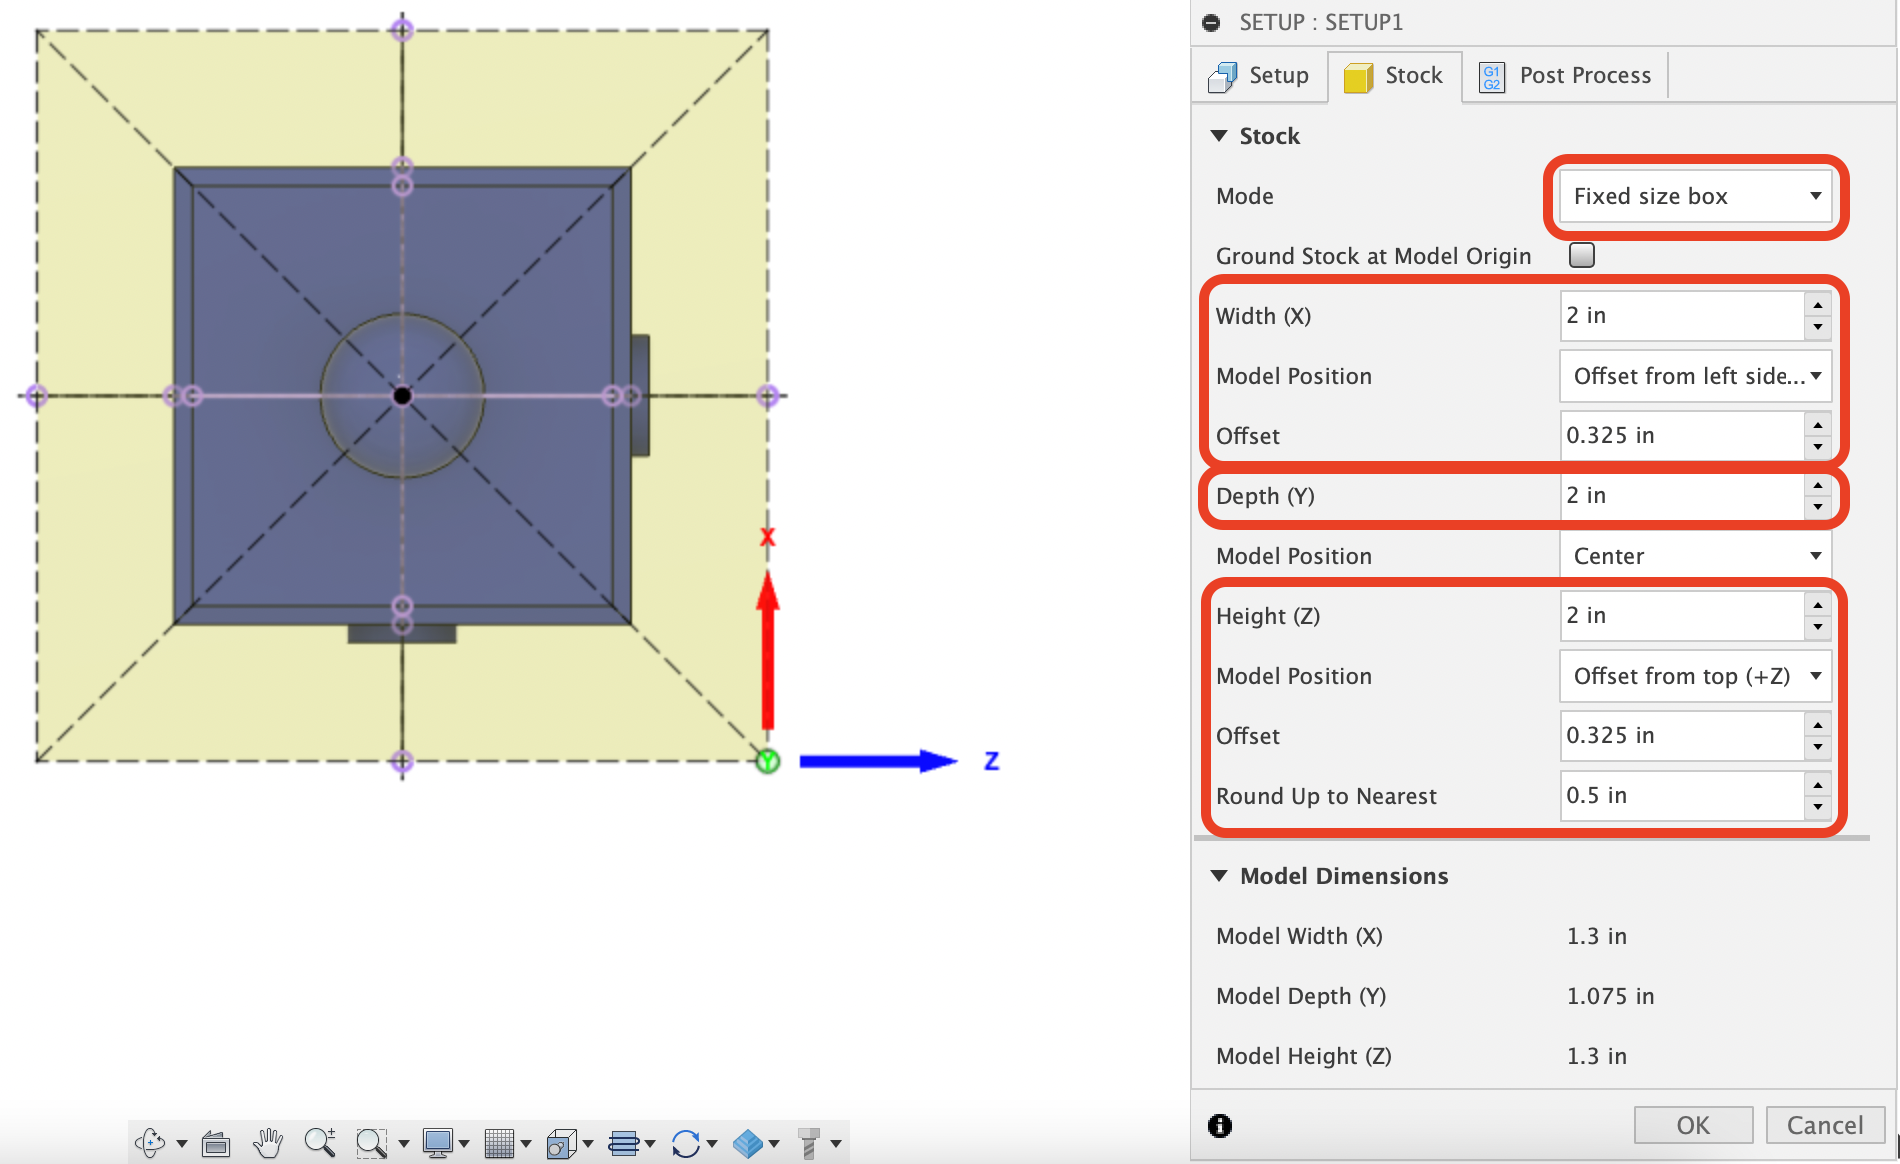
First choose “Fixed size box” as the stock mode. (This tells Fusion that the stock is a cube of known dimensions. For a known cylindrical stock, you would use “Fixed size Cylinder”). This part will be made from a 2 x 2 x 2 inch block of wax so the “Width” “Depth” and “Height” of the stock should all be set to 2 inches. You will notice from the top view that the translucent yellow box is slightly offset of our sketches that outline where we want the stock (in the X and Z directions). This is because the sketches are centered in relation to the hemisphere, where Fusion is calculating the geometric center as halfway between a flat side and the face of the protrusion on the opposite side. However, we aligned our stock sketches to be centered on the hemisphere, so now we should align our stock to the sketches - the easiest way to do this is to offset the edge of the stock from the edge of the part. For “Model Position” under (X) and (Z), switch the offsets to (-X) and (+Z) and add a 0.325” offset (the sketch edge happens to be .325” from the side of the part)
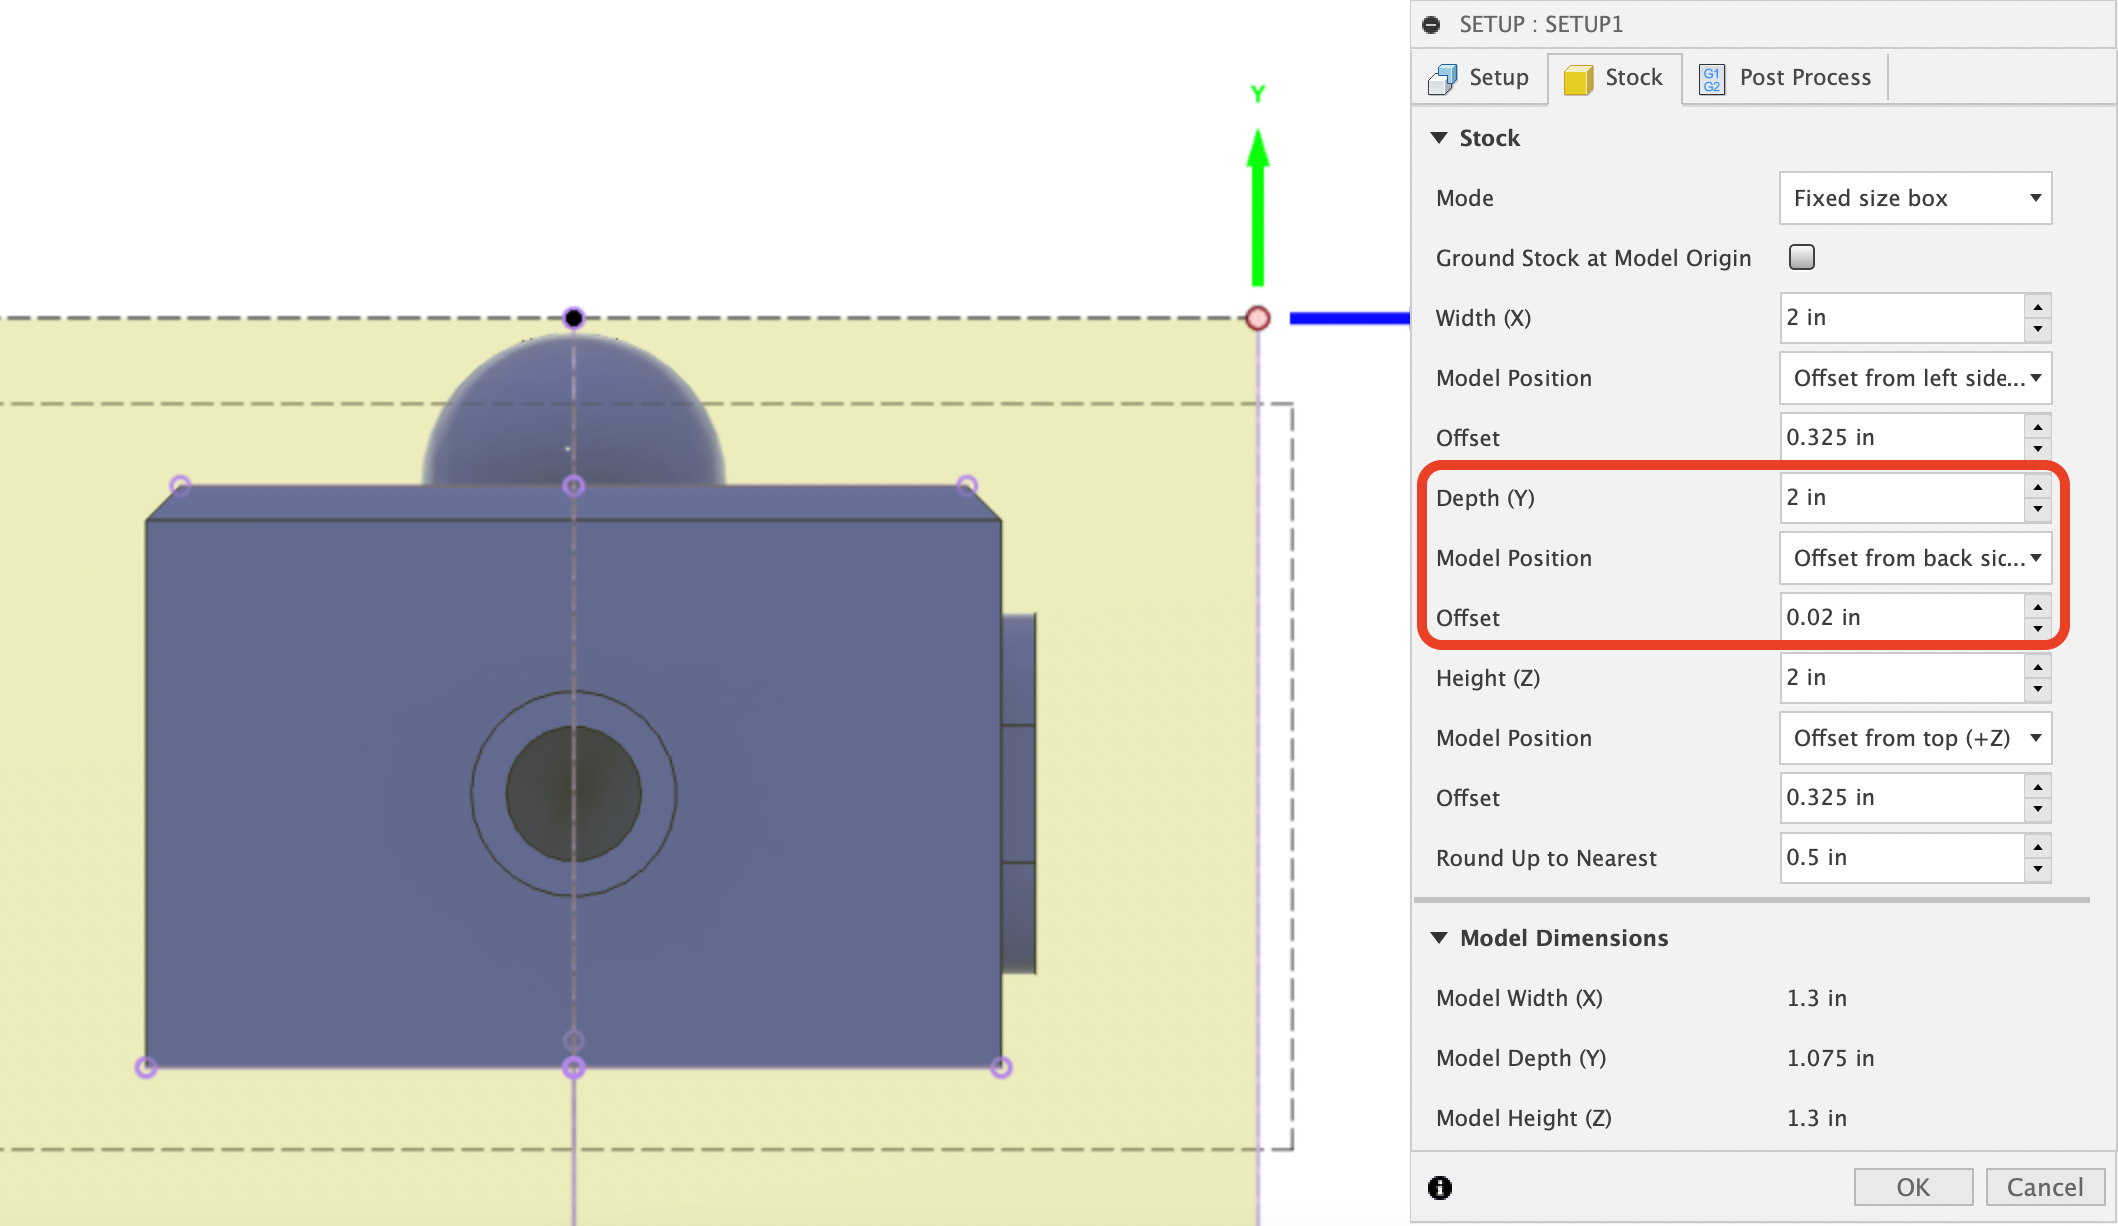
Our side sketches are also drawn so that the hemisphere on top of the part is 0.02” below the top of the stock. This allows for variance in the height of the stock material, minimizes the amount of material that needs to be removed from the top, and leaves extra stock at the bottom to hold in the vise. Since we want the stock in our CAM program to match this concept, we need to apply a 0.02” offset in the +Y direction for the “Model Position” of Y. When complete, your stock tab should look like the following and the translucent yellow box should be coplanar with the top of the and align with the stock sketches:
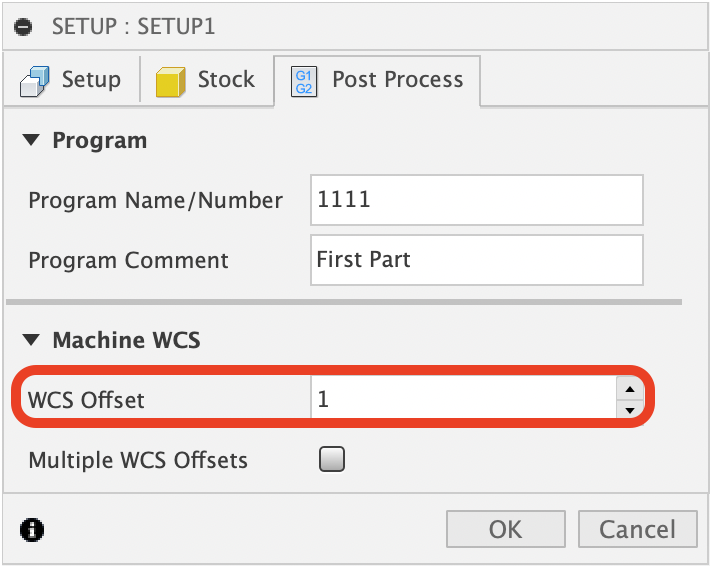
Next, move to the final tab of the Setup named “Post Process”. Here you can give your program a name and comment as well as pick what WCS offset you want to use. In this example, we are using WCS offset 1 because we want to use the G54 code to define our work offsets on the machine.
When finished in the “Post Process” tab, click OK to save and apply all the changes to the Setup you just created. Save your progress.
Section 3: Tool Library
The tool used to cut this part is the 3mm (1/8” shank) Datron single flute tool that was sent with the Pocket NC machine (Part Number 0068630E). (Machines shipped prior to 6/1/2021 were shipped with Part Number 52508, a 1/8” single flute Harvey tool only suitable for cutting soft materials such as wood, wax, and plastic. The newly provided Datron tool is suitable for these materials as well as aluminum, copper, brass, and bronze. For this part, the suggested feeds and speeds will work for either tool).
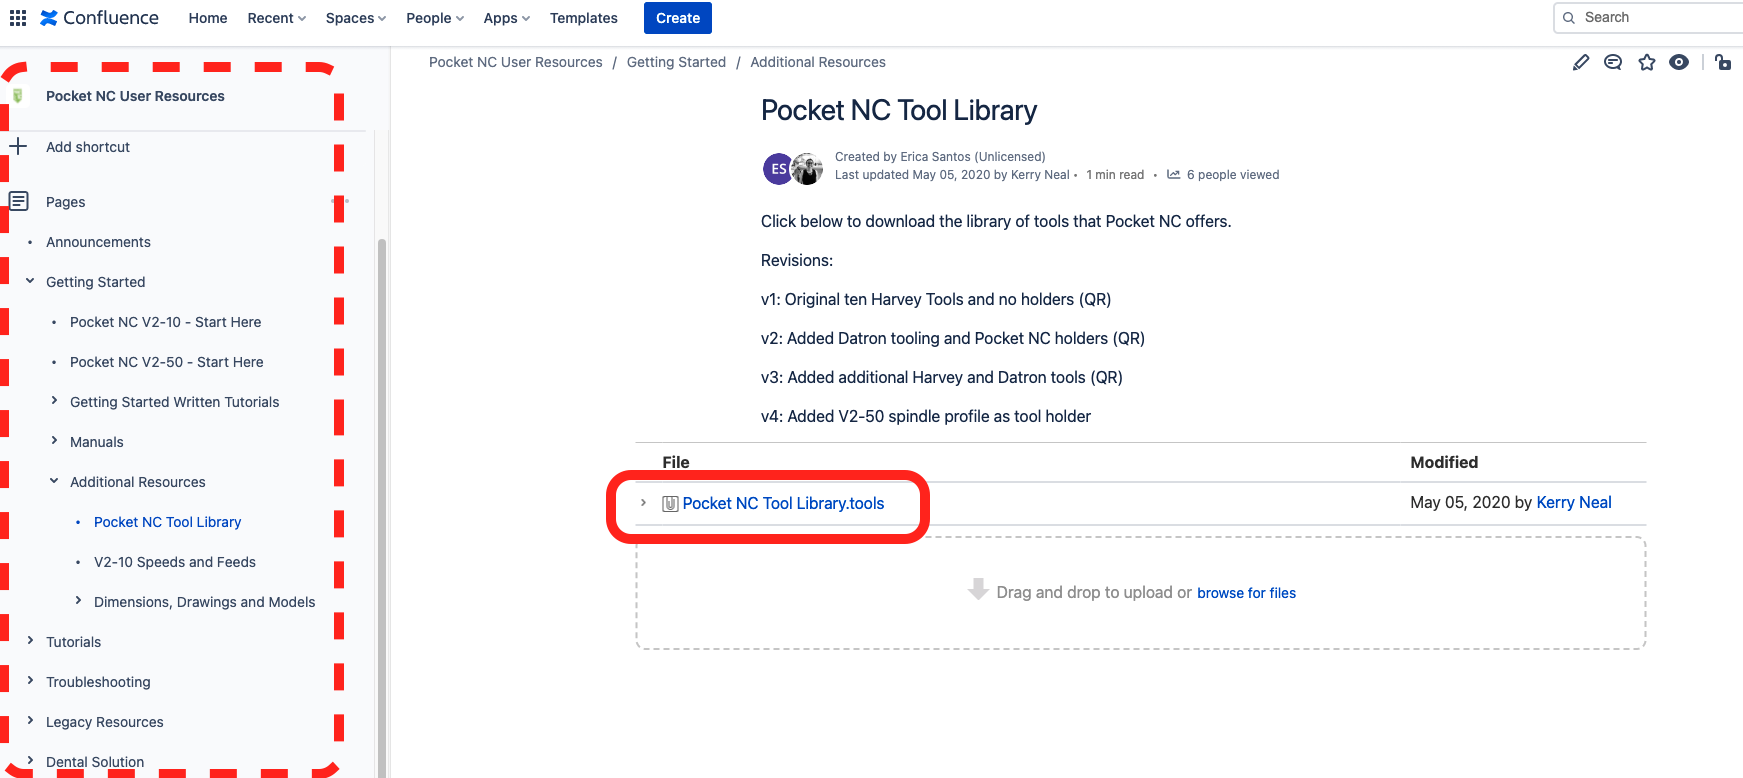
First, we need to download the Pocket NC Tool Library. You can download the library containing all of the tools sold by Pocket NC from the bottom of this tutorial.
| Info |
|---|
Reference Note:The User Resources database also has the tool library here and provides links to a wealth of information about feeds and speeds, dimensions, troubleshooting, etc: |
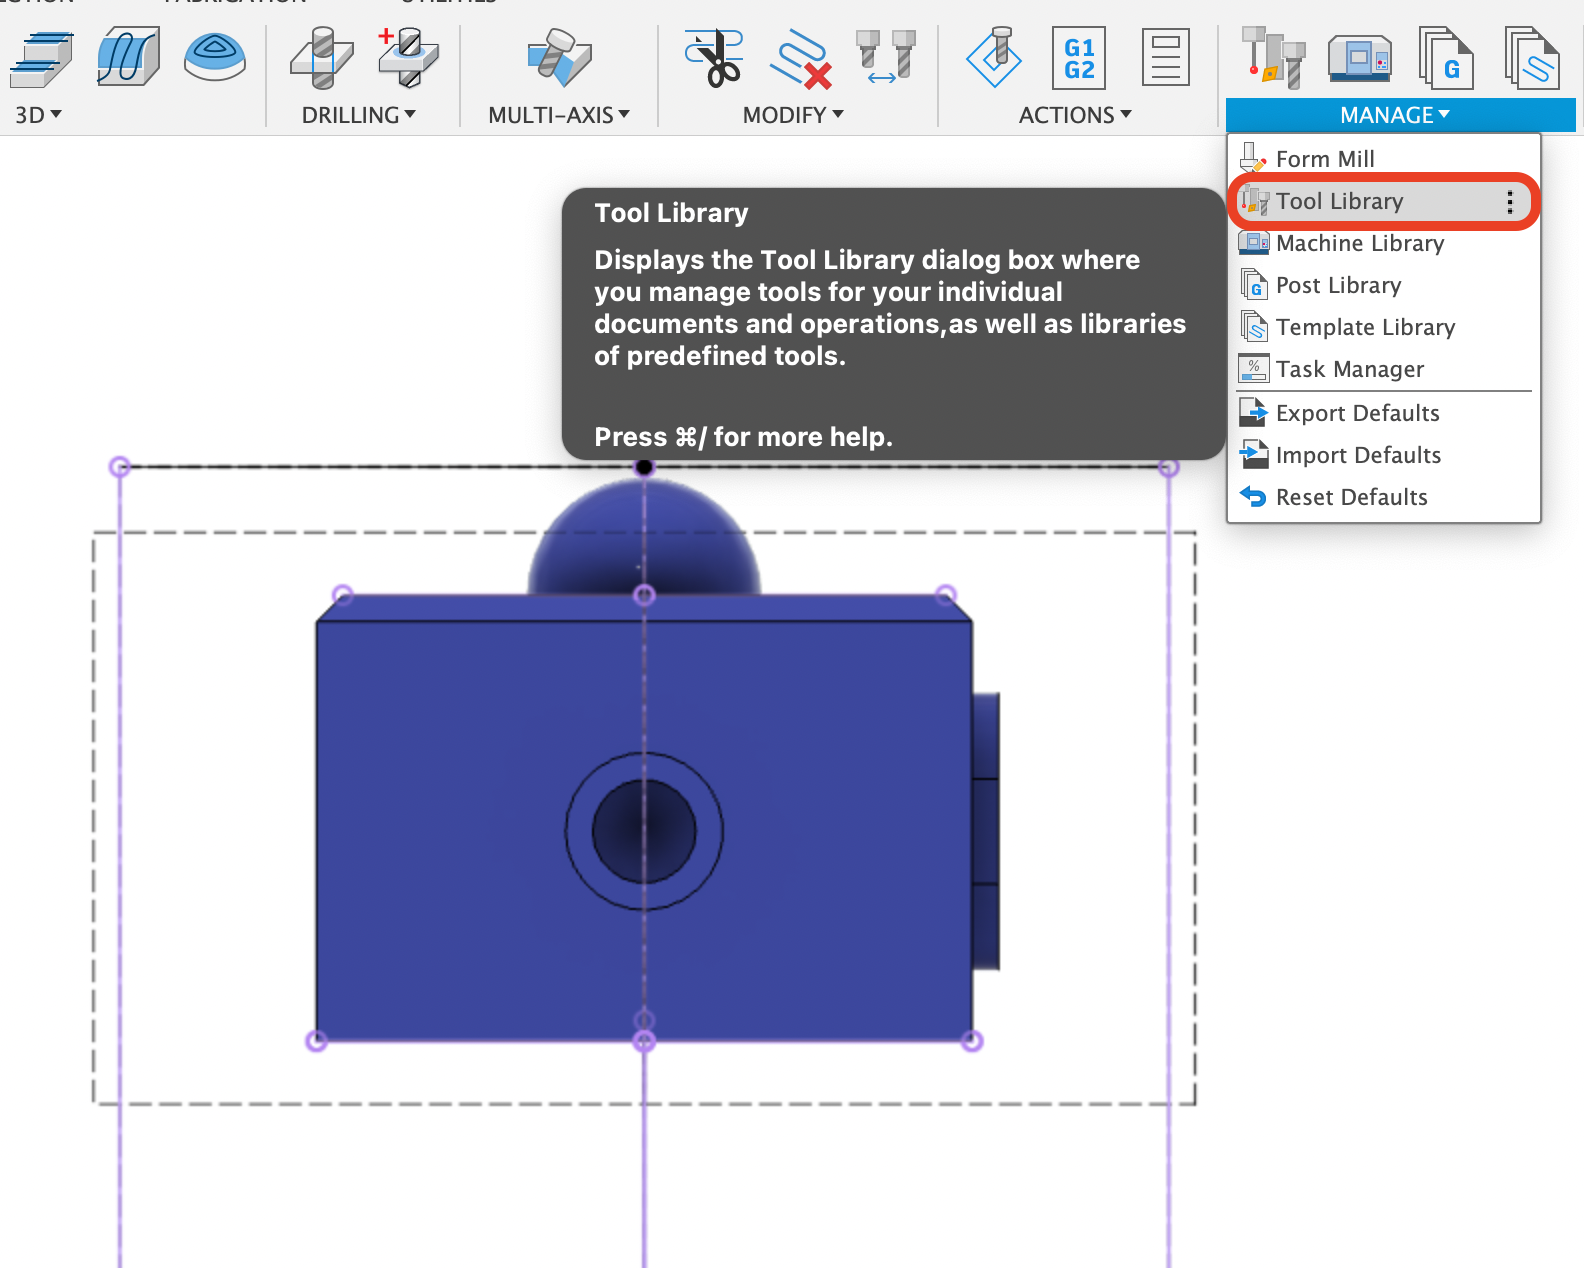
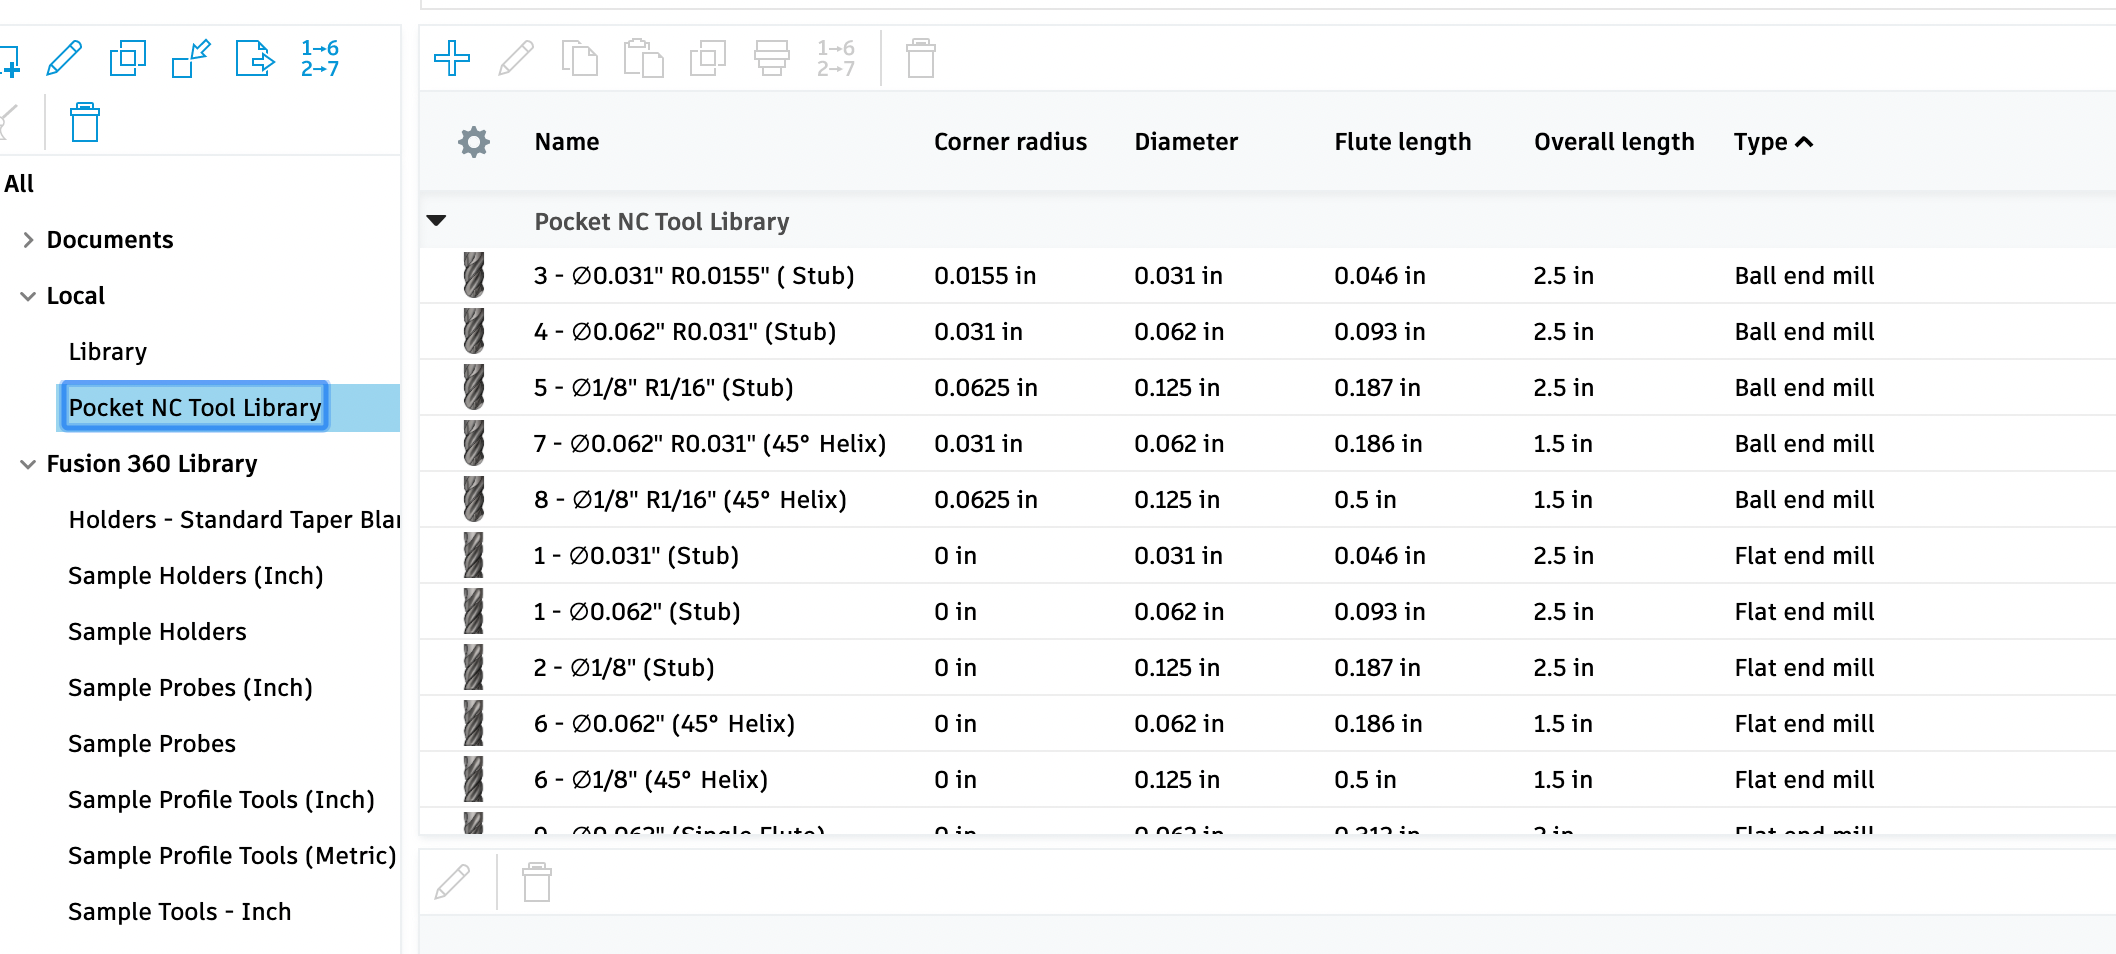
To import the newly downloaded tool library, select “Manage” then “Tool Library”
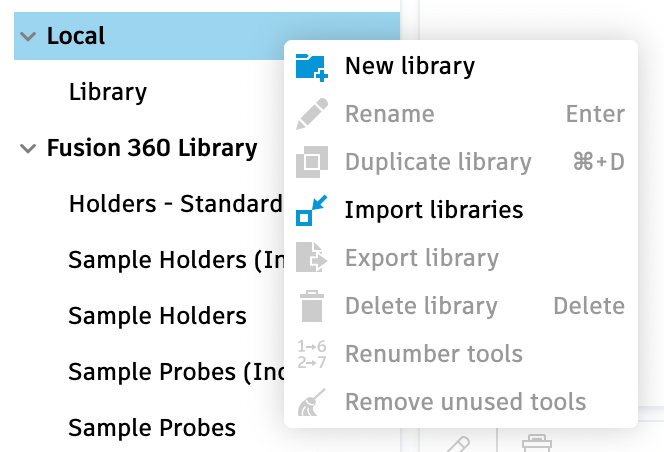
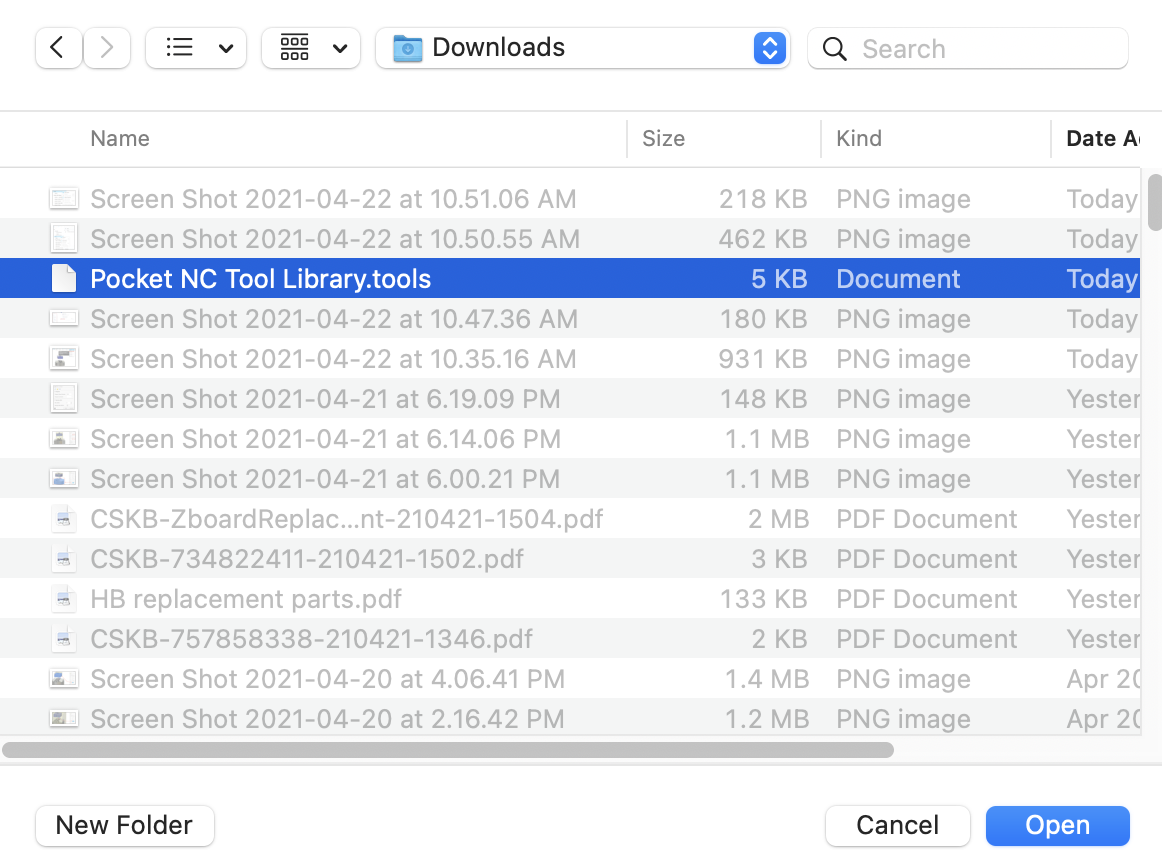
Next, right click “Local” then select “Import libraries”. Navigate to where you downloaded the Pocket NC Tool Library, select it, and “Open”.
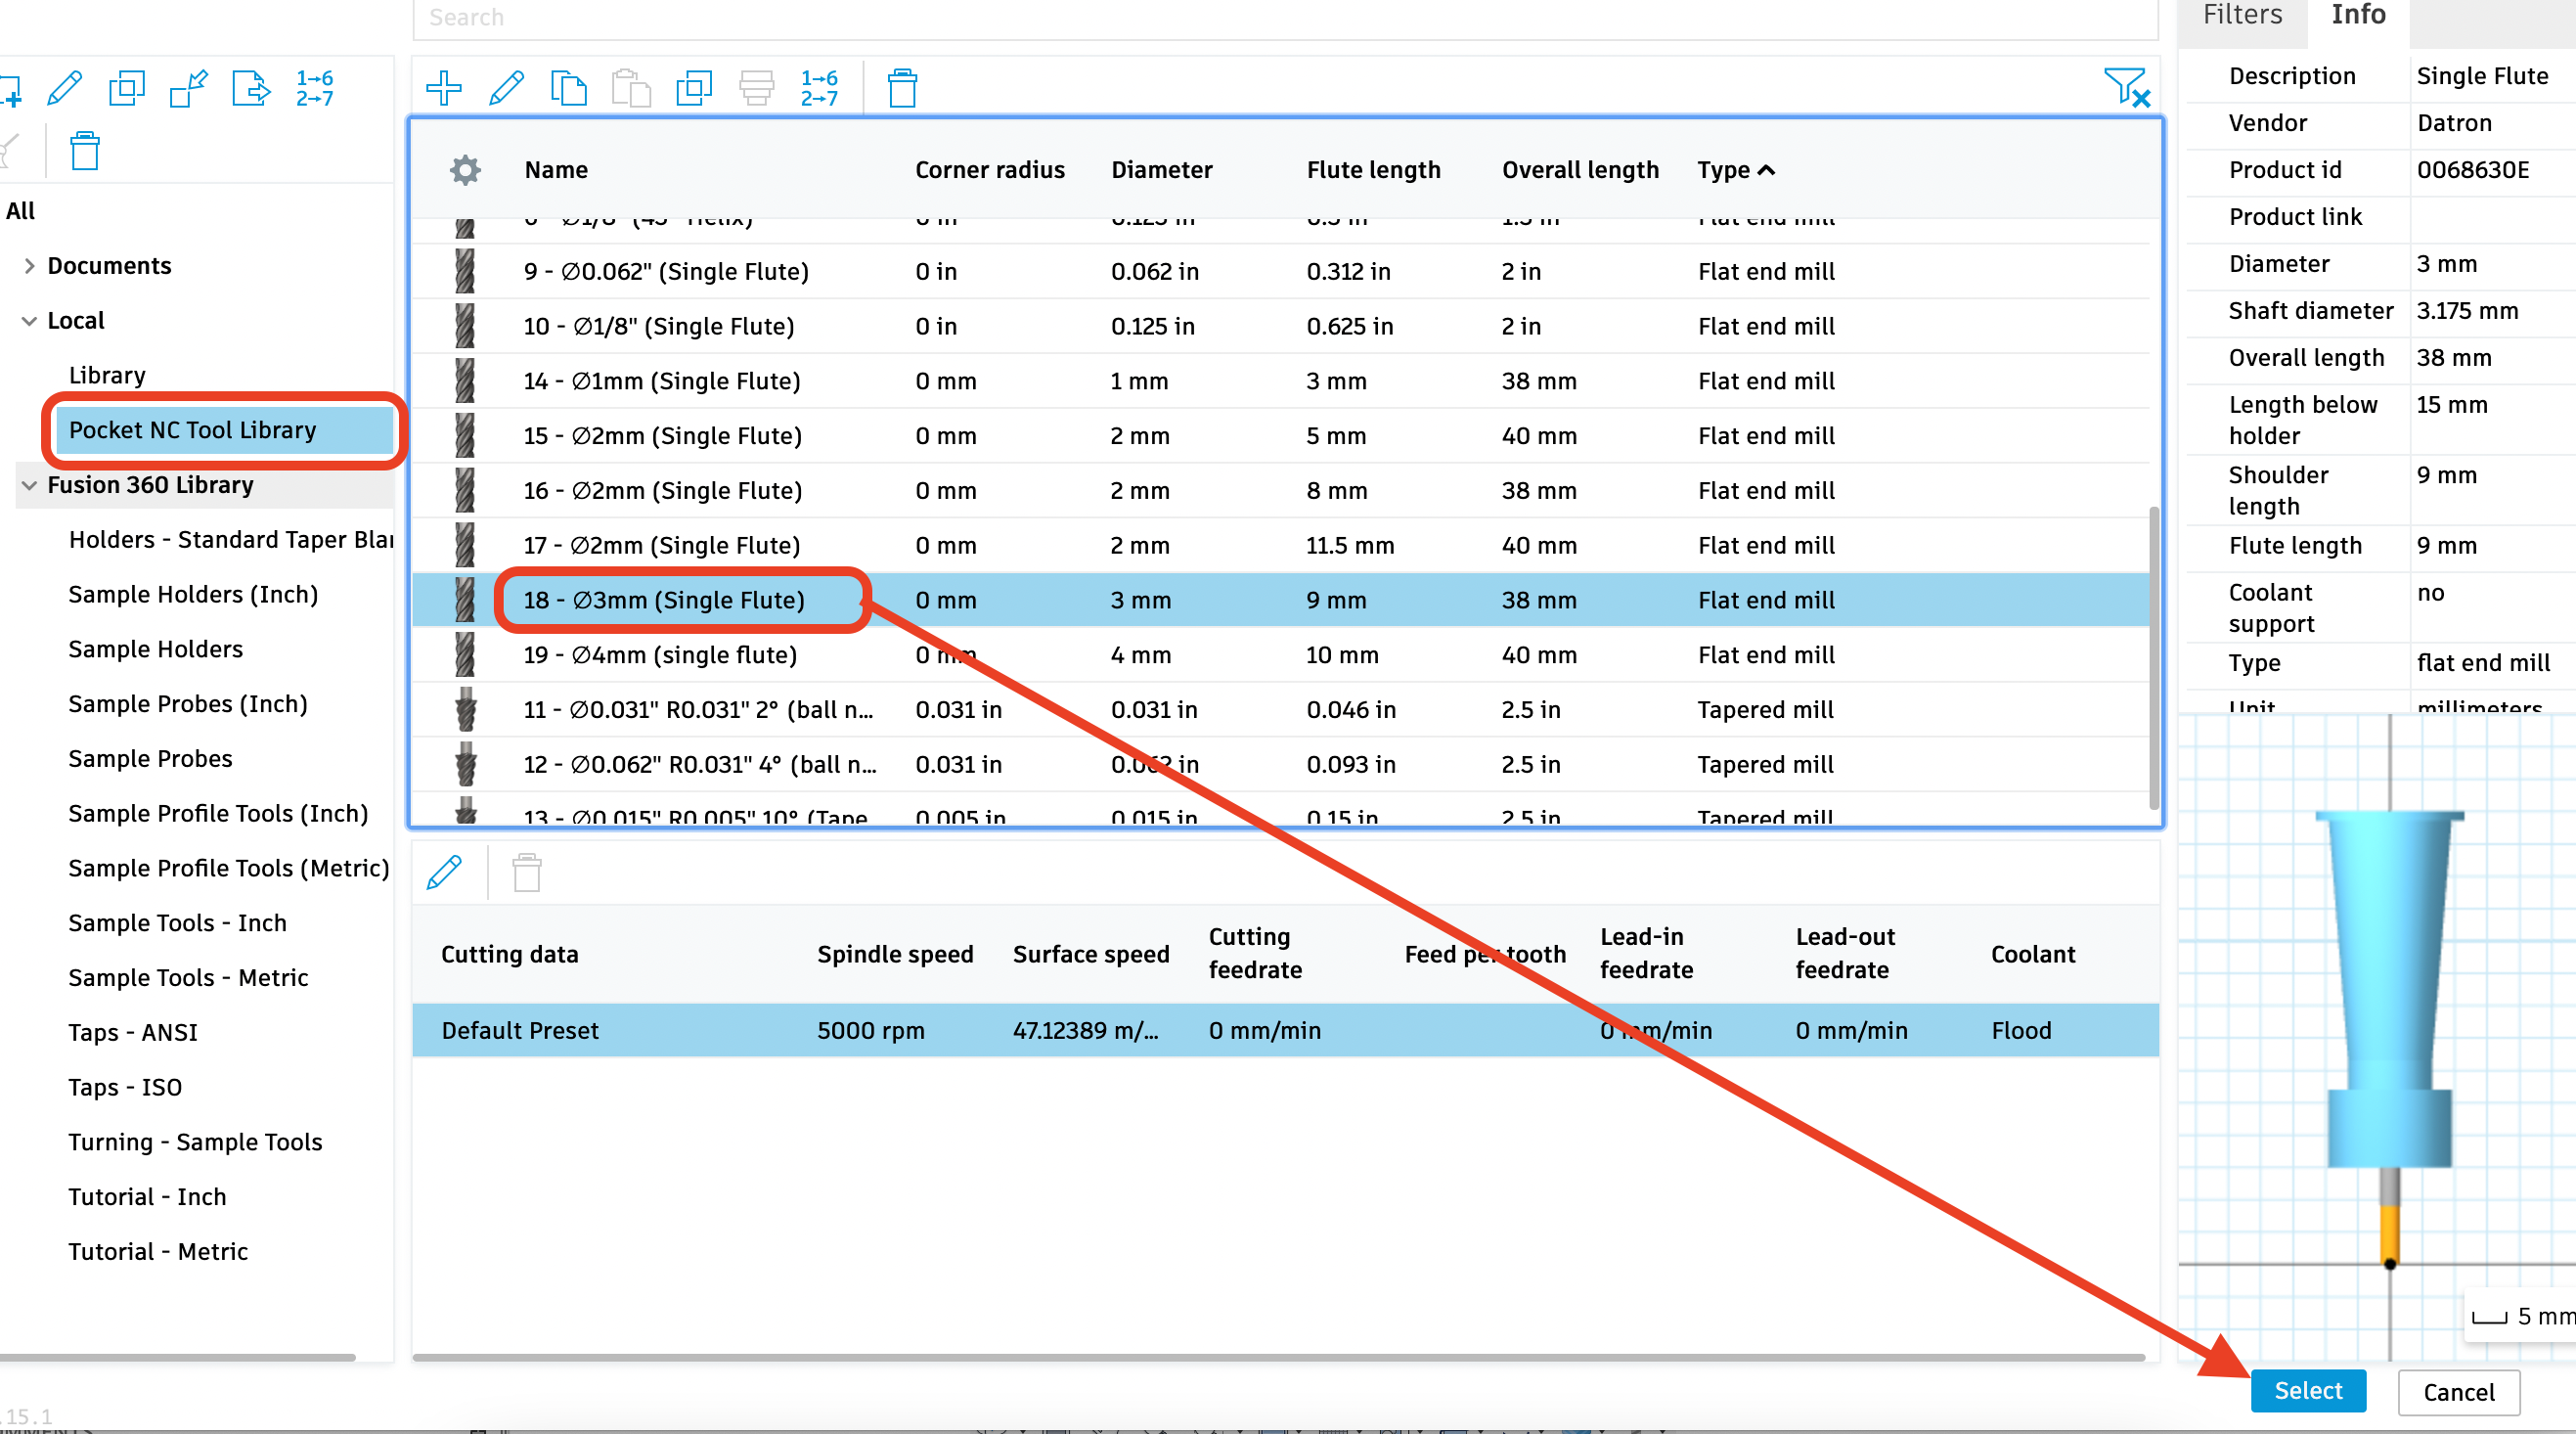
The fully populated PNC library will now be available for use on this part and other future projects. (Tool #18 is the 3mm Datron tool we will use for this part; Tool #10 is the 1/8” Harvey that was shipped with older machines)
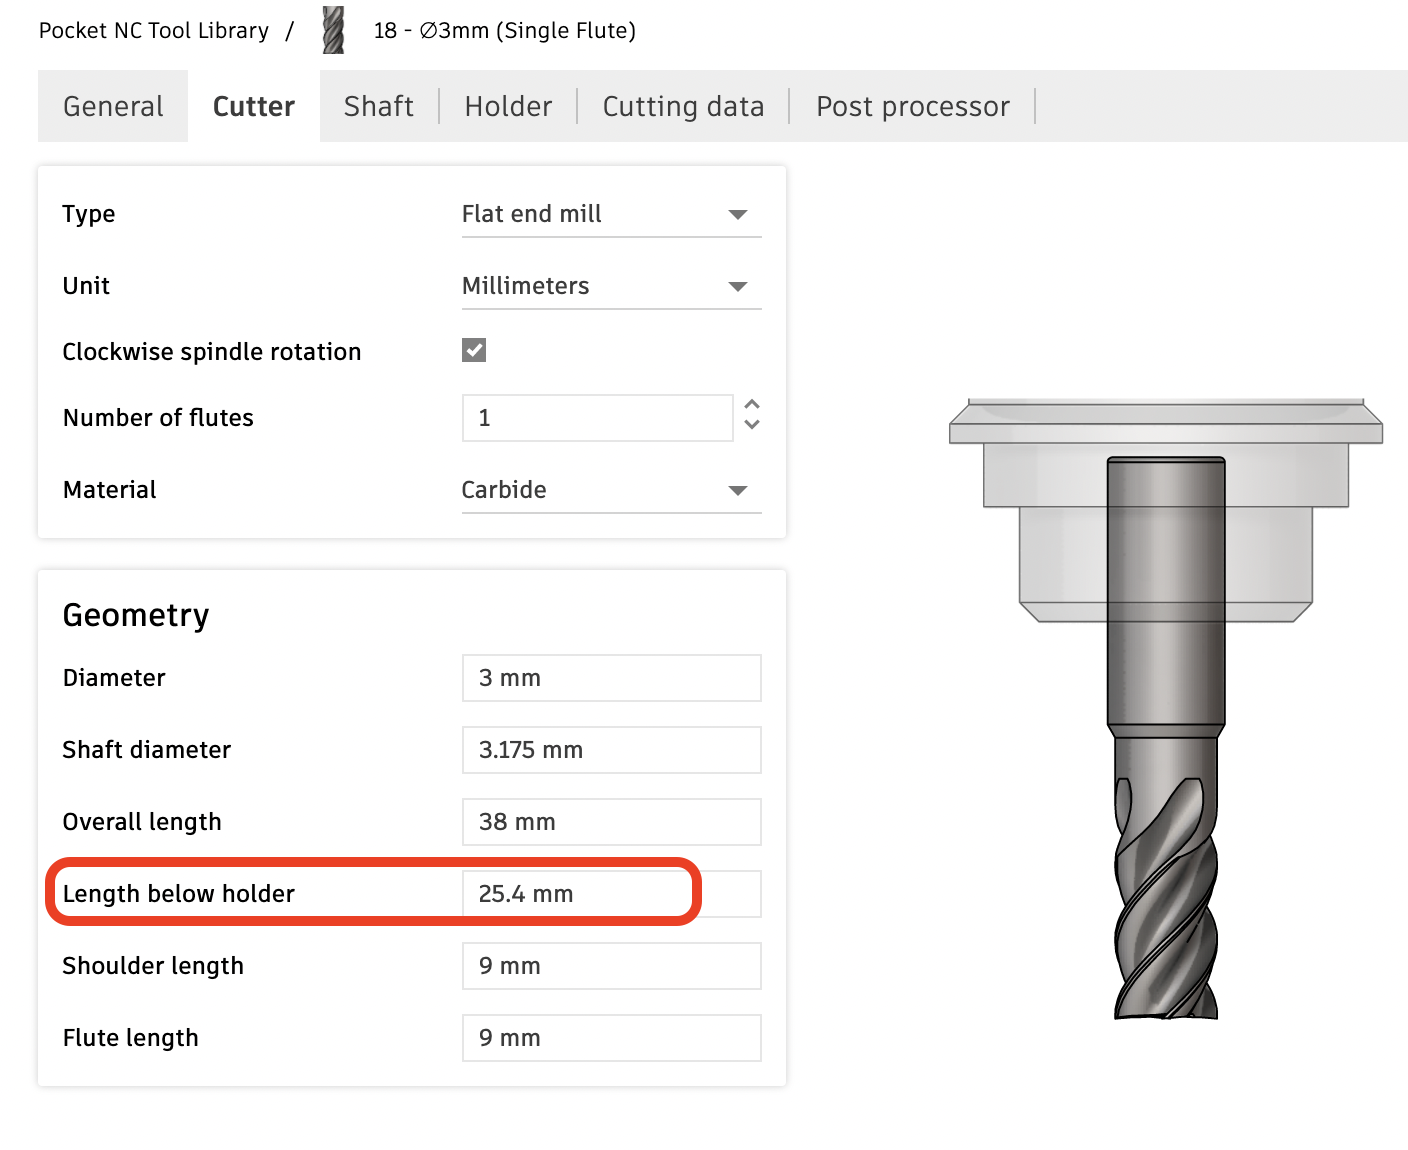
To reach all of the features of this part and ensure the tool holder does not crash, we will need 1 inch of the tool sticking out of the holder. Whether you are using Tool #18 or Tool #10, now is a good time to adjust the the tool. To do so, open the tool library, right click on your tool, and select “Edit tool”. Then navigate to the tab labeled “Cutter” and change the “Length below holder” to 1 inch (25.4mm):
Section 4: Toolpaths
Now that we have the Setup complete and the Tool Library imported in the “Manufacture” workspace, we can begin adding tool paths.
Adaptive toolpaths will be used to clear the bulk of the material from the top and sides of the part. This type of toolpath tries to minimize the machining time while also lengthening the life of the tool by taking passes that keep the load on the tool constant. After that we will use more feature-specific toolpaths to finalize the geometry.
Section 4.1: Adaptive Toolpath for the Top Face
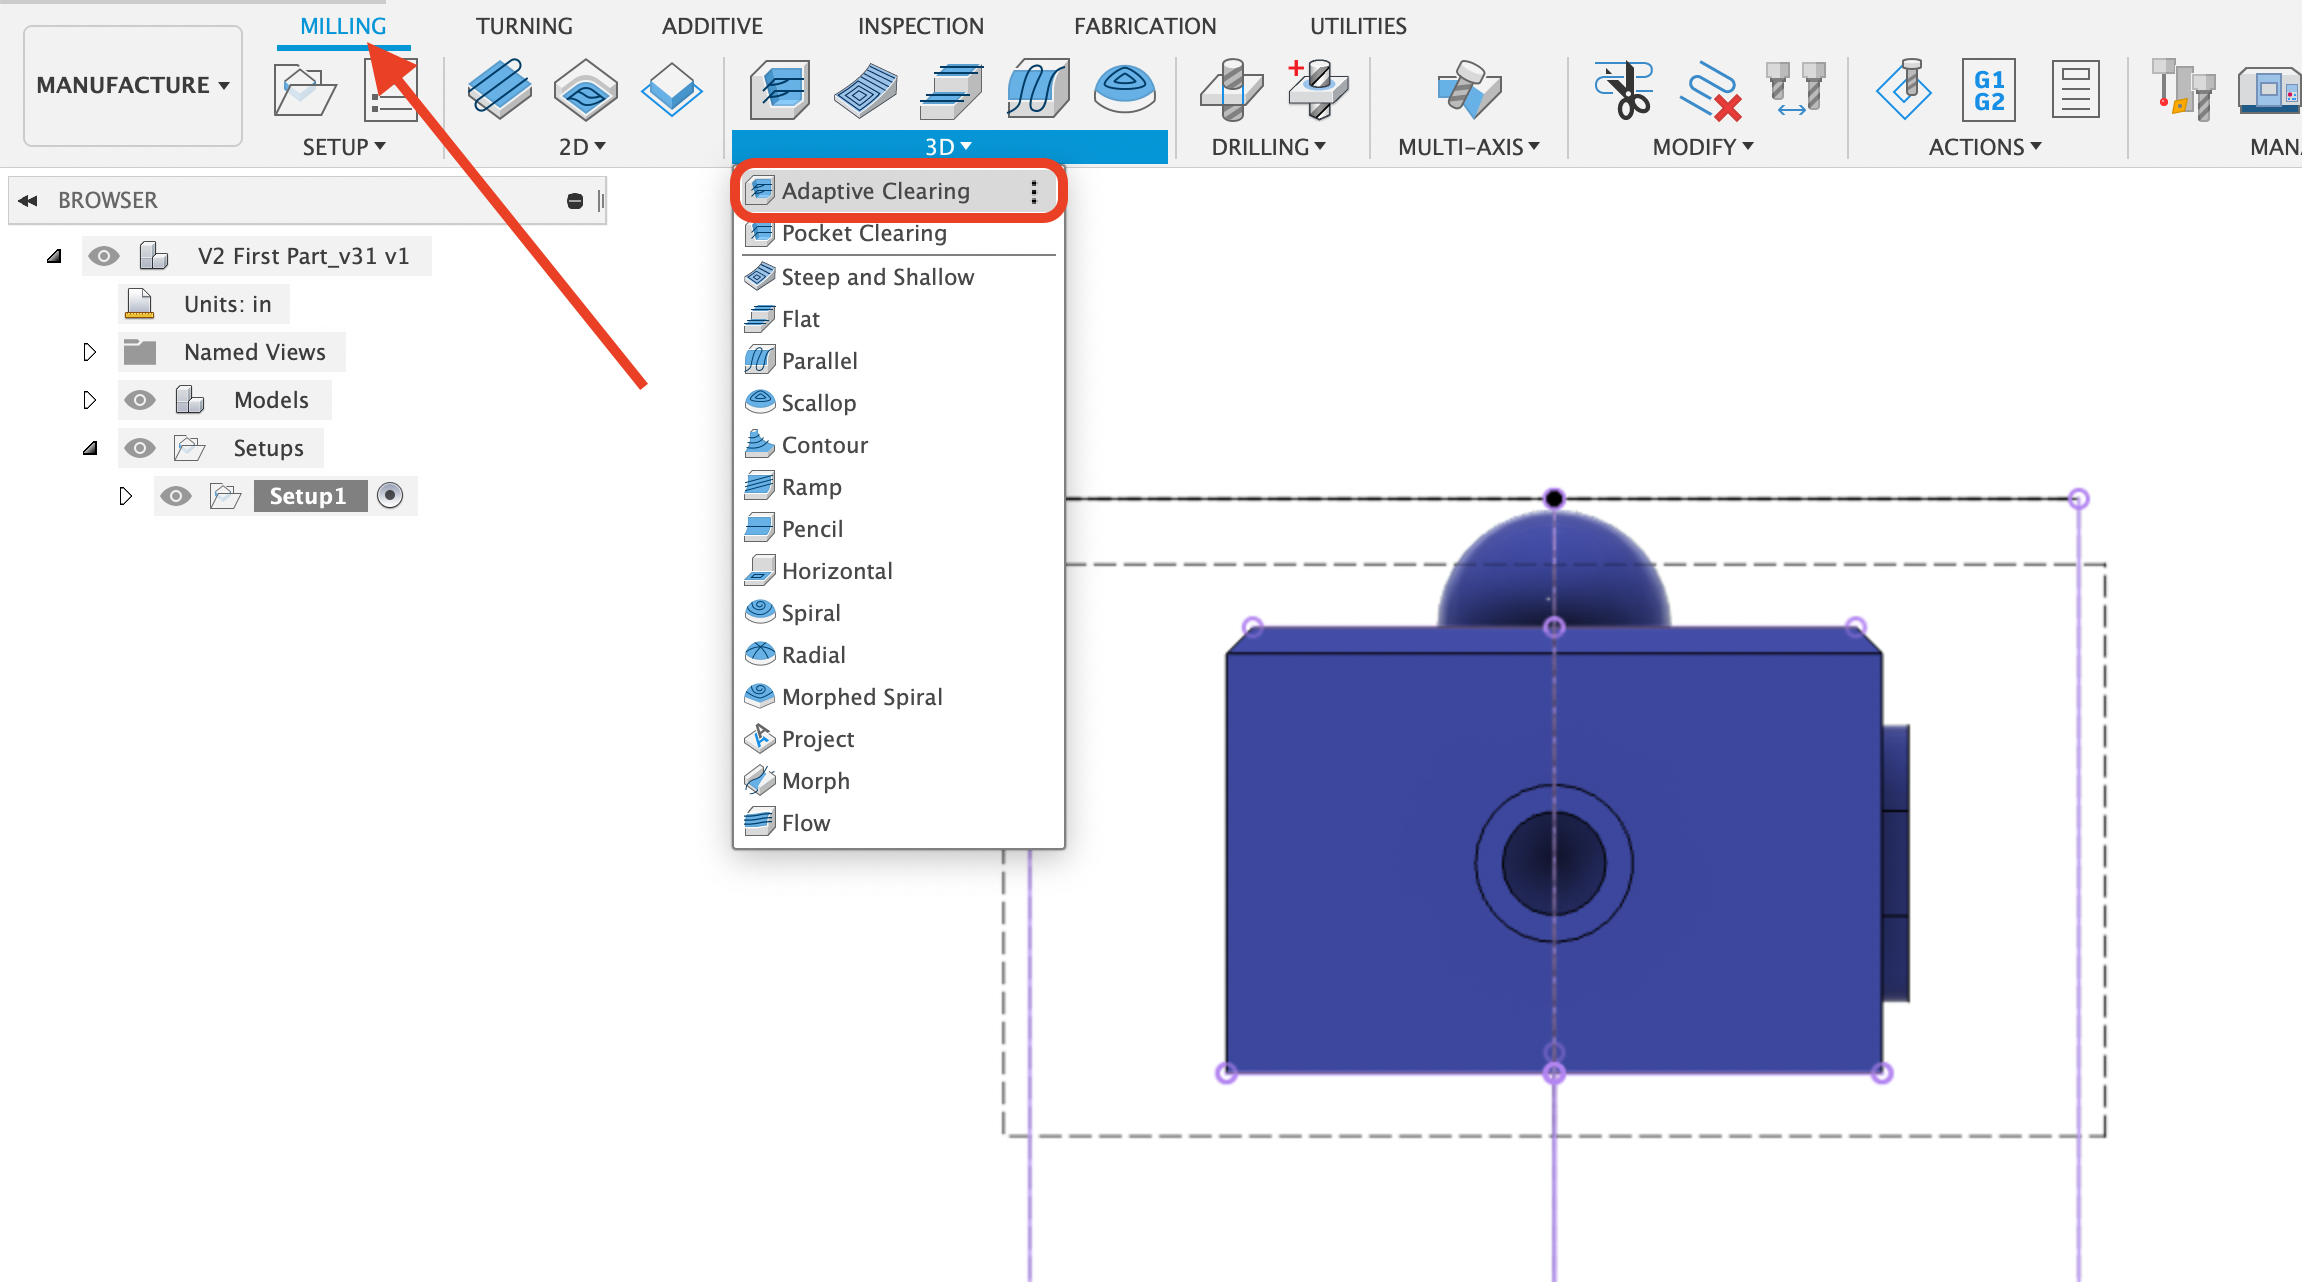
To create the first toolpath, navigate to the “Milling” tab, select the “3D” dropdown menu, and select “Adaptive Clearing”. (We could use 2D Adaptive clearing to make the top face, but it would leave a cylinder of uncut material around the hemisphere. The 3D version will allow us to remove material around the hemisphere)
After selecting the 3D Adaptive Clearing, a menu will pop up to adjust the variables for the chosen toolpath. We will work through each tab (Tool, Geometry, Heights, Passes, and Linking) completing the needed variables and passing over the more advanced settings (a quick internet search can supply a wealth of videos and articles on more advanced Fusion operations).
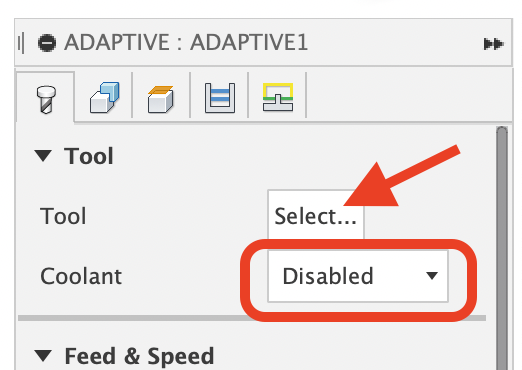
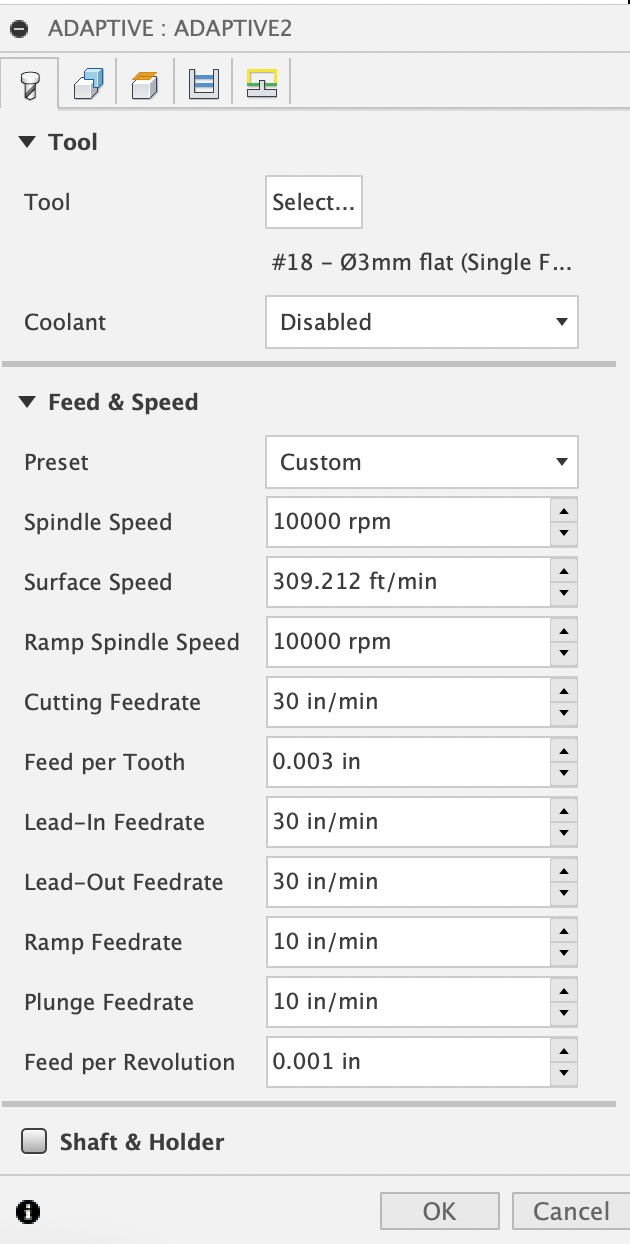
In the Tool tab, click the “Select…” button at the top to select a tool. Then select Tool #18 from the PNC Tool Library. (If you have an older machine, select Tool #10 as previously mentioned). Also switch the “Coolant” dropdown menu to “Disabled” since the machine is not compatible with coolant:
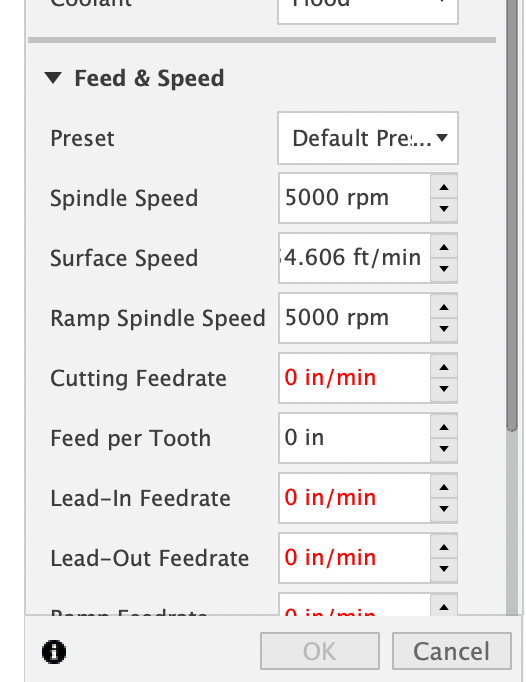
You will notice that some variables for the tool are auto-populated from the tool library, and some are red showing that no values are currently entered for needed variables. You can make any changes needed here and it won’t modify the PNC tool library, it will just create a version of the tool that is specific to this part and setup.
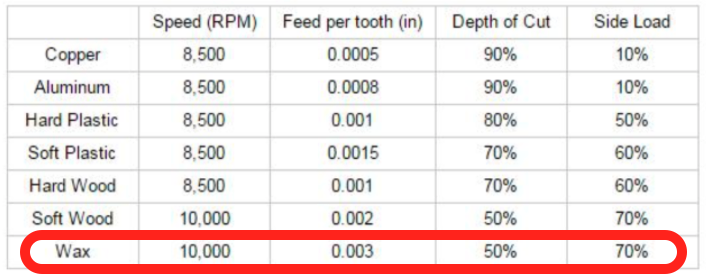
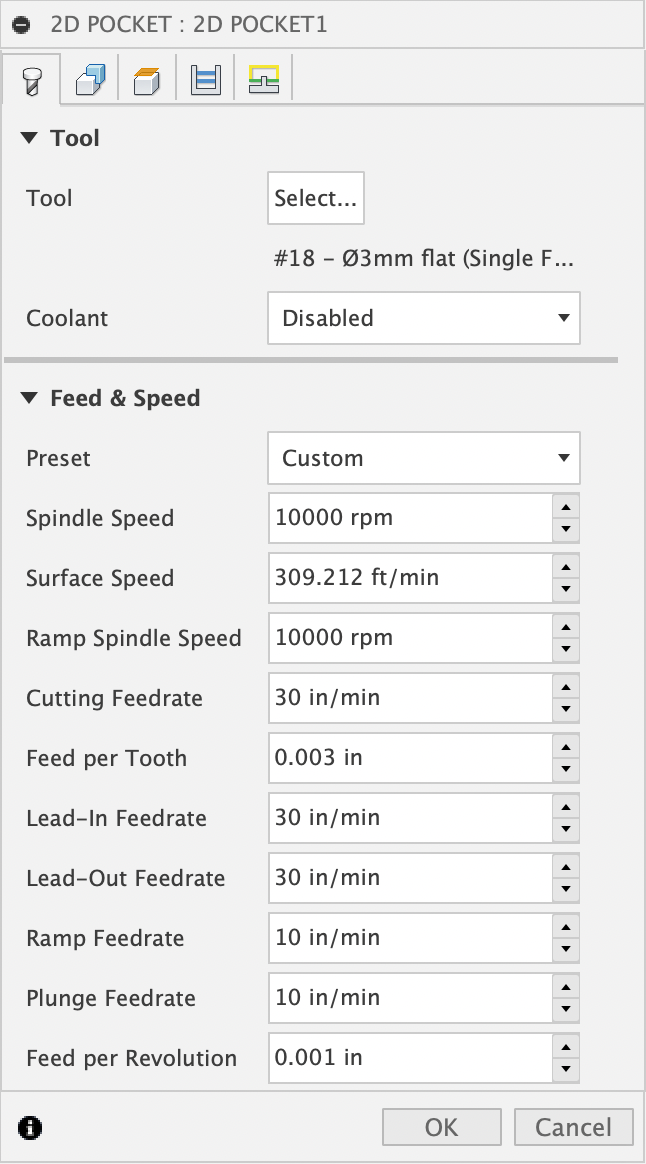
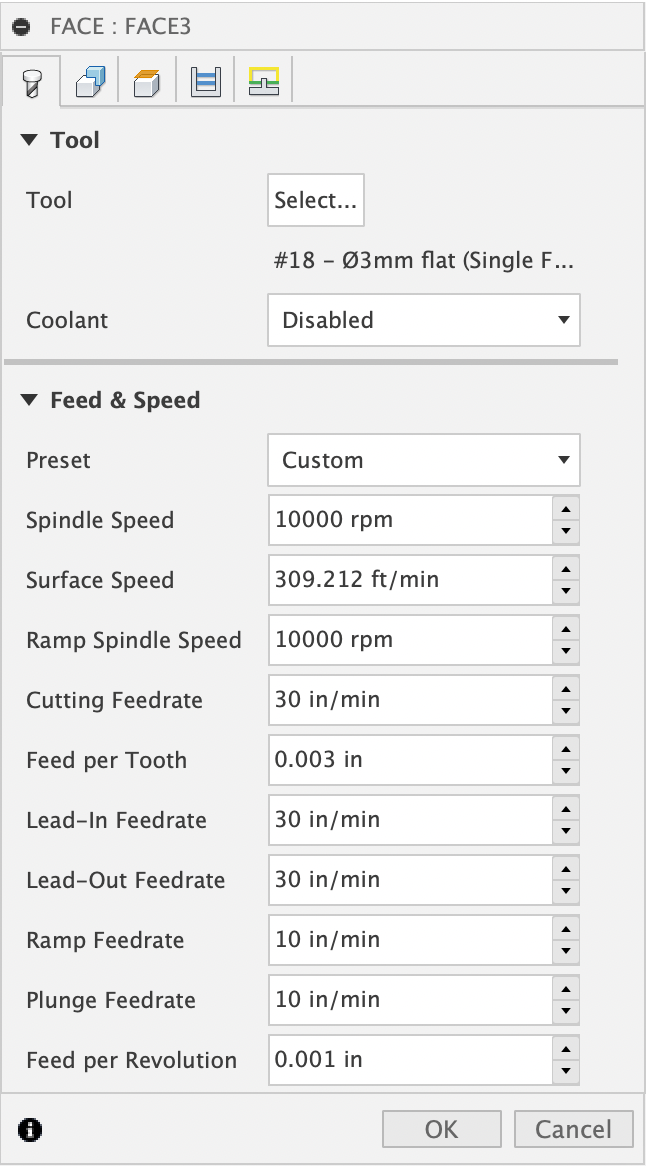
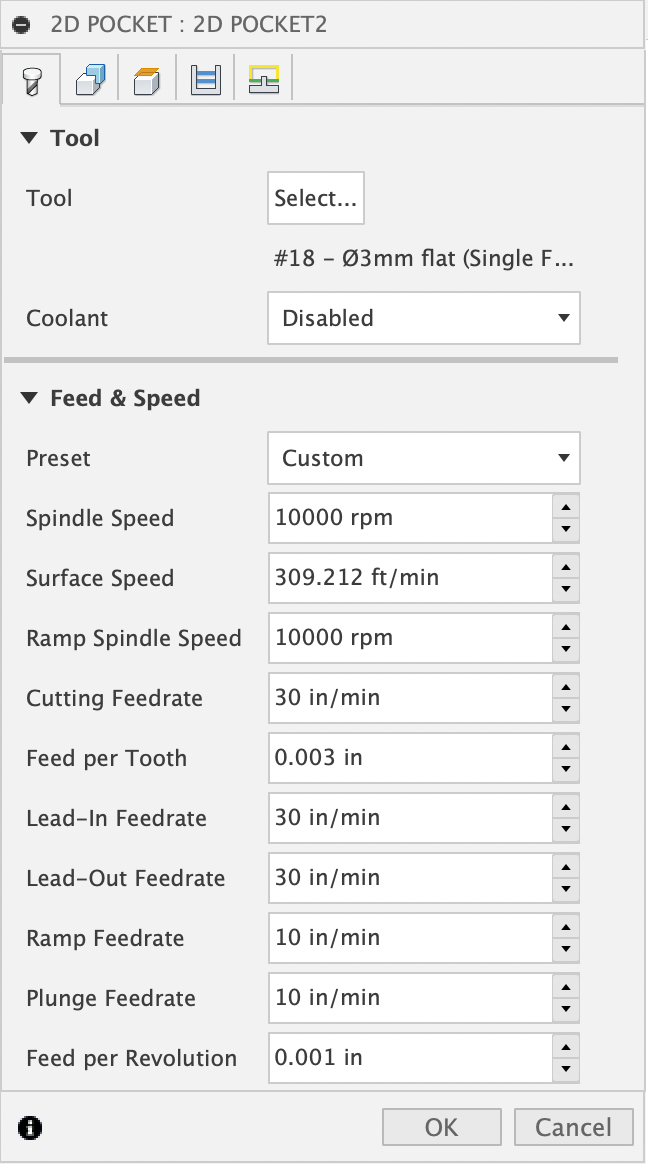
For this part, we will need to enter some feeds and speeds. If we look at the PNC Feeds and Speeds ChartV2-10 Speeds and Feedsprovided in the User Resources we see that for a V2-10 the recommended Speed is 10,000rpm, Feed per tooth is 0.003in, Depth of cut is 50% of the tool diameter (0.059” or 1.5mm), and Side load is 70% of the tool diameter (0.083” or 2.1mm). (These values will also work well on a V2-50, but there are additional recipes that can take advantage of the higher spindle speed as well. We recommend starting with these values for your first part and researching/testing other recipes for your own parts in the future)
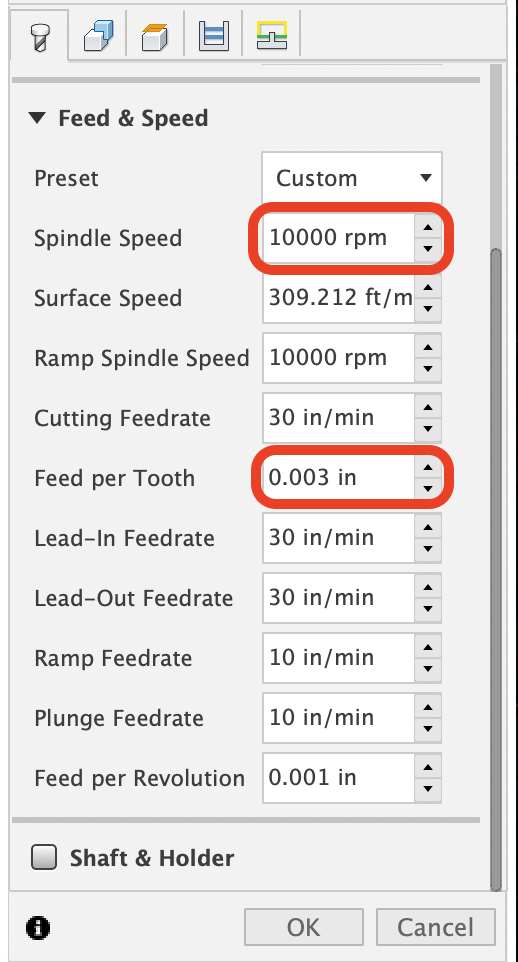
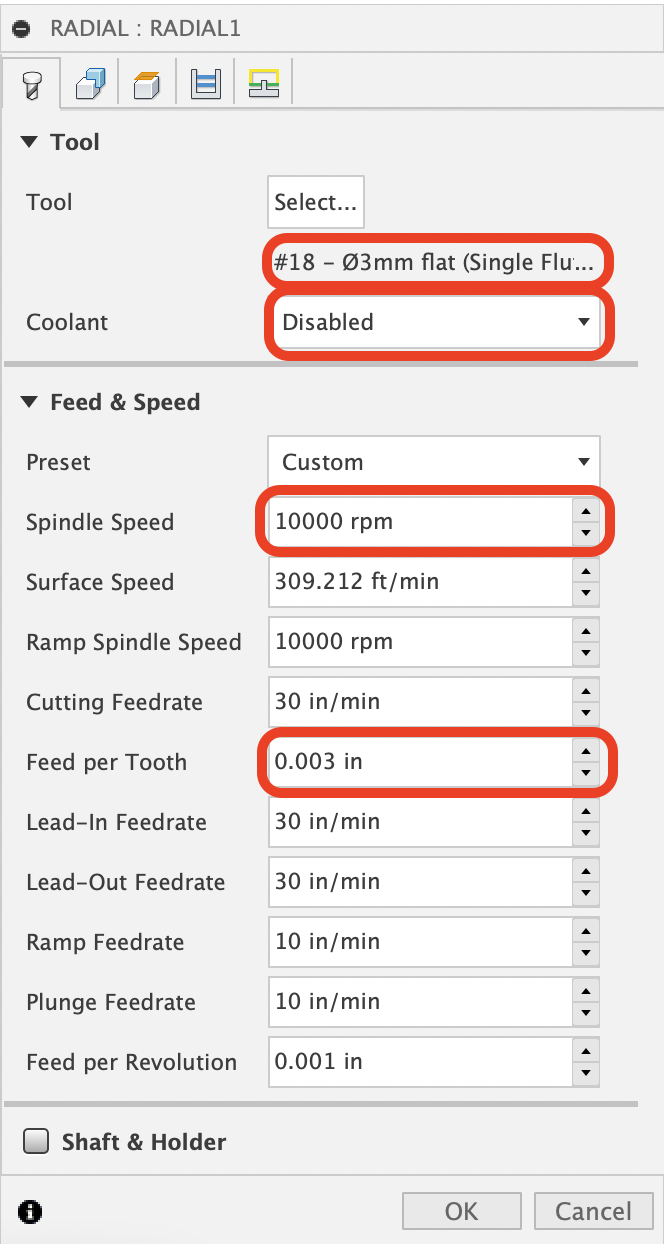
The simplest way to fill out all of the missing variables is to enter the Spindle Speed (10,000 rpm) first, followed by the Feed per Tooth (0.003 in). Note that when you enter the Spindle Speed, Fusion will automatically update the Surface Speed as well as the Ramp Spindle Speed. Similarly, when you enter the Feed per Tooth, all other values will automatically update. This will give us a safe recipe, but maybe not the most optimized. A large portion of machining is developing an understanding of feeds and speeds, so we recommend starting with these automatically updating values first, and then experimenting with variations as you design future parts and create toolpaths with different materials.
After entering these two values and auto-populating the rest, we can skip the section at the bottom titled “Shaft & Holder” and move to the next tab titled “Geometry”. (“Shaft & Holder” allows you to dial in aspects of the tool holder).
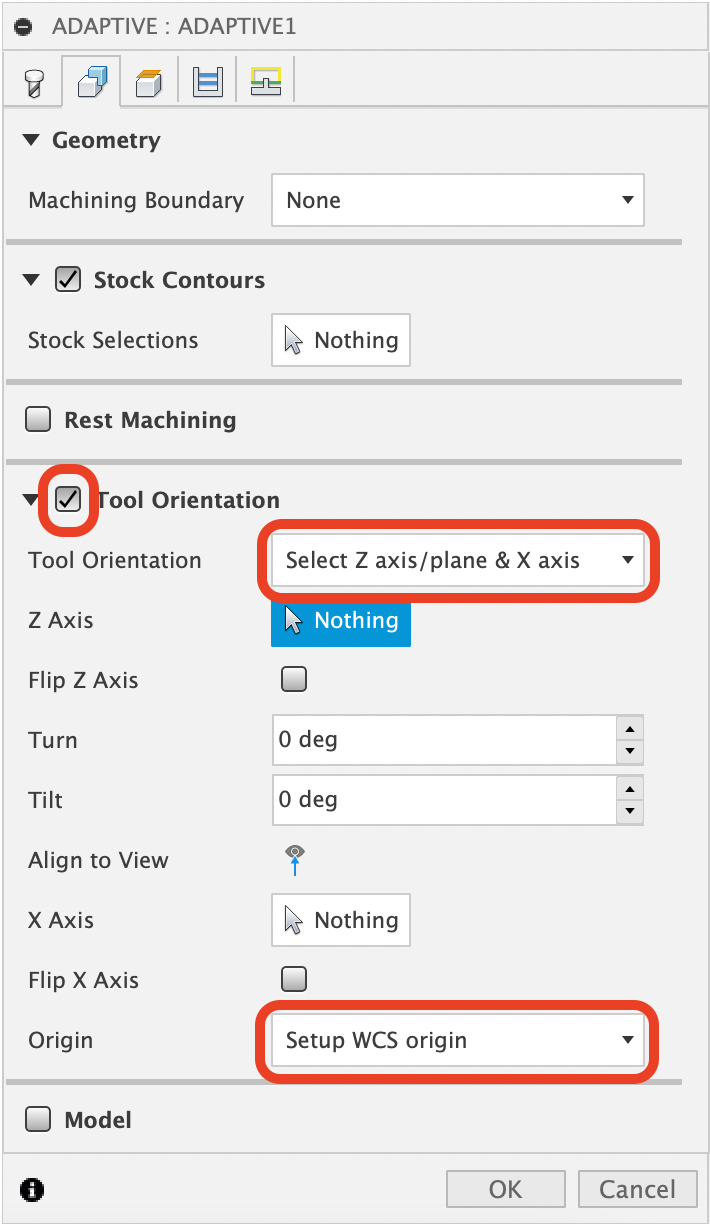
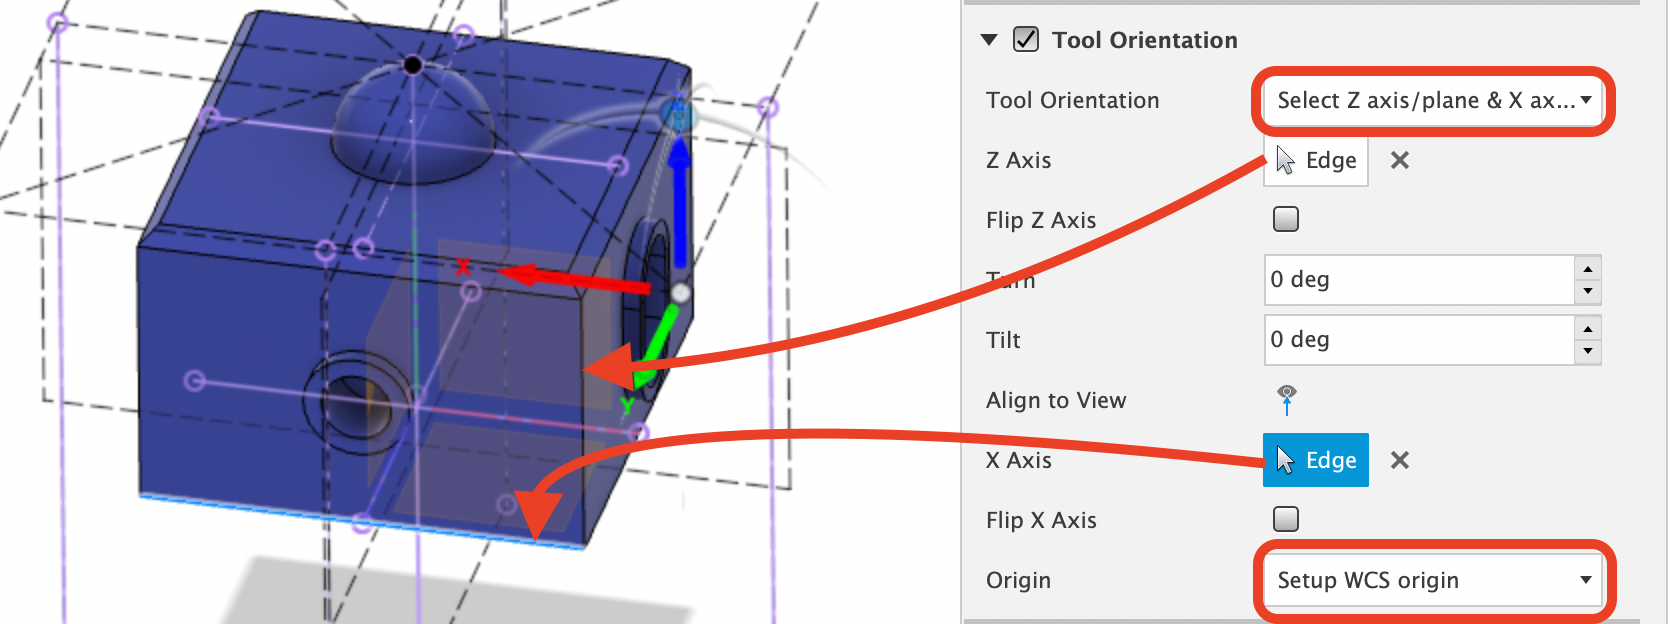
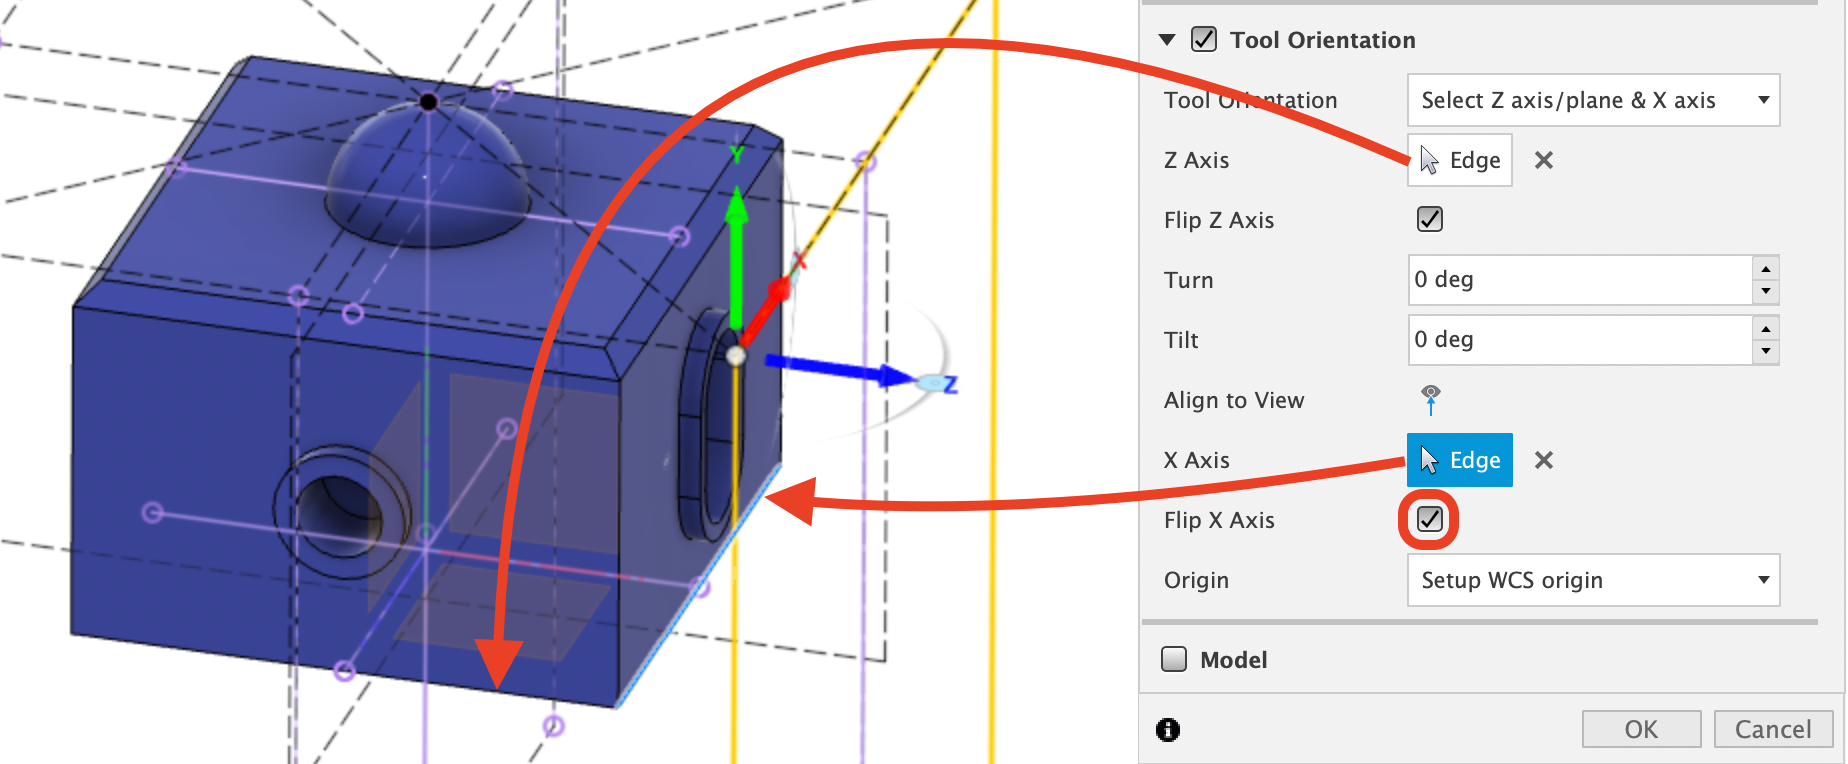
In the geometry tab, it is best to start by setting up the Tool Orientation. This step is very important and will ensure the features are machined correctly and that the tool does not crash into the part, the vise, or the machine! Make sure that the Tool Orientation dropdown box is set to “Select Z axis/plane & X axis” and that the Origin dropdown box is set to “Setup WCS Origin”. This will ensure that the CAM software references the machine’s coordinate system and moves the axes correctly to machine the features:
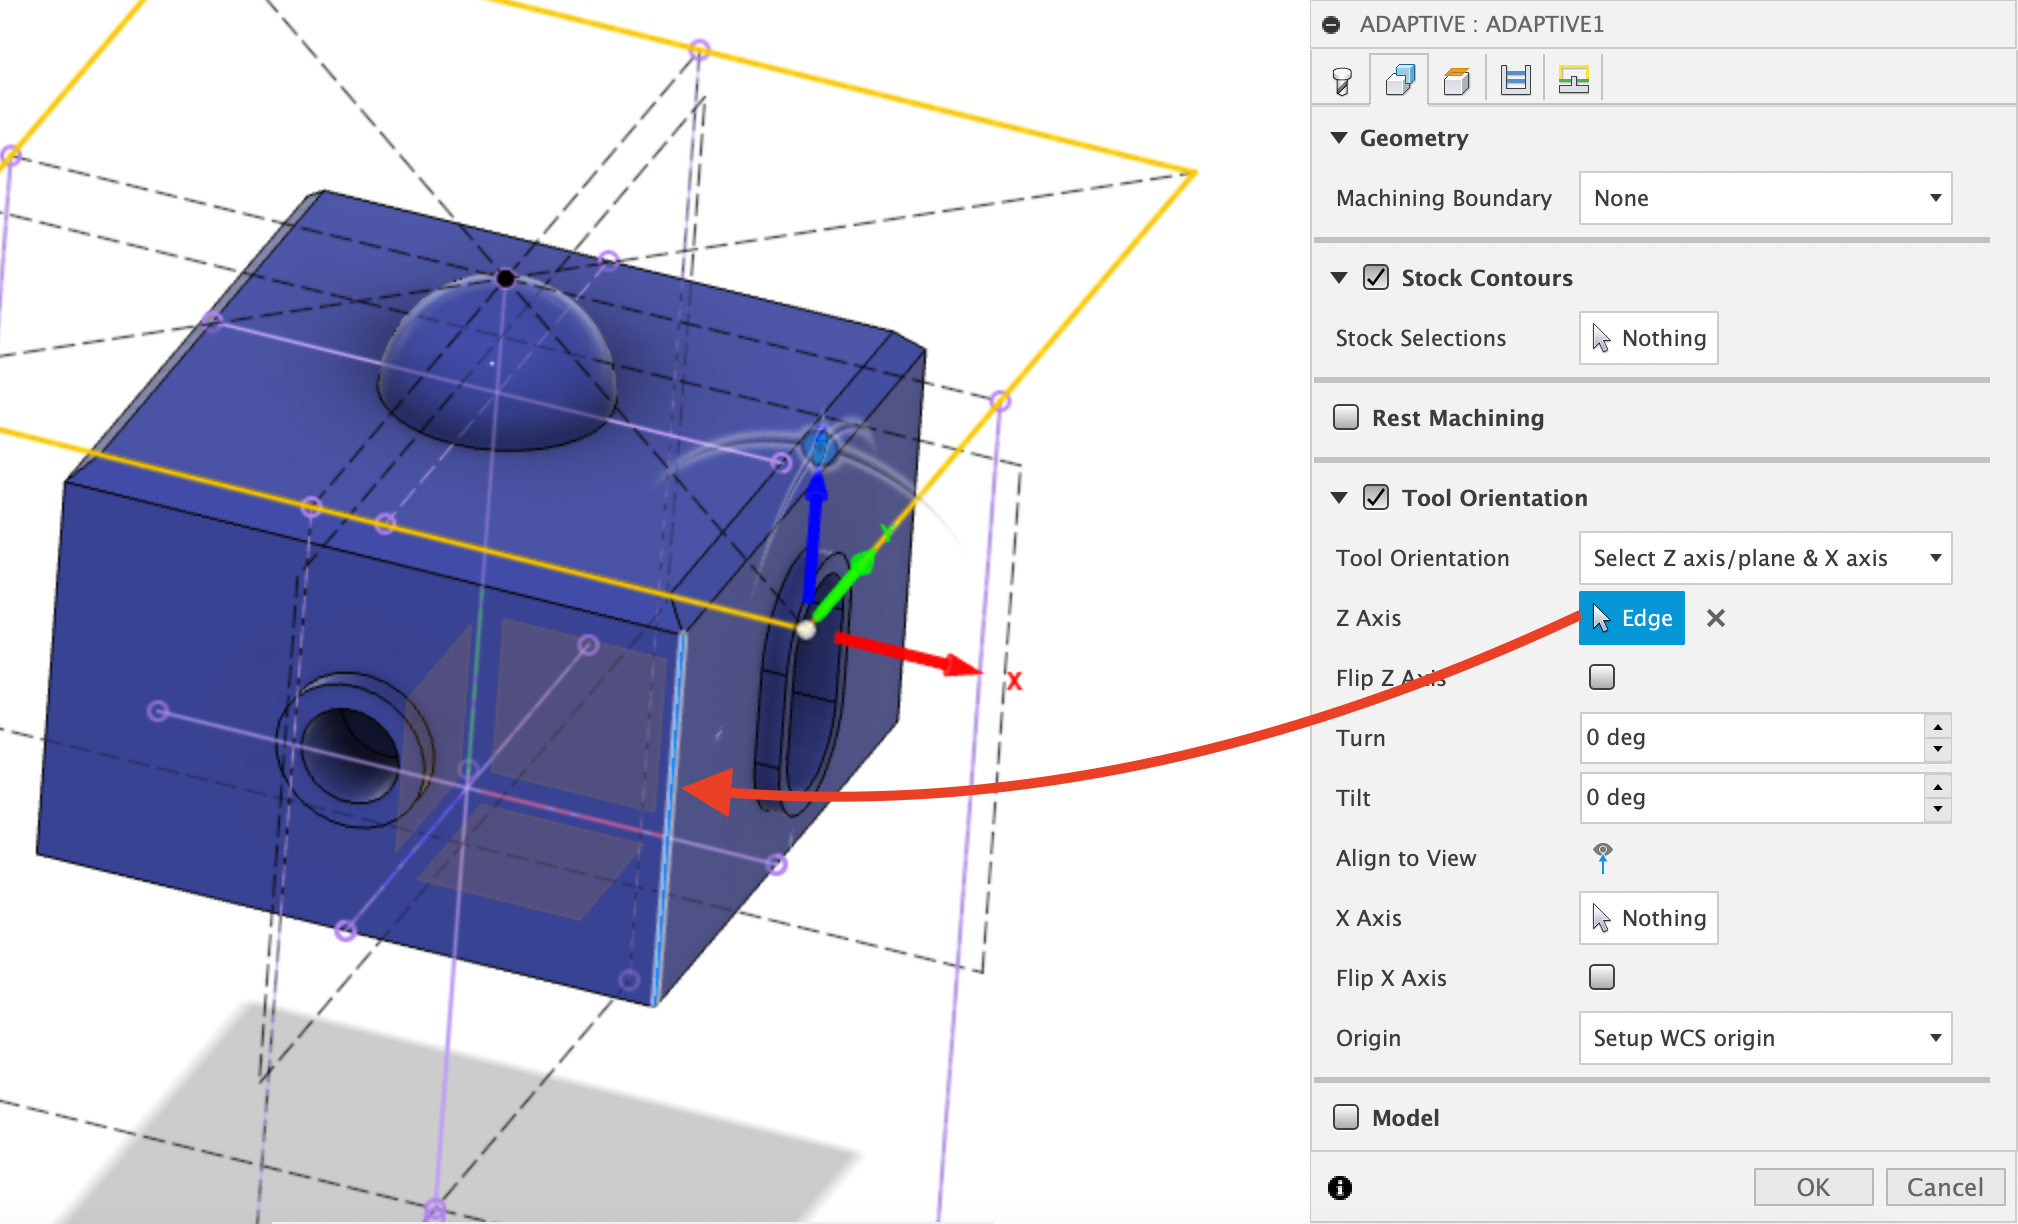
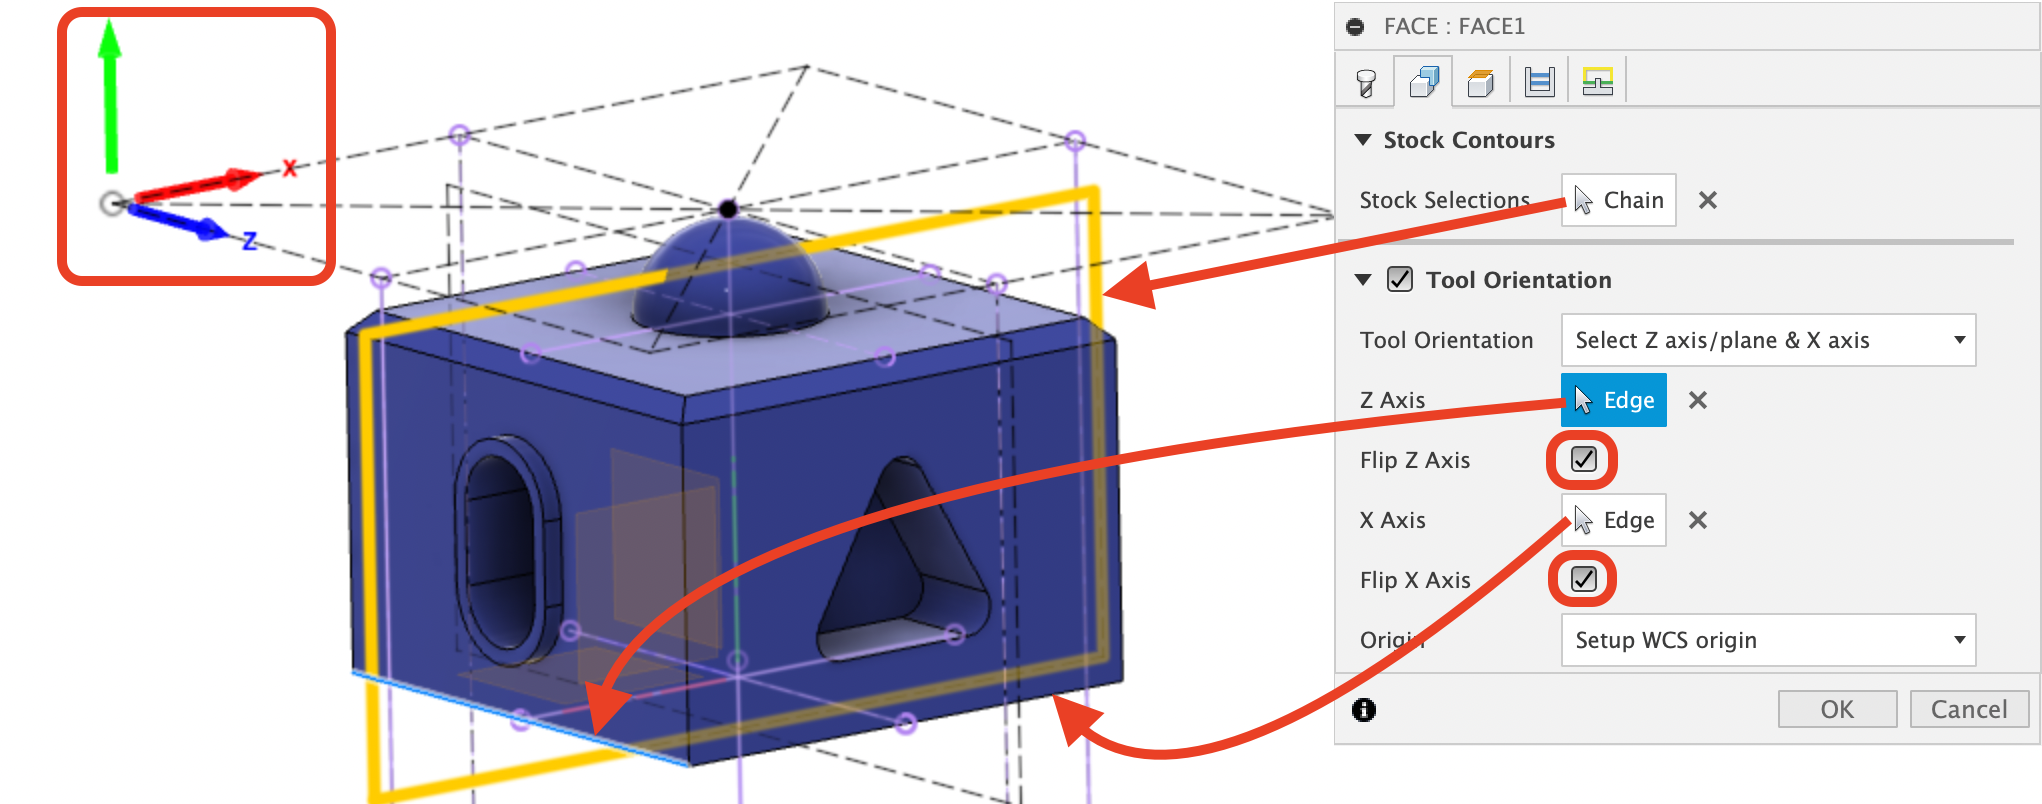
Next, we need to select a Z Axis for where it currently says “Nothing” and an X Axis for where it currently says “Nothing”. When cutting the top, the Z Axis (spindle) will approach from the top and be perpendicular to the top surface, so we need to pick an edge of the part or sketch that aligns with that axis. For this example, select the front, right corner as shown below. Once you select the edge, you will notice that the blue Z arrow has become vertical and the blue “Nothing” box has updated to say “Edge”:
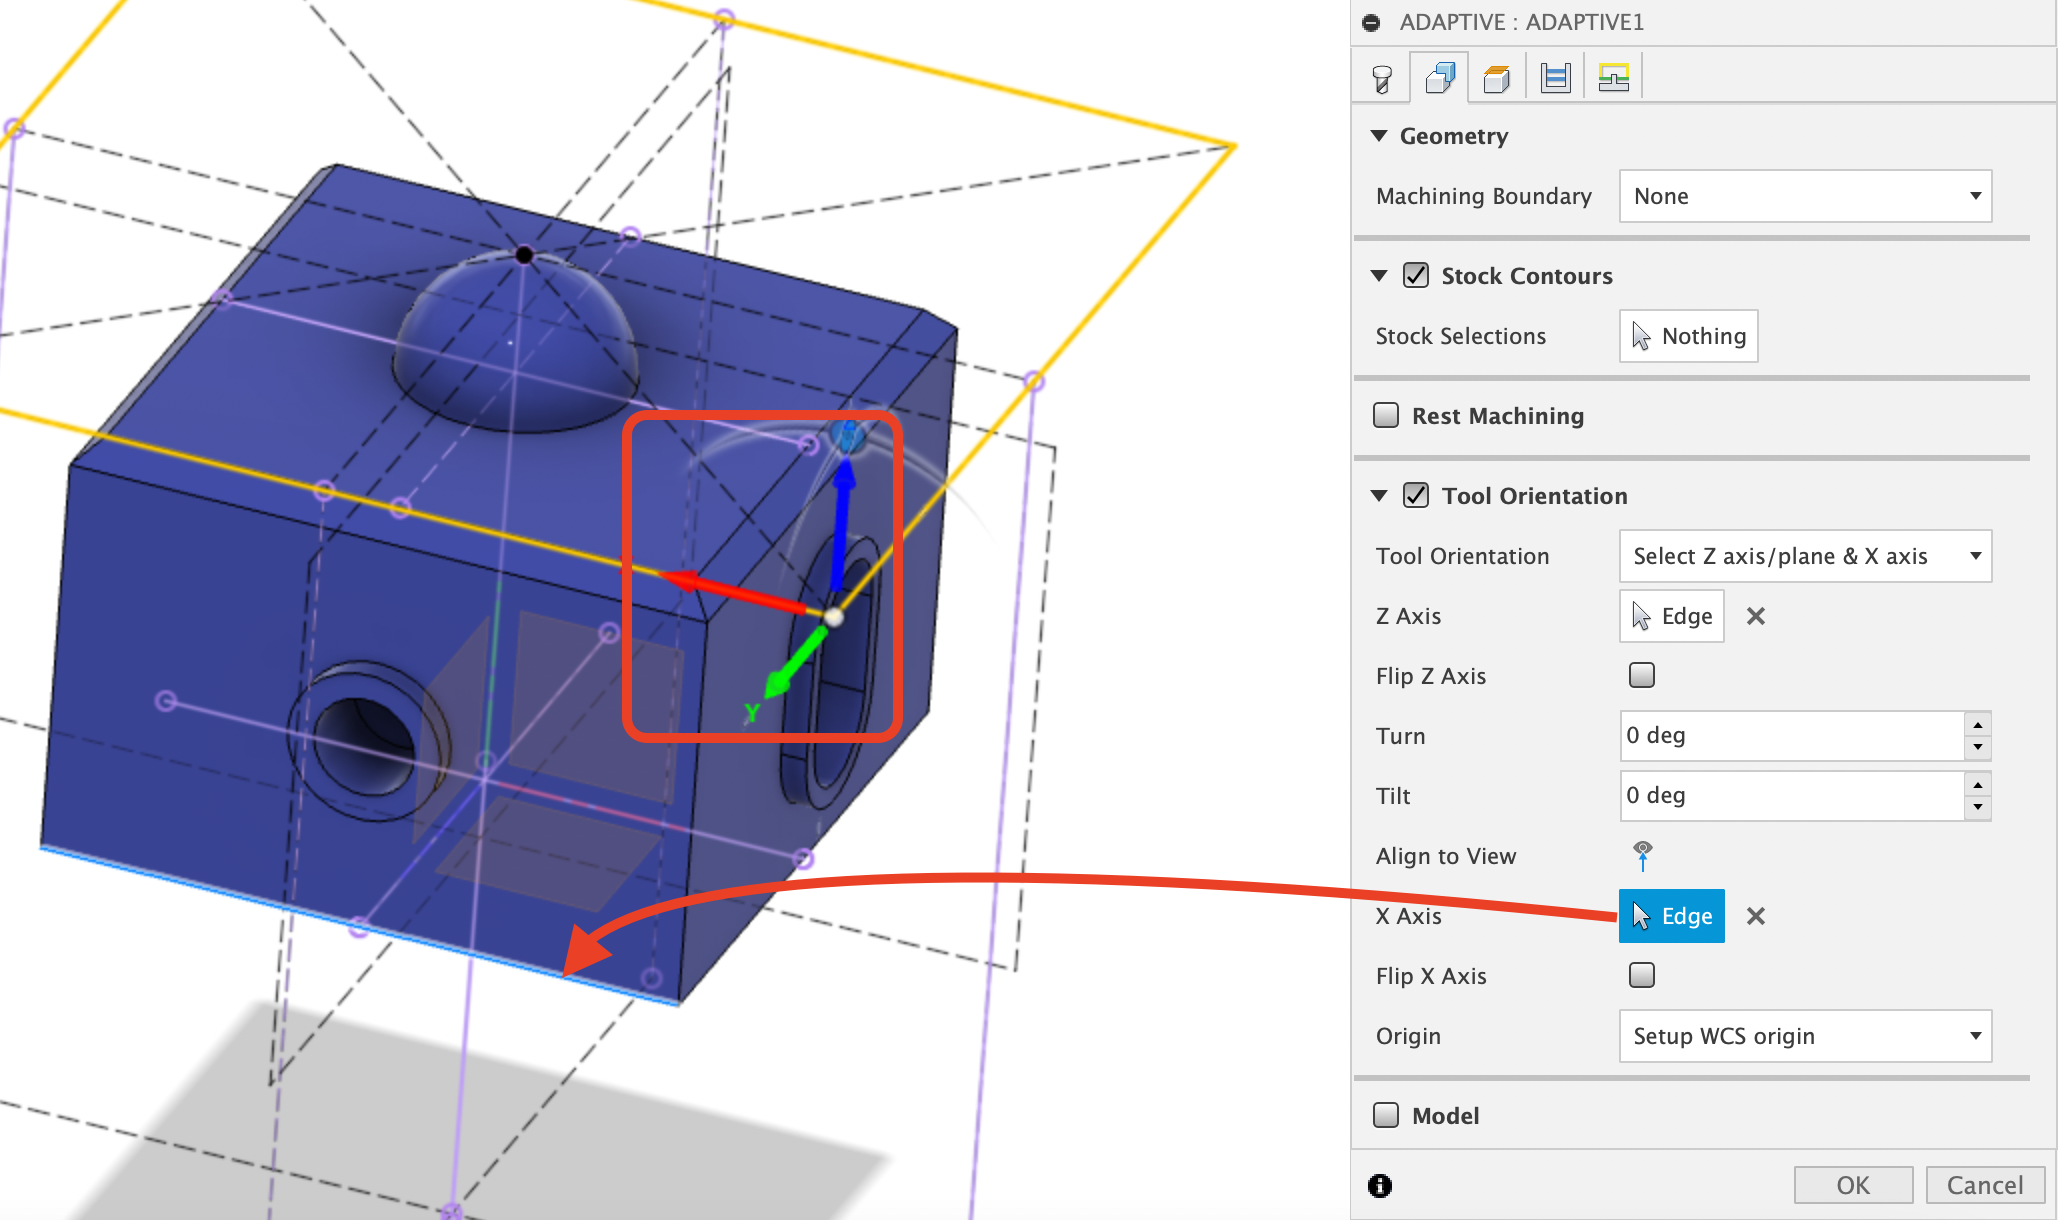
After that, click the “Nothing” box next to “X axis” and select the lower front edge as shown below. The “Nothing” will update to “Edge” for this axis and the red arrow will align with that edge. Note that the coordinates are now facing the correct directions for the spindle to approach and cut the top of the part:
Ensure that your X/Y/Z coordinates look the exact same as the image above and point positive in the same directions. If you need to adjust them, click through the edges again or select the “Flip Z Axis” or “Flip X Axis” buttons to mirror those axes from positive to negative.
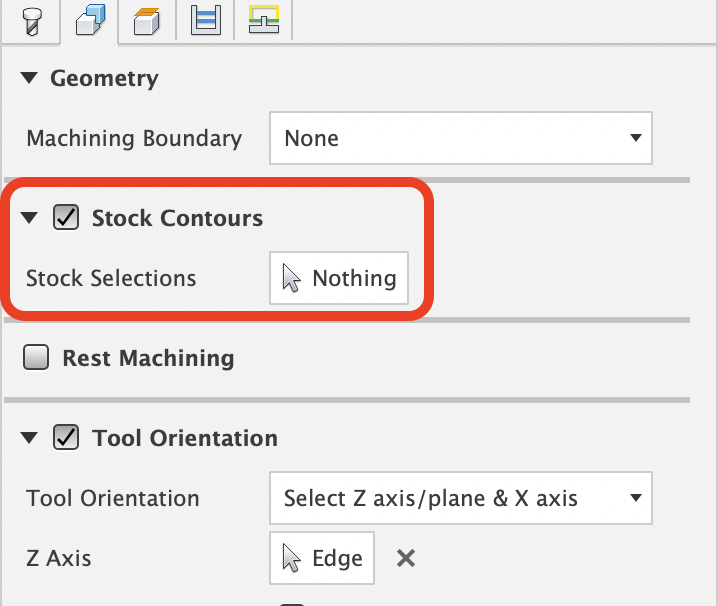
Next, ensure the “Stock Contours” box is checked. Since we set the stock to square during the Setup portion, the toolpath will automatically use the outline of the top of the stock as the boundary for the toolpath. You do not have to select a contour and can leave this box as “Nothing”. Ensure that the “Rest Machining” box and the “Model” boxes are not checked, we do not need them for this operation. Verify that your entire Geometry tab looks the same as below, and then move to the next tab labeled “Heights”:
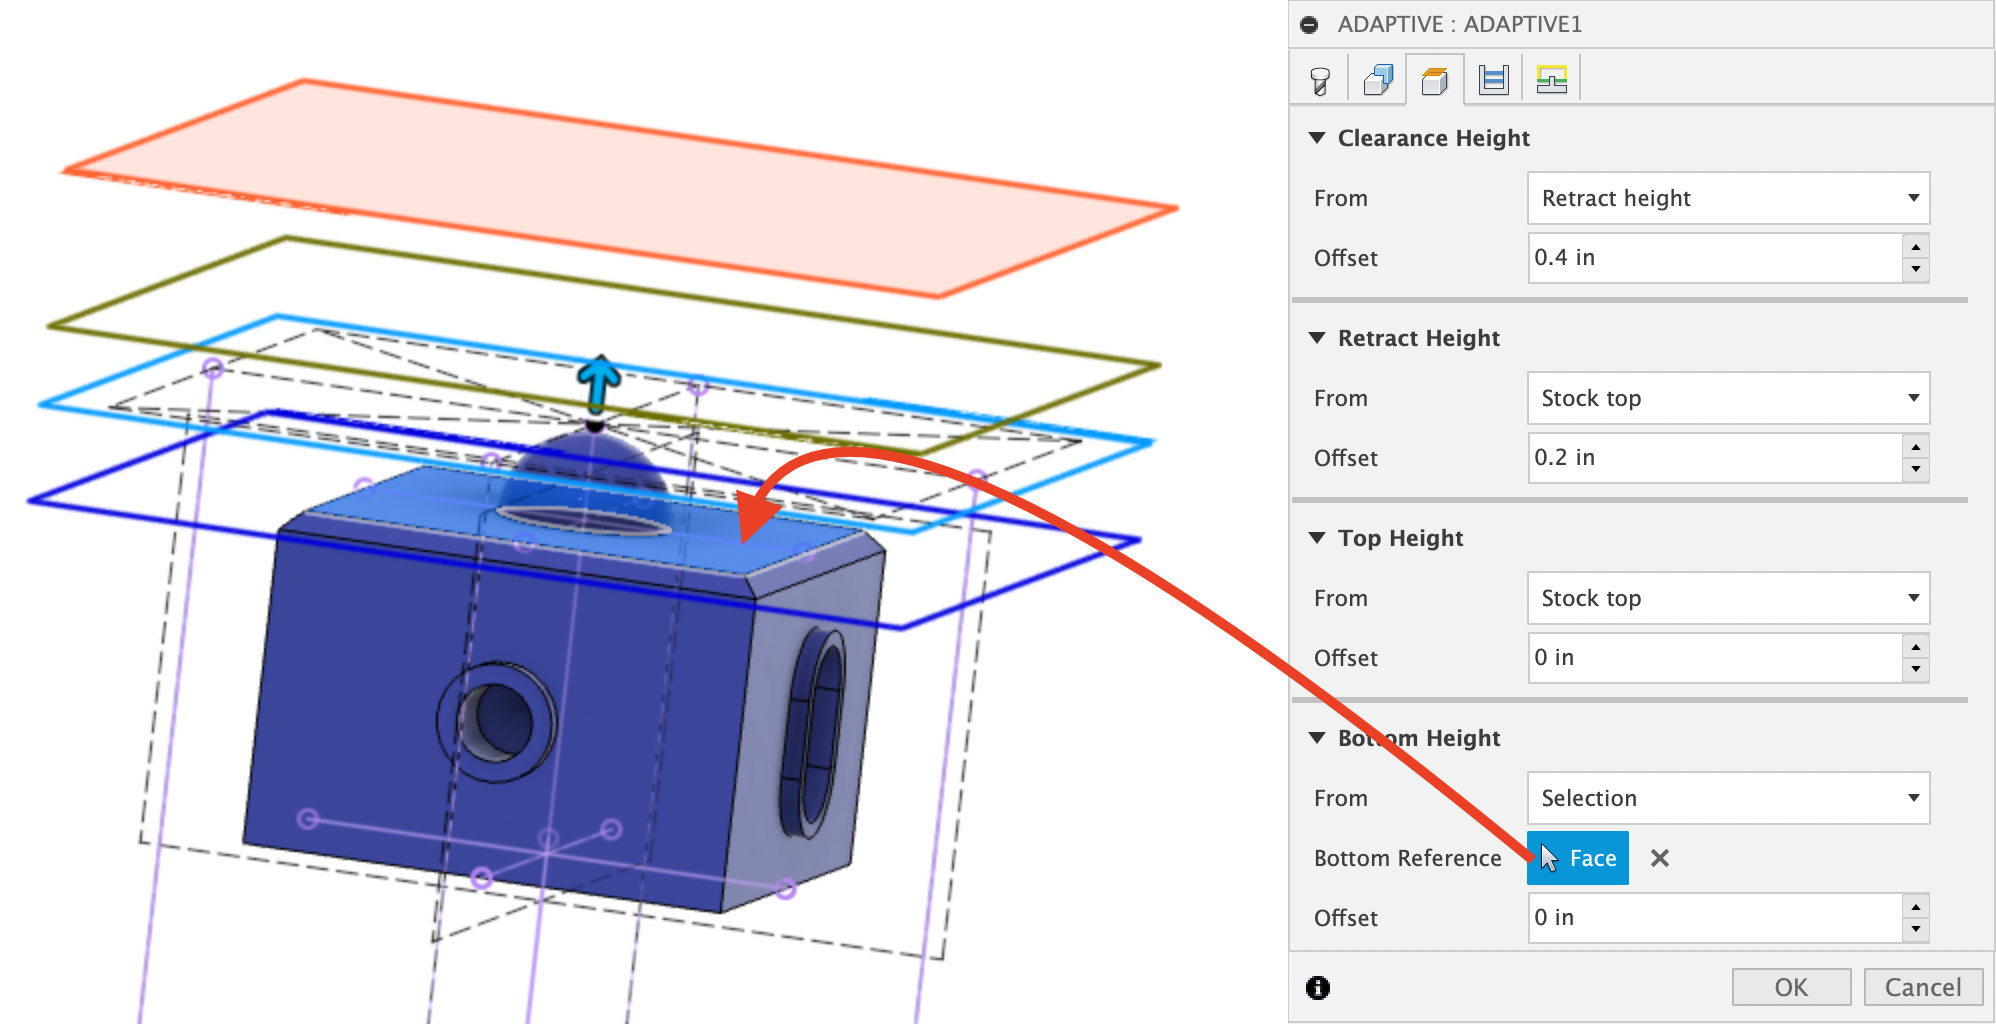
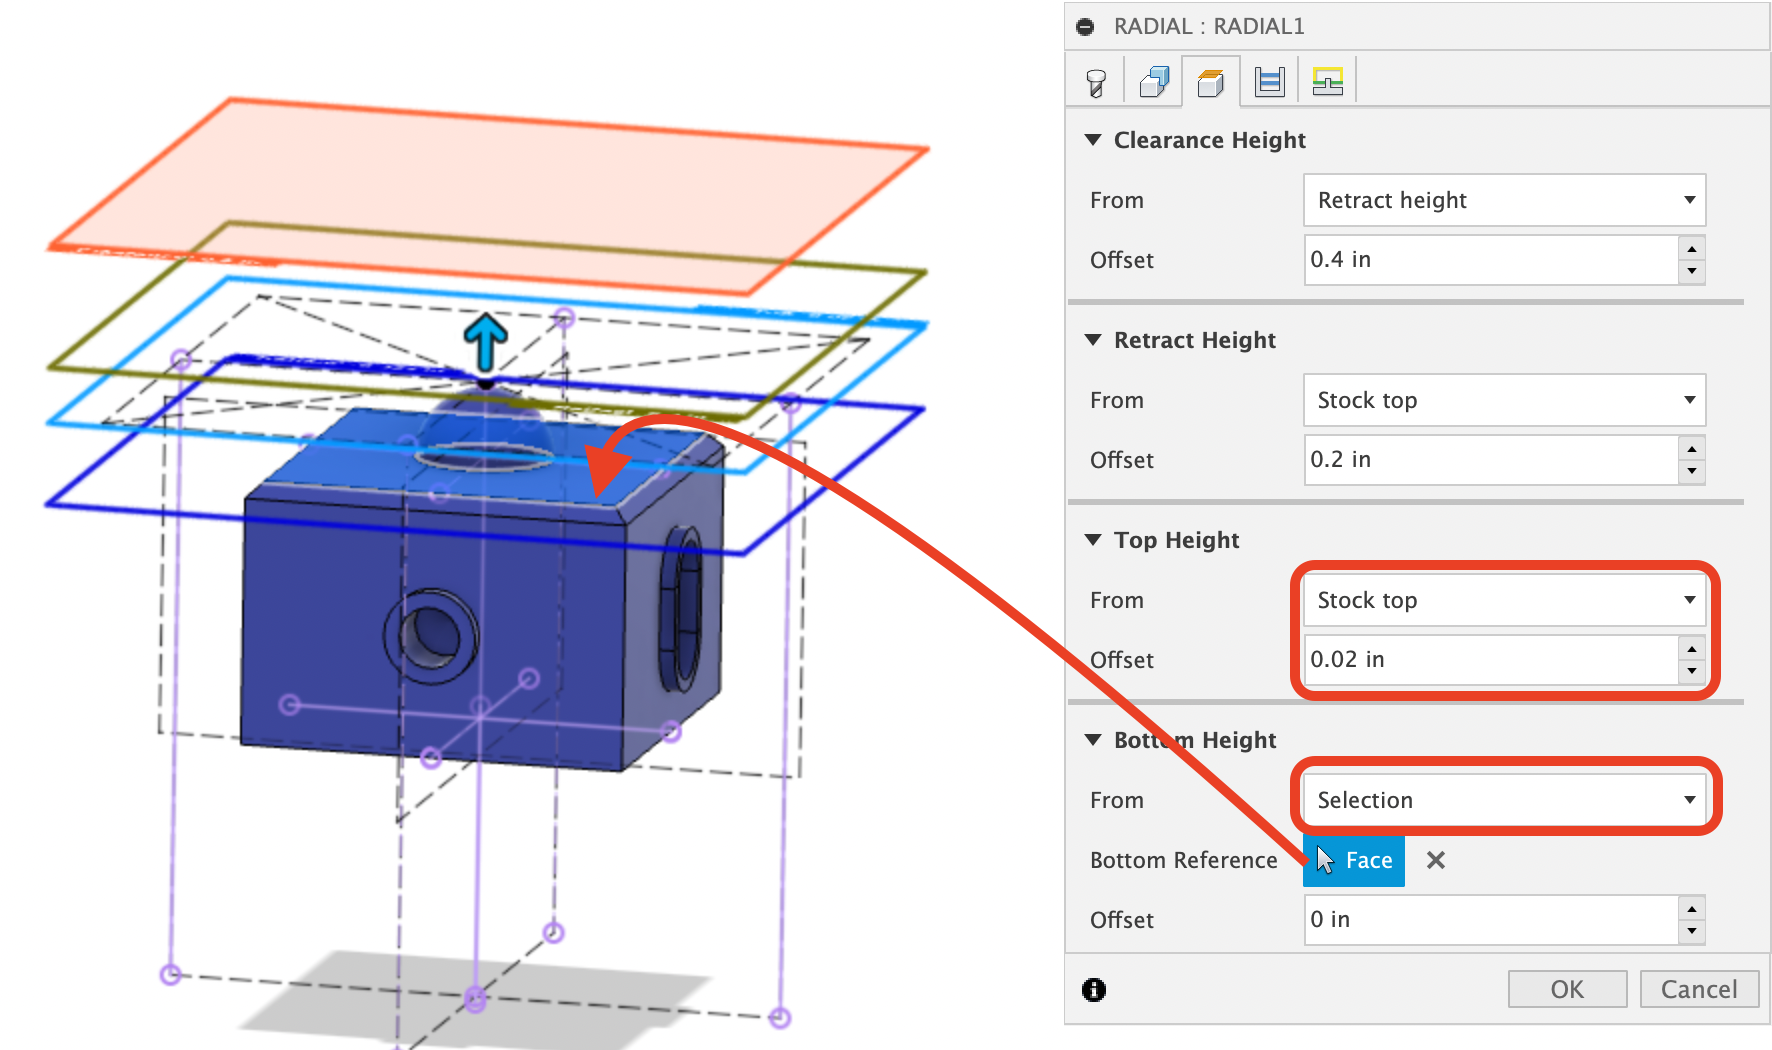
The Heights tab is where we set the bottom and top limits of material removal as well as safety clearances. To begin, scroll down to the Bottom Height section, change the dropdown to “Selection” and click the top surface of the part. (This tells the software that we want to machine all the way down to this surface). If you are having trouble selecting the top of the block, hover over it then click and hold to bring up a menu of options to select. Leave the offset as 0 since we have a flat face for reference (offsets can be helpful for more oddly-shaped parts that don’t have flat faces).
You will notice that the plane with the purple edges has now aligned with the top surface of the part:
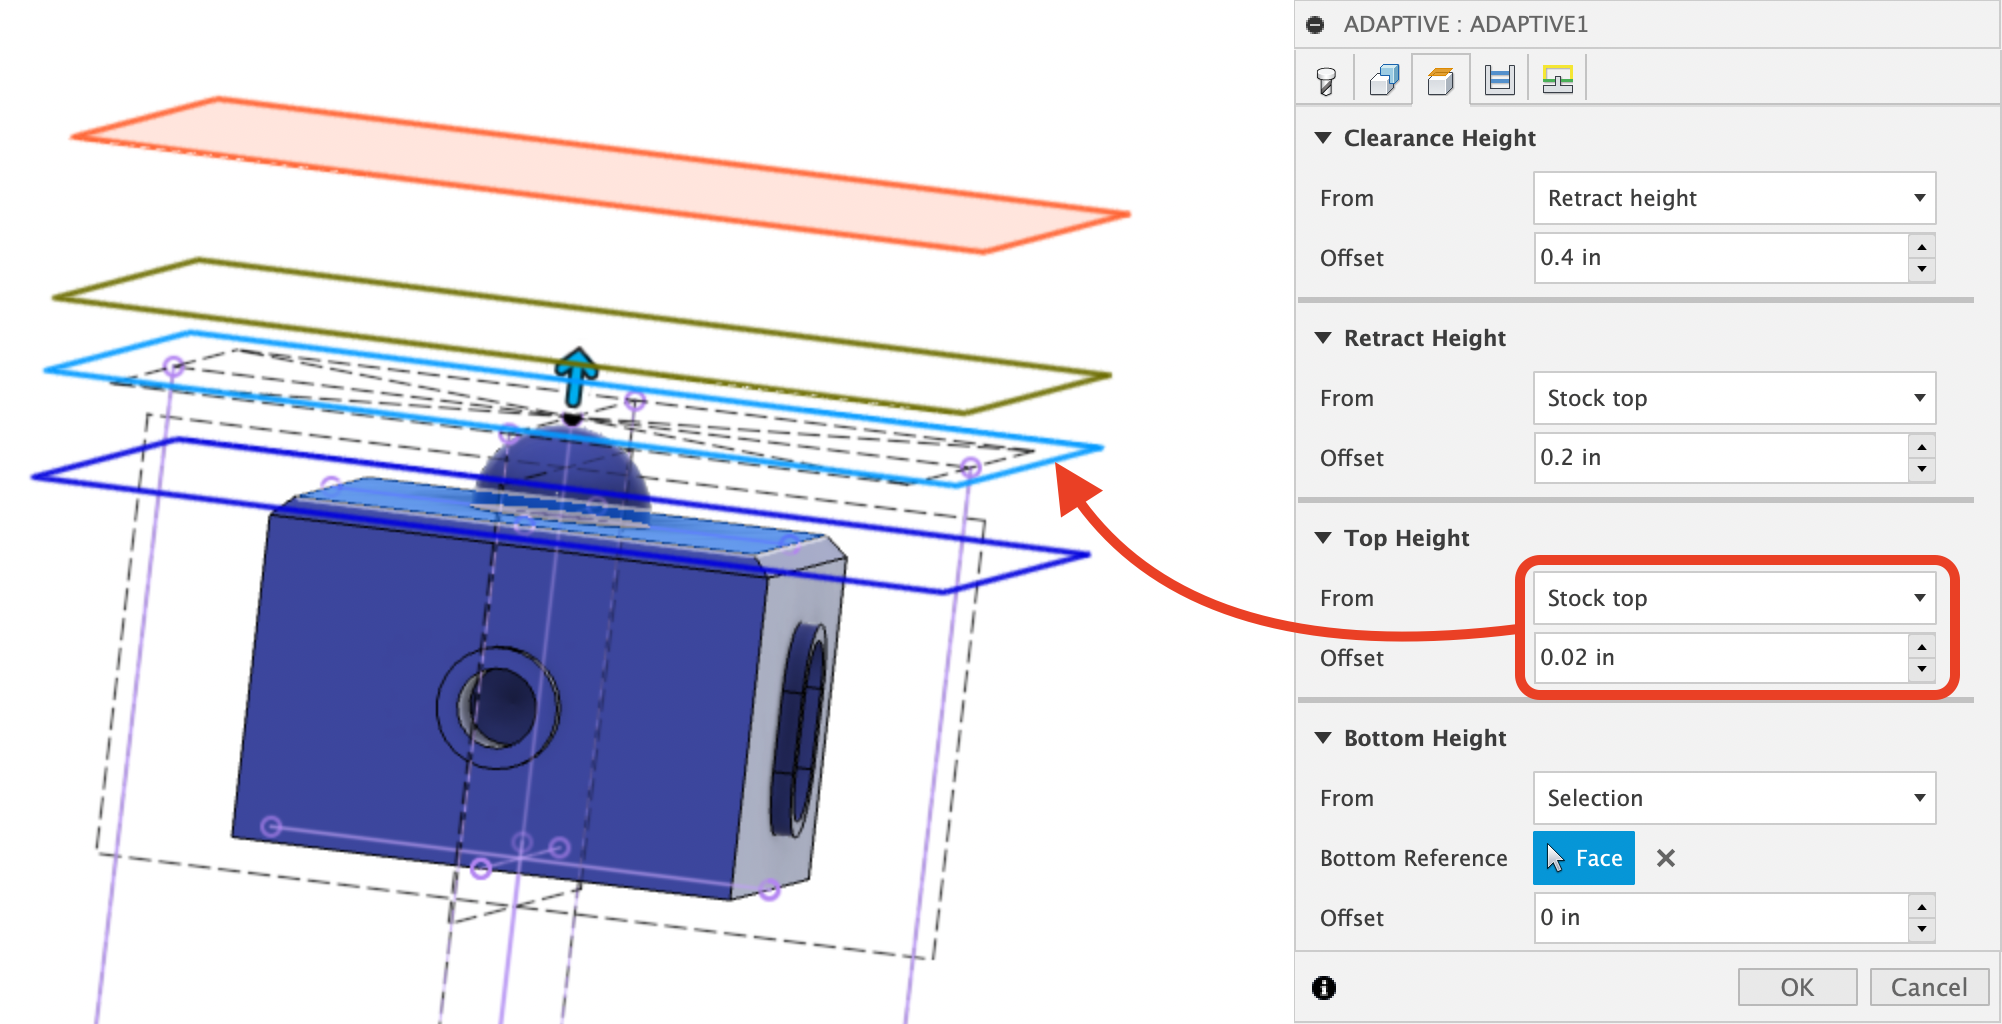
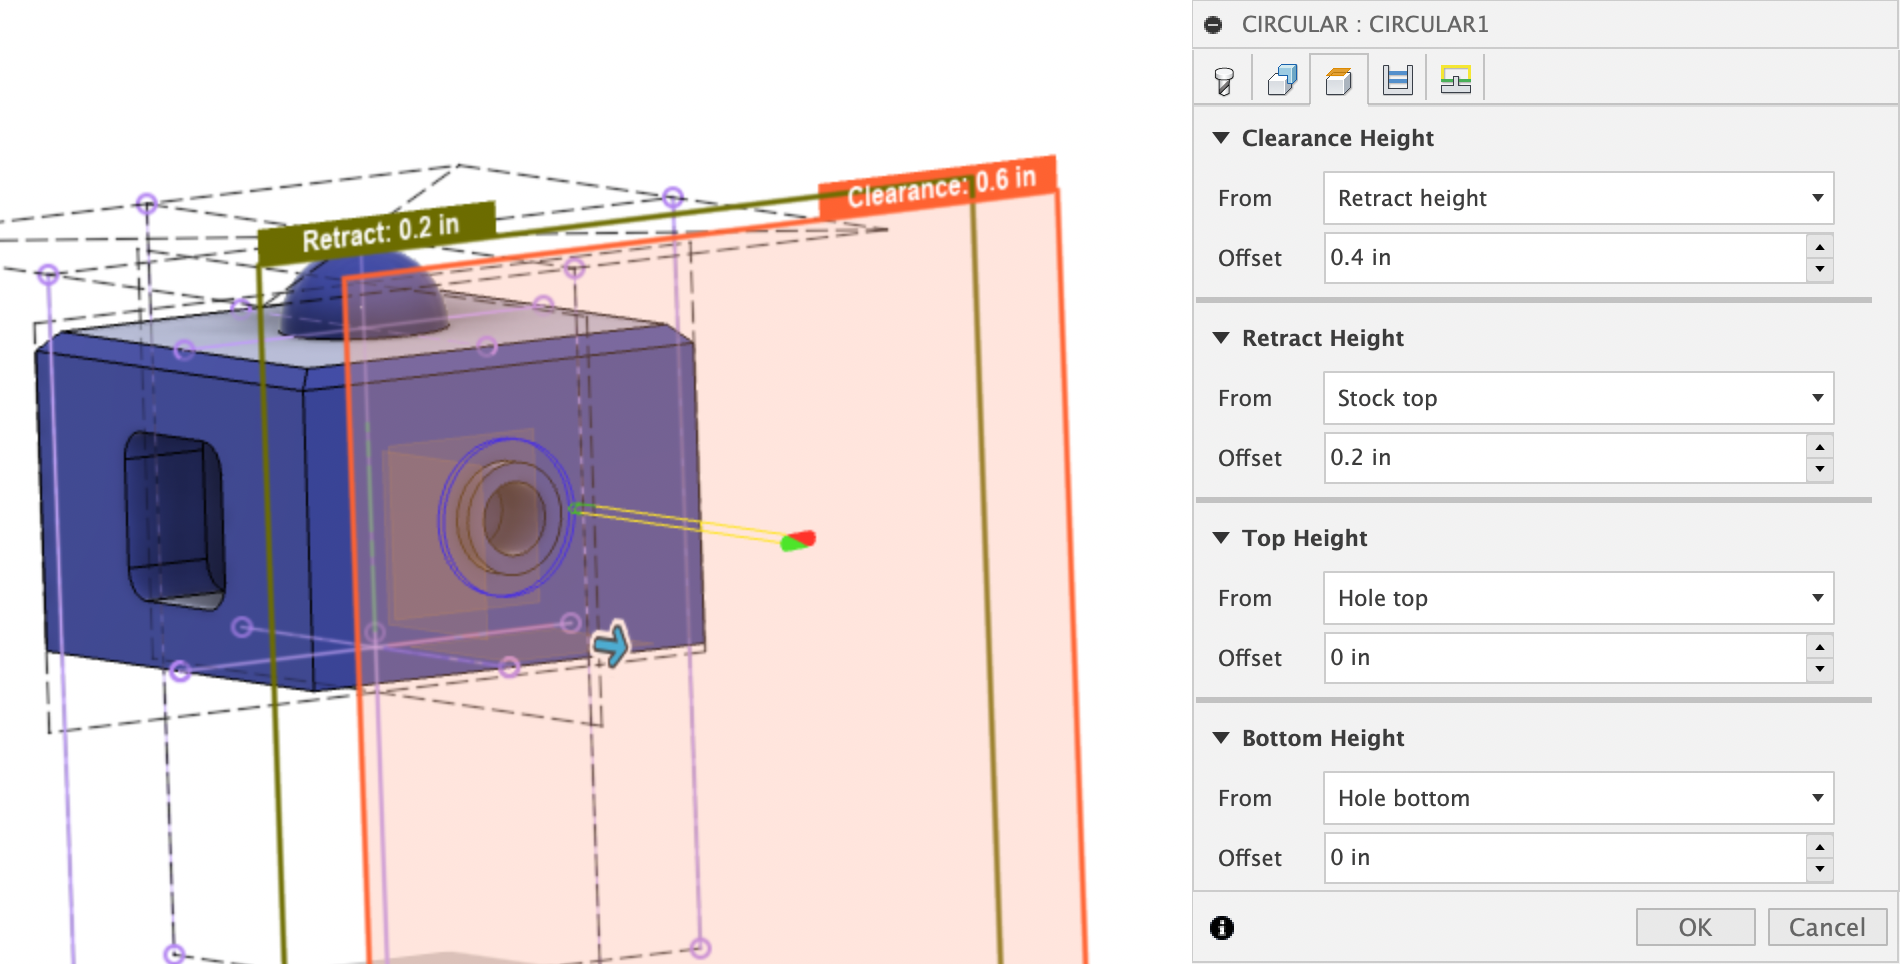
Next, we want to adjust the Top Height. This plane tells the machine where to expect to first come into contact with material and begin machining. Leaving this set to “Stock Top” and adding a 0.02” offset will allow for variations in stock size and provide a small safety factor. The Retract Height tells the software how far to retract the tool at the end of an operation and the Clearance Height tells the software how far to retract the tool to bring it back to a safe position away from the part when moving the machine. We will leave these two heights in their default configurations. (These heights can be adjusted to lessen the time it takes to complete an operation or increased to provide more clearance - the more they are lowered the more risk there is of crashing the machine). Verify your Heights tab looks the same as below, then continue to the next tab labeled “Passes”:
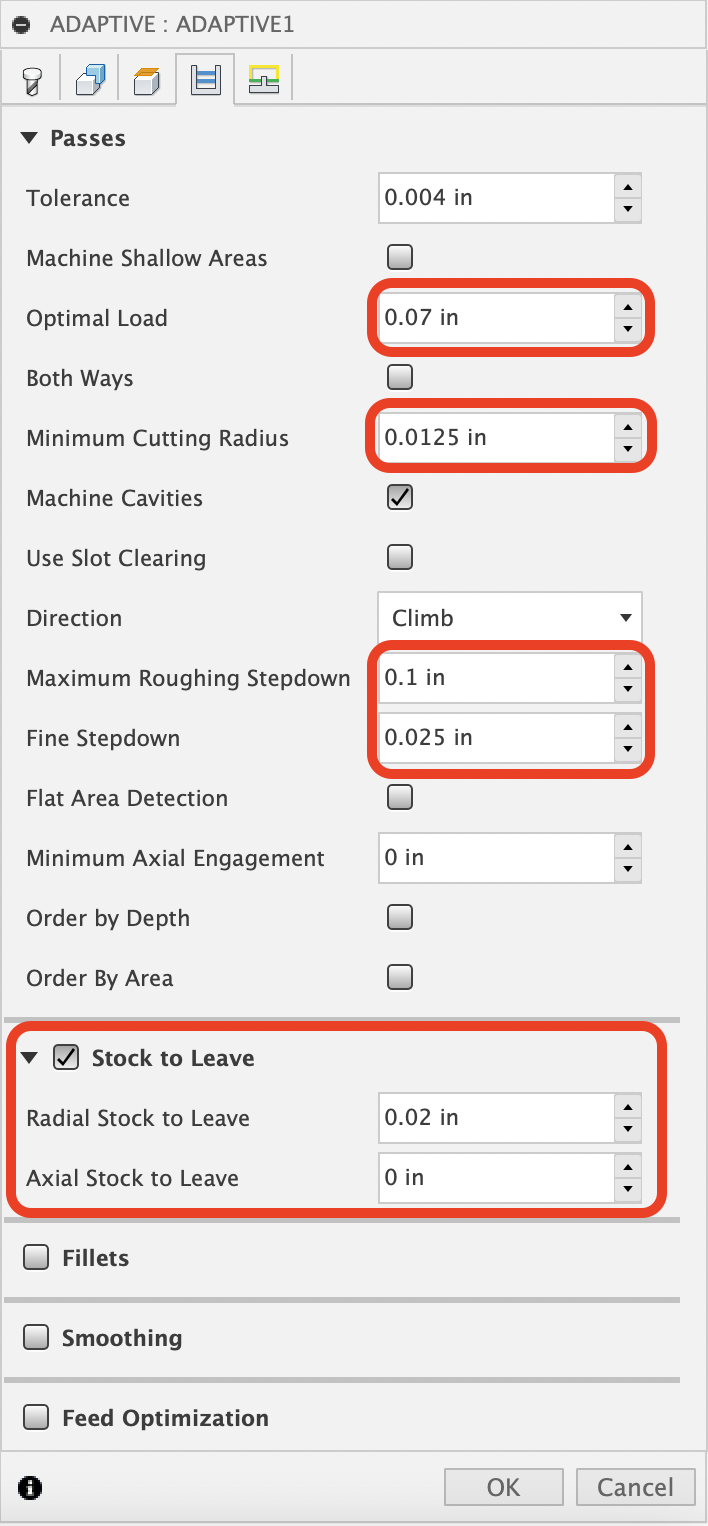
The “Passes” tab controls how much material is removed at any given time. Three values need to be adjusted to get a proper cut; "Optimal Load", "Maximum Roughing Stepdown”, “Fine Stepdown” and "Stock to Leave". The settings below work well for wax, you will probably want to decrease the “Optimal Load” to .05 or less for plastics. Note that for this operation, we have 0 inches for “Axial Stock to Leave” and 0.02 inches for “Radial Stock to Leave”. This means that in the axial direction (aligned with the shaft of the tool) we will cut all the way to our defined heights without leaving extra material for a finishing pass. However, we are leaving 0.02 inches of material perpendicular to the tool so that there is excess material left around the hemisphere for us to clean up with a finer operation for a better surface finish. (Adaptive clearing is more of a roughing operation).
With your Passes tab matching the image above, go to the final tab labelled “Linking”.
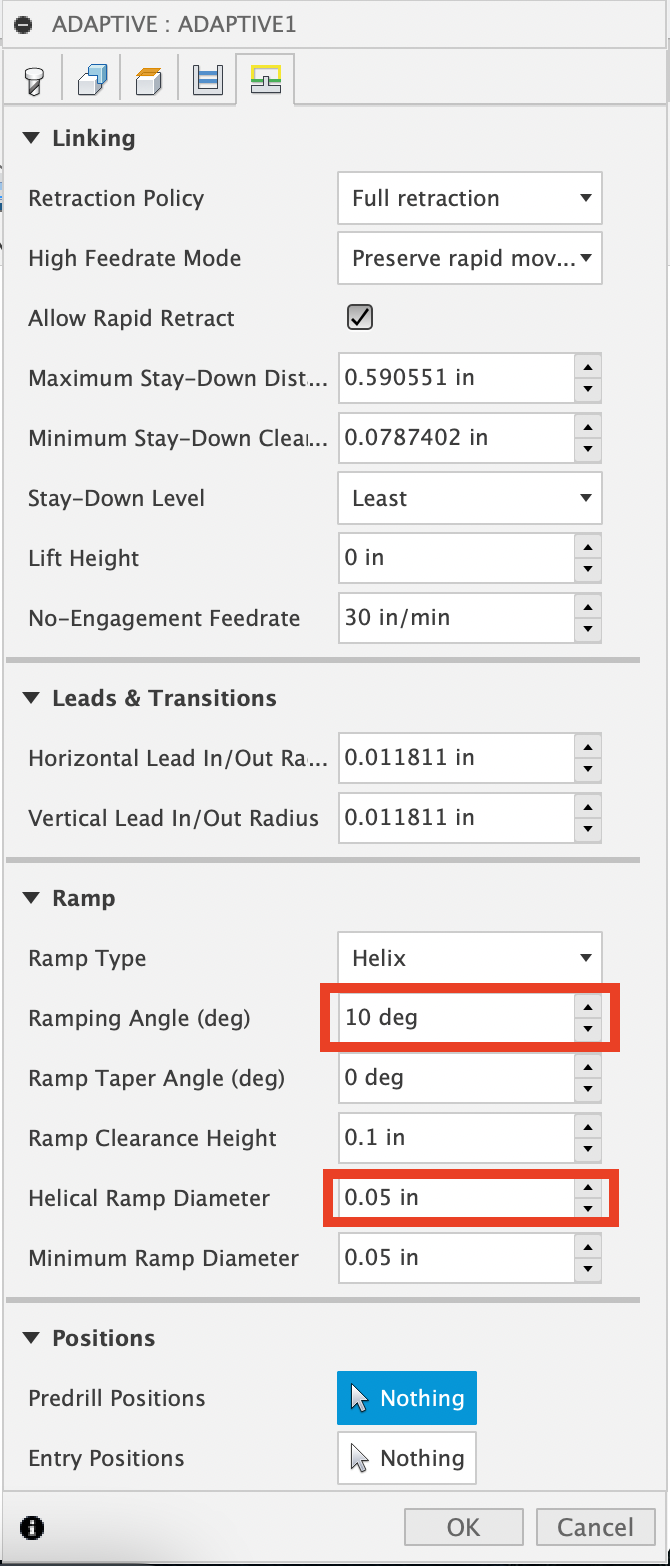
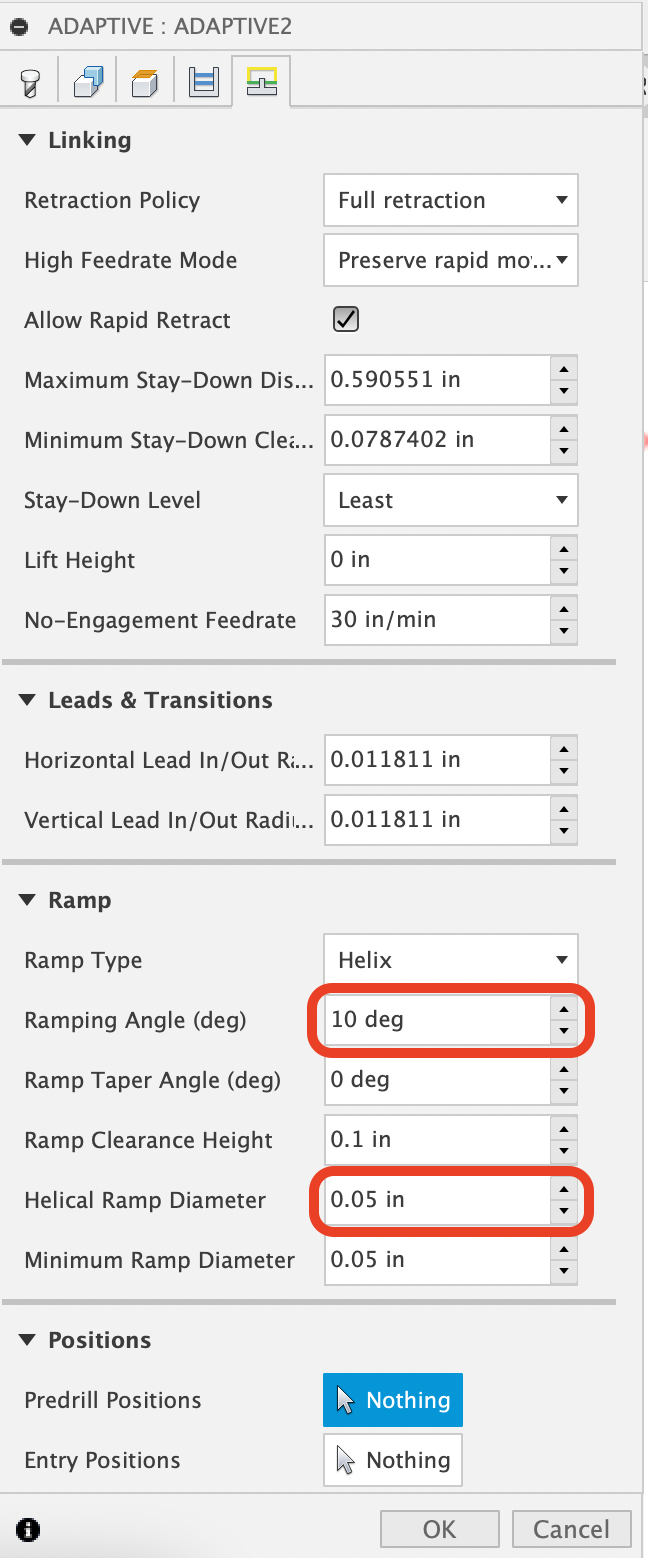
The last tab, "Linking" allows the user to fine tune the behavior of a tool path. For example, "No Engagement Feedrate" can be altered from 20 in/min to 40 in/min to save time when the tool is in a retract and not cutting. And the entrance and exit behavior of the toolpath can be adjusted.
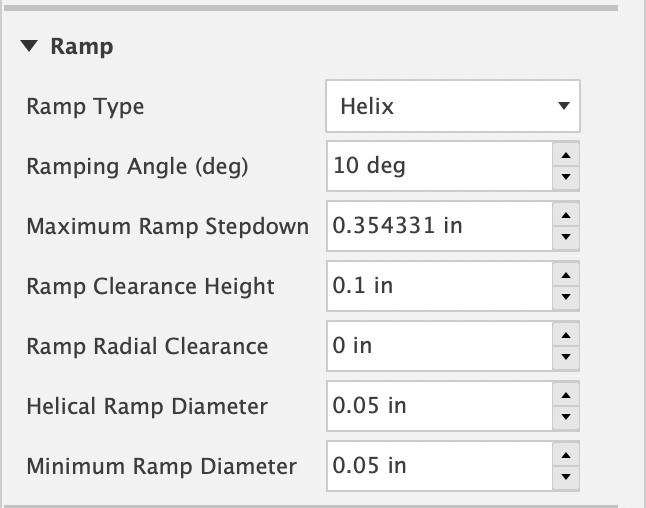
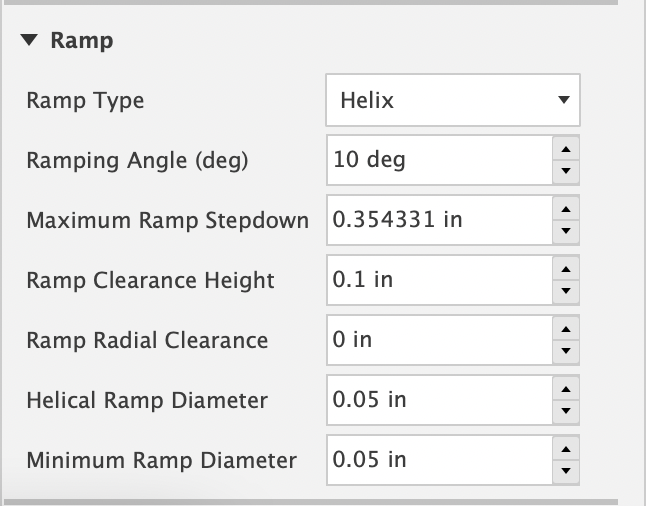
The only settings that have been changed in the screenshot below are decreasing the Helical Ramp Diameter to 0.05 inches and increasing the Ramping Angle from 2 degrees to 10 degrees. These changes will save time when machining. The harder the material that is being machined the shallower the ramp angle should be, 2 degrees is good for Aluminum, but 10 - 15 degrees is appropriate for wax.
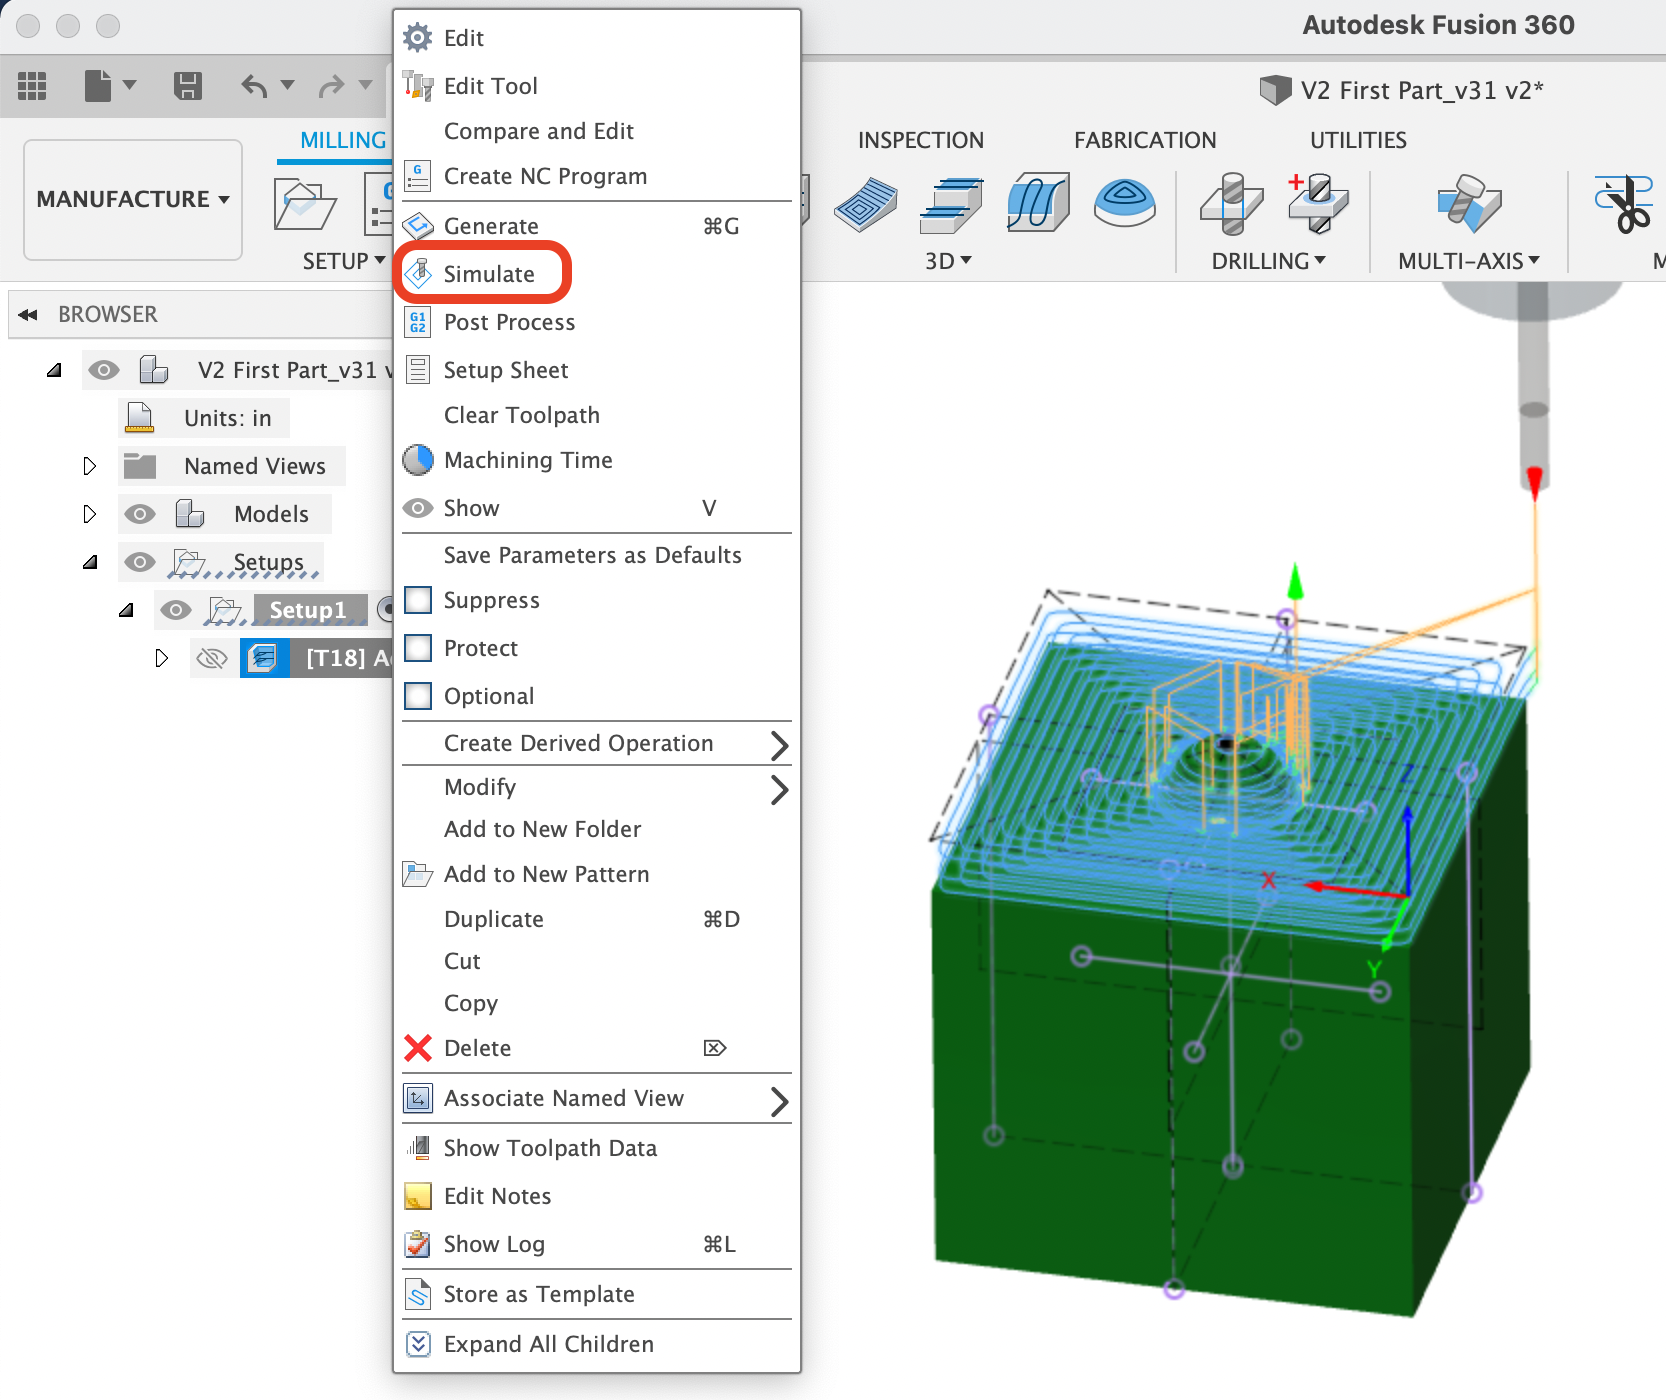
Once your Linking tab looks like the image above. Click “OK” to finish the toolpath. This will generate the toolpath for you to view - the lines represent to movement of the tool and the green block represents the amount of stock remaining after the operation. (If you do not see the toolpath, simply click on the operation on the left hand side of the window to bring it back up again. If you would like to view the motion of the toolpath, right-click on the operation and click Simulate to watch a video of the operation. If you do not see the green block or would like to learn more about visibility settings, this video is a good reference). Since we are done with the first operation, go ahead and save your progress.
Section 4.2: Radial Toolpath for the Top Face
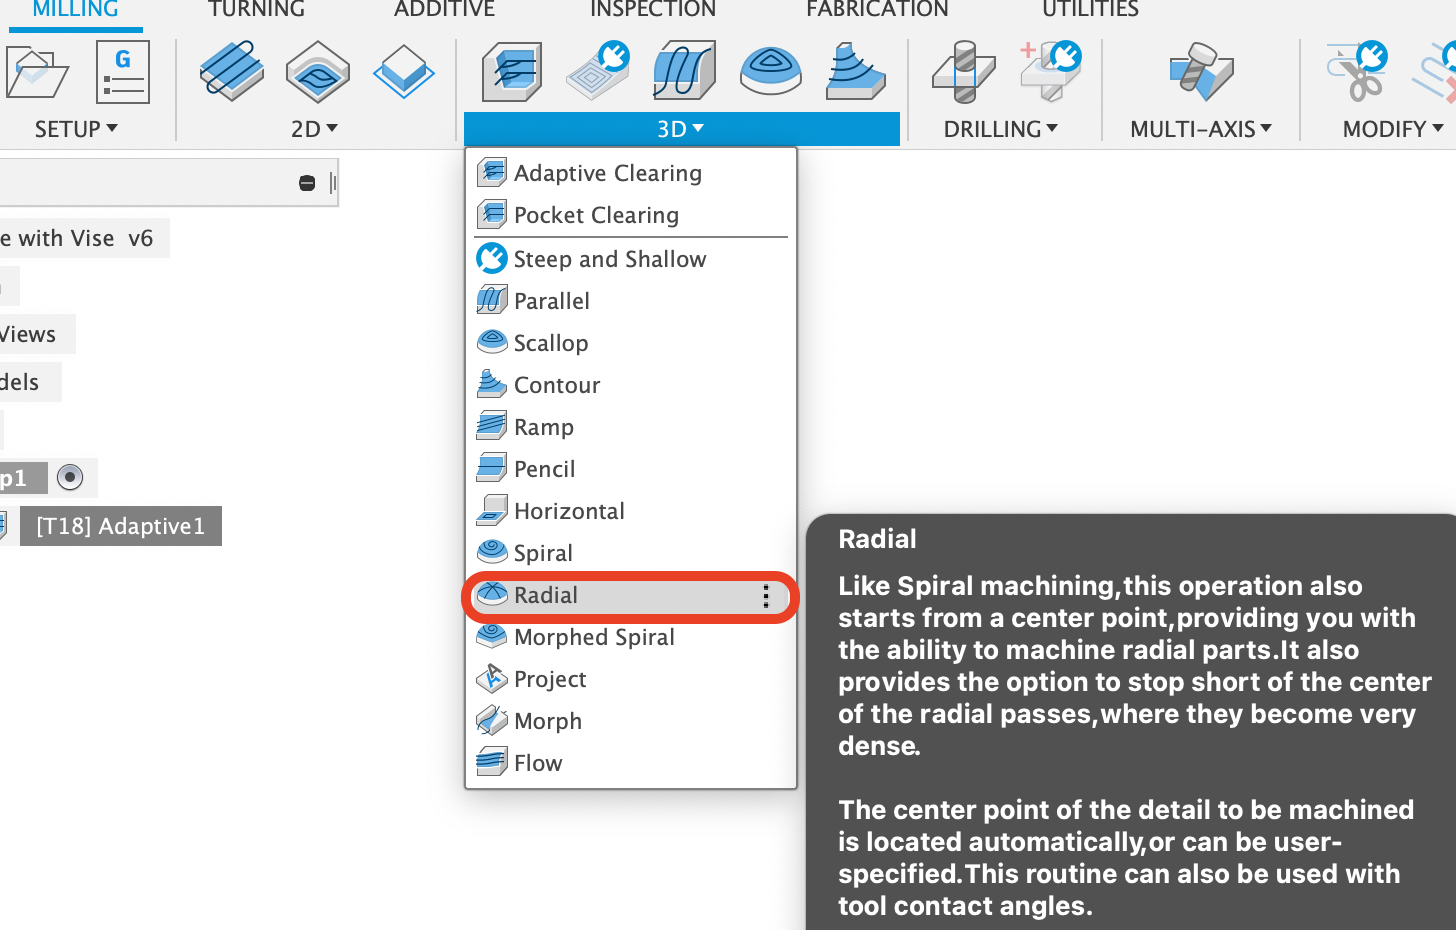
Since our machine is already oriented to machine the top of our part, we will now add a finishing pass to the hemisphere. A radial toolpath will be used - this path keeps the cutter in contact with the part and uses paths that are equally spaced radially around the selected center point. This toolpath will follow the contour of the face in the Z direction with toolpaths spaced a constant radial distance away from one another on the hemispherical face.
To begin, select the Radial toolpath from the 3D dropdown menu:
This (and almost all toolpaths) will bring up the same tabs as before with the Adaptive Clearing toolpath but some options will change. On the Tool tab, select the same tool as before, turn off coolant, and add the Spindle Speed and Feed per Tooth values we used before (the tool and feeds/speeds should auto-populate from the last toolpath). When done, your tooling tab should look like the following:
With the Tool tab looking the same as above, move to the Geometry tab. Here you will notice we have different options available than the Adaptive Clearing tool path since the Spiral is defined and constrained by different geometry. We will once again begin be setting up our Tool Orientation - using the same orientation as the previous toolpath will save machining time since the machine will not need to reorient itself. With the Tool Orientation box selected, make sure that the Origin dropdown box is set to “Setup WCS Origin” and that the Tool Orientation dropdown box is set to “Select Z axis/plane & X axis”. Then select the front right edge for the Z-axis and the lower front edge for the X-axis like before. Your coordinate system should once again look exactly like the following:
Next we need to fill in the Geometry section and tell the software which geometry will define the toolpath. Click the dropdown menu next to Machining Boundary and select “Selection”, then Click the “Nothing” box immediately below and select the base of the hemisphere. The base should now glow as a selected circle and the “Nothing” box will have changed to say “Chain”:
After that, click the “Nothing” box next to Center Points and select the axis going through the center of the hemisphere - that “Nothing” box will now change to “Point”. Then set the containment method to “Tool Outside Boundary” in order to ensure that the entire surface is machined and the tool stays to the outside of the selected geometry instead of cutting into the hemisphere:
The “Slope” setting box should be checked and should be set to allow the toolpath to machine from an angle of 0 degrees to angle of 90 degrees. After this, continue to the Heights tab.
The Heights tab will look exactly the same as in the previous Adaptive Clearing toolpath and we will set the options the same. As a reminder, Retract Height and Clearance Height are left as the default, Top Height is set to “stock top” (but offset 0.02” to accommodate stock variances), and Bottom Height is changed to “Selection” with the top surface of the part being selected. Once your Heights tab looks like the following, progress to the Passes tab:
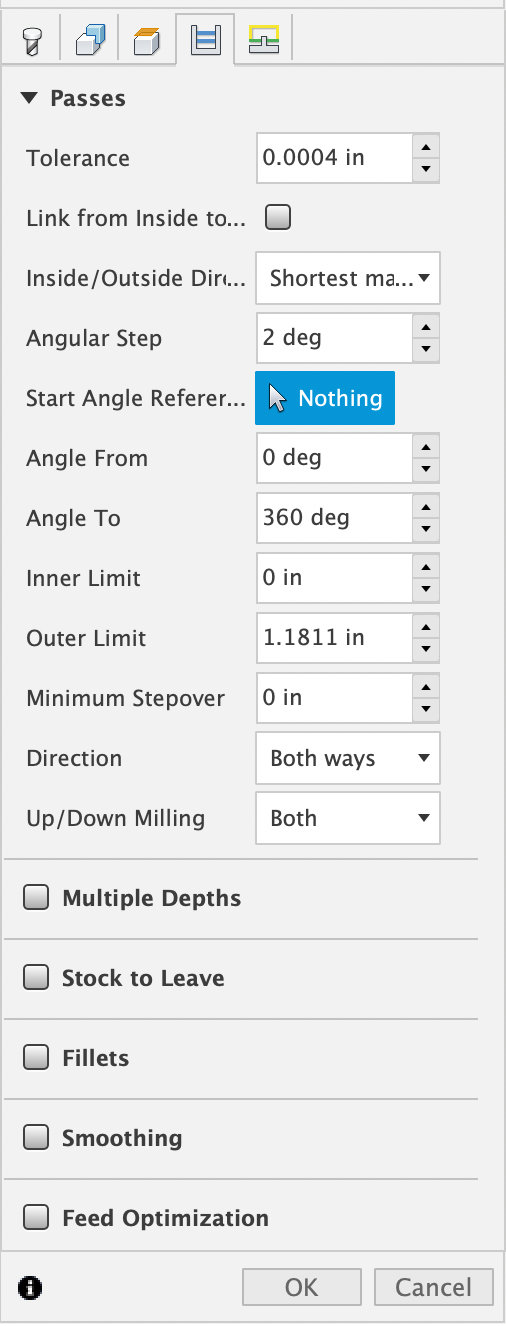
Under the “Passes” tab set the angular step size. This controls how close together the tool paths are. The closer these paths are to one another, the better the finish will be, but if they are farther apart the path will take less time. A step size of 2 degrees will work ok for this application (the larger the part feature is the closer together the toolpaths need to be).
The “Angle From” and “Angle To” settings control whether the entire circumference of the surface will be machined. We want all of it so we want to go from 0 degrees to 360 degrees. All other options can be left as the default. We will allow the tool to cut both directions since we are prioritizing speed over surface finish. We do not want to use the Stock to Leave option here since this is our finishing pass. Once your Passes tab looks like the following, progress to the final Linking tab:
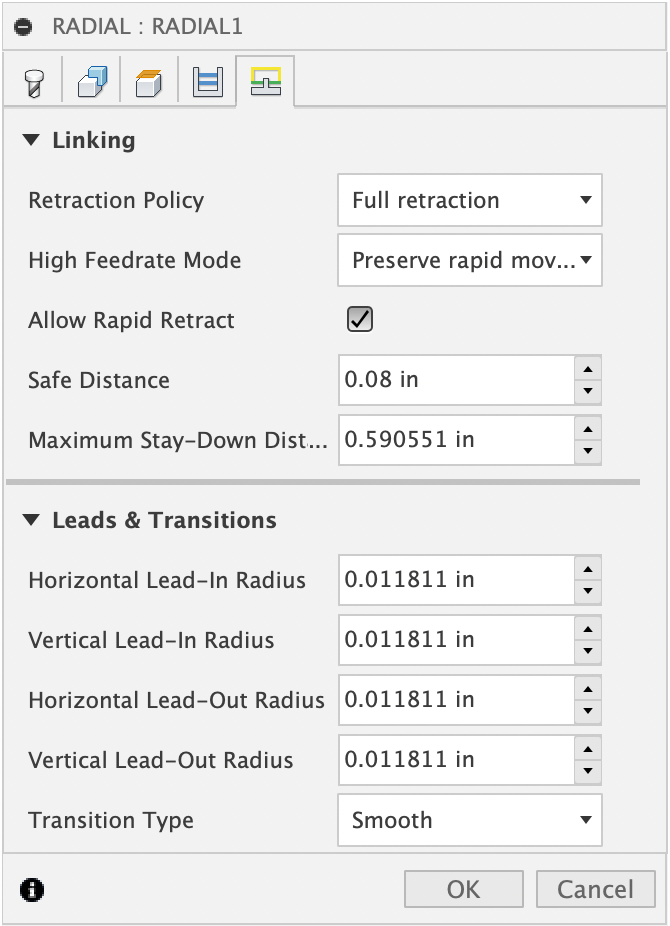
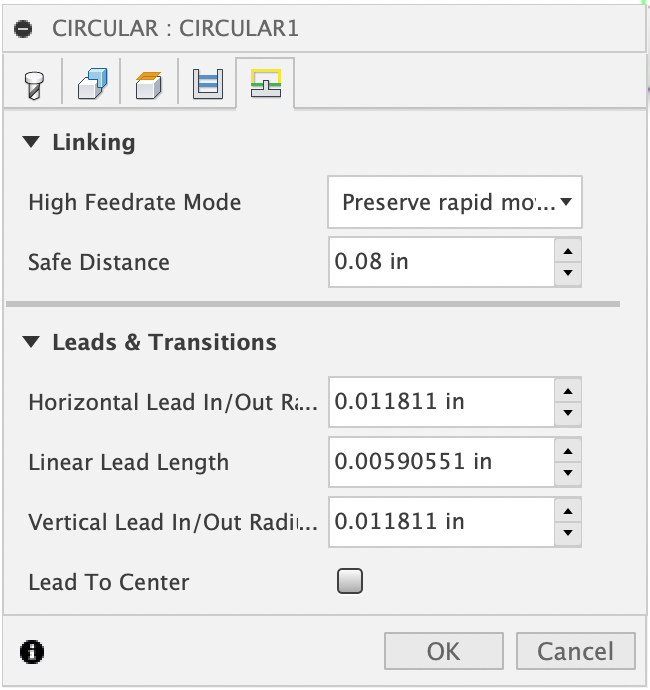
The settings in the “Linking” tab can be left at the defaults. For the 3mm Datron Tool 18, this will look like the following:
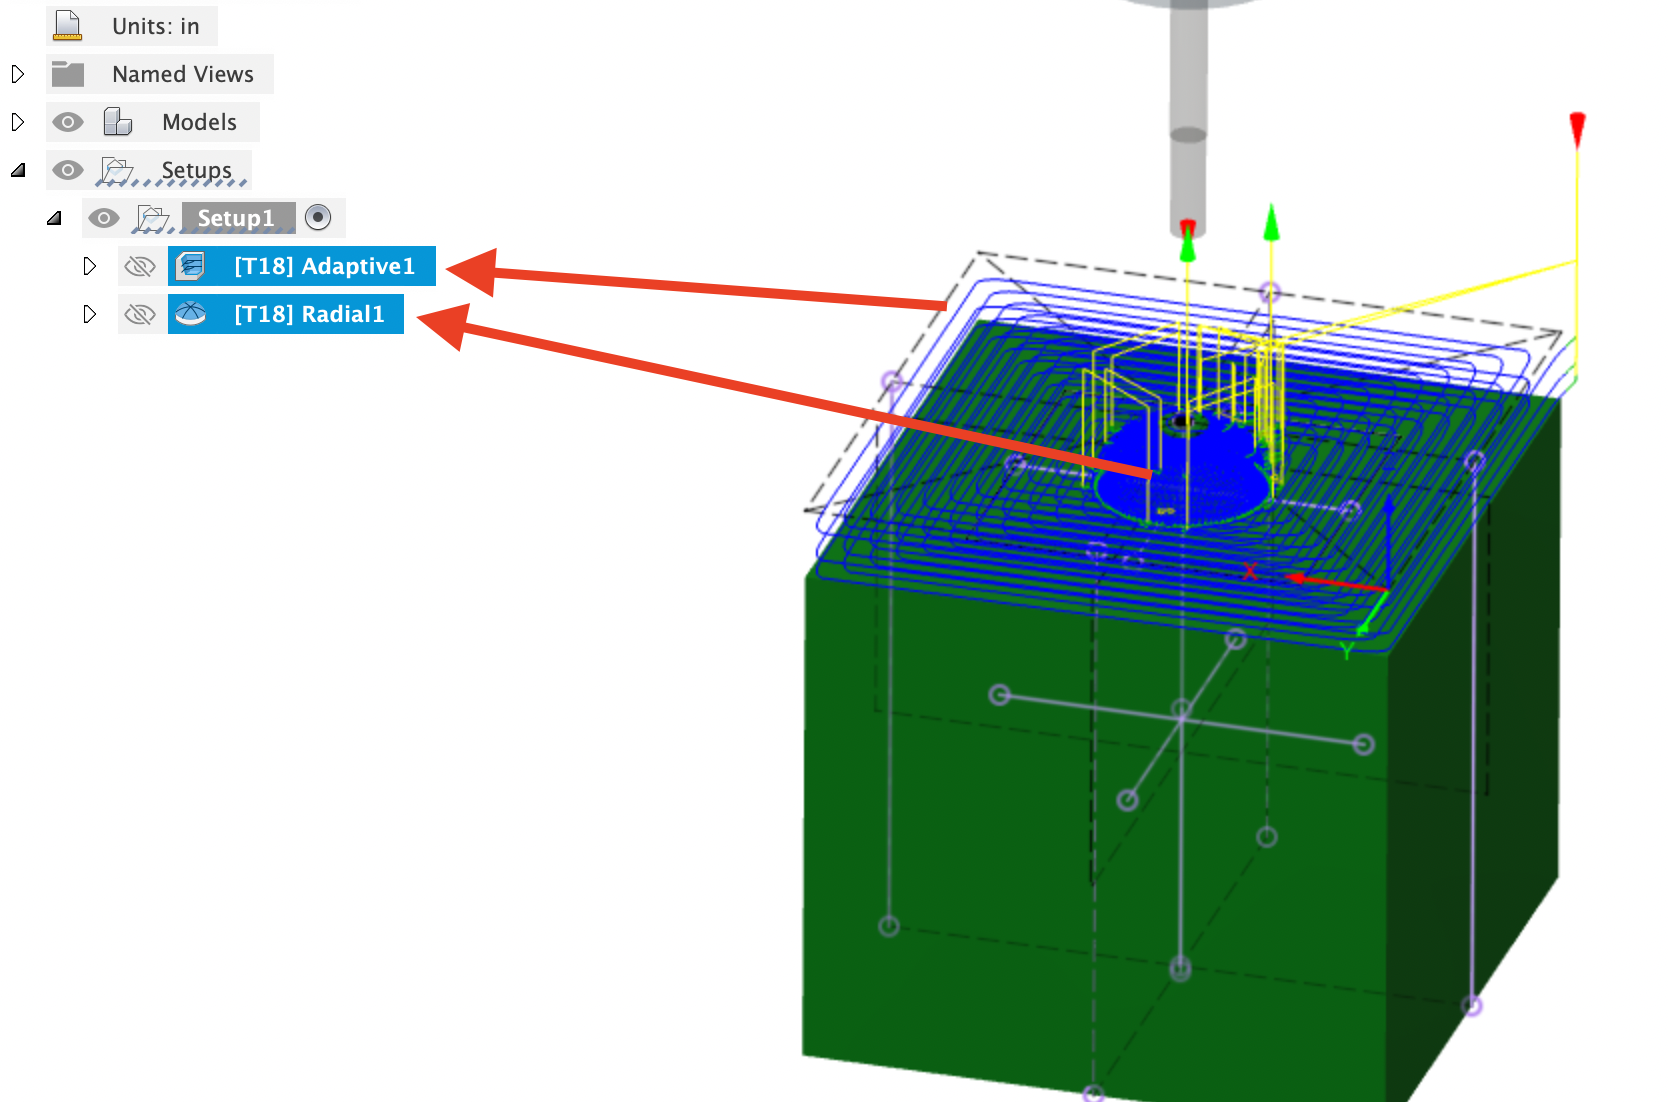
Hit the “OK” button to finish this toolpath. If you would like to preview the tool path, click on it on the left side of the window. If you would like to preview all toolpaths so far, hold the “shift” key and click both toolpaths. If you would like to simulate one or both toolpaths, right-click and select simulate. Once you are done, save your current progress.
| Info |
|---|
Reference Note: Simulating all of your toolpaths is a great way to remember which features are complete and which areas still need material removed to complete the part |
Some parts will have many different toolpaths and it can be confusing to remember which is which. By clicking on the toolpath on the left side of the screen, and then clicking again, you can rename it something that is easier to remember such as “Top Clearing” and “Top Radial”:
Section 4.3: Adaptive Clearing for the Oval Slotted Face
Next, we will use 3D adaptive clearing to remove material from the slotted face with the oval-shaped recess. Begin by creating a new toolpath from the 3D dropdown menu and selecting Adaptive Clearing. Then set up the Tool tab the same as before so that it matches the image below:
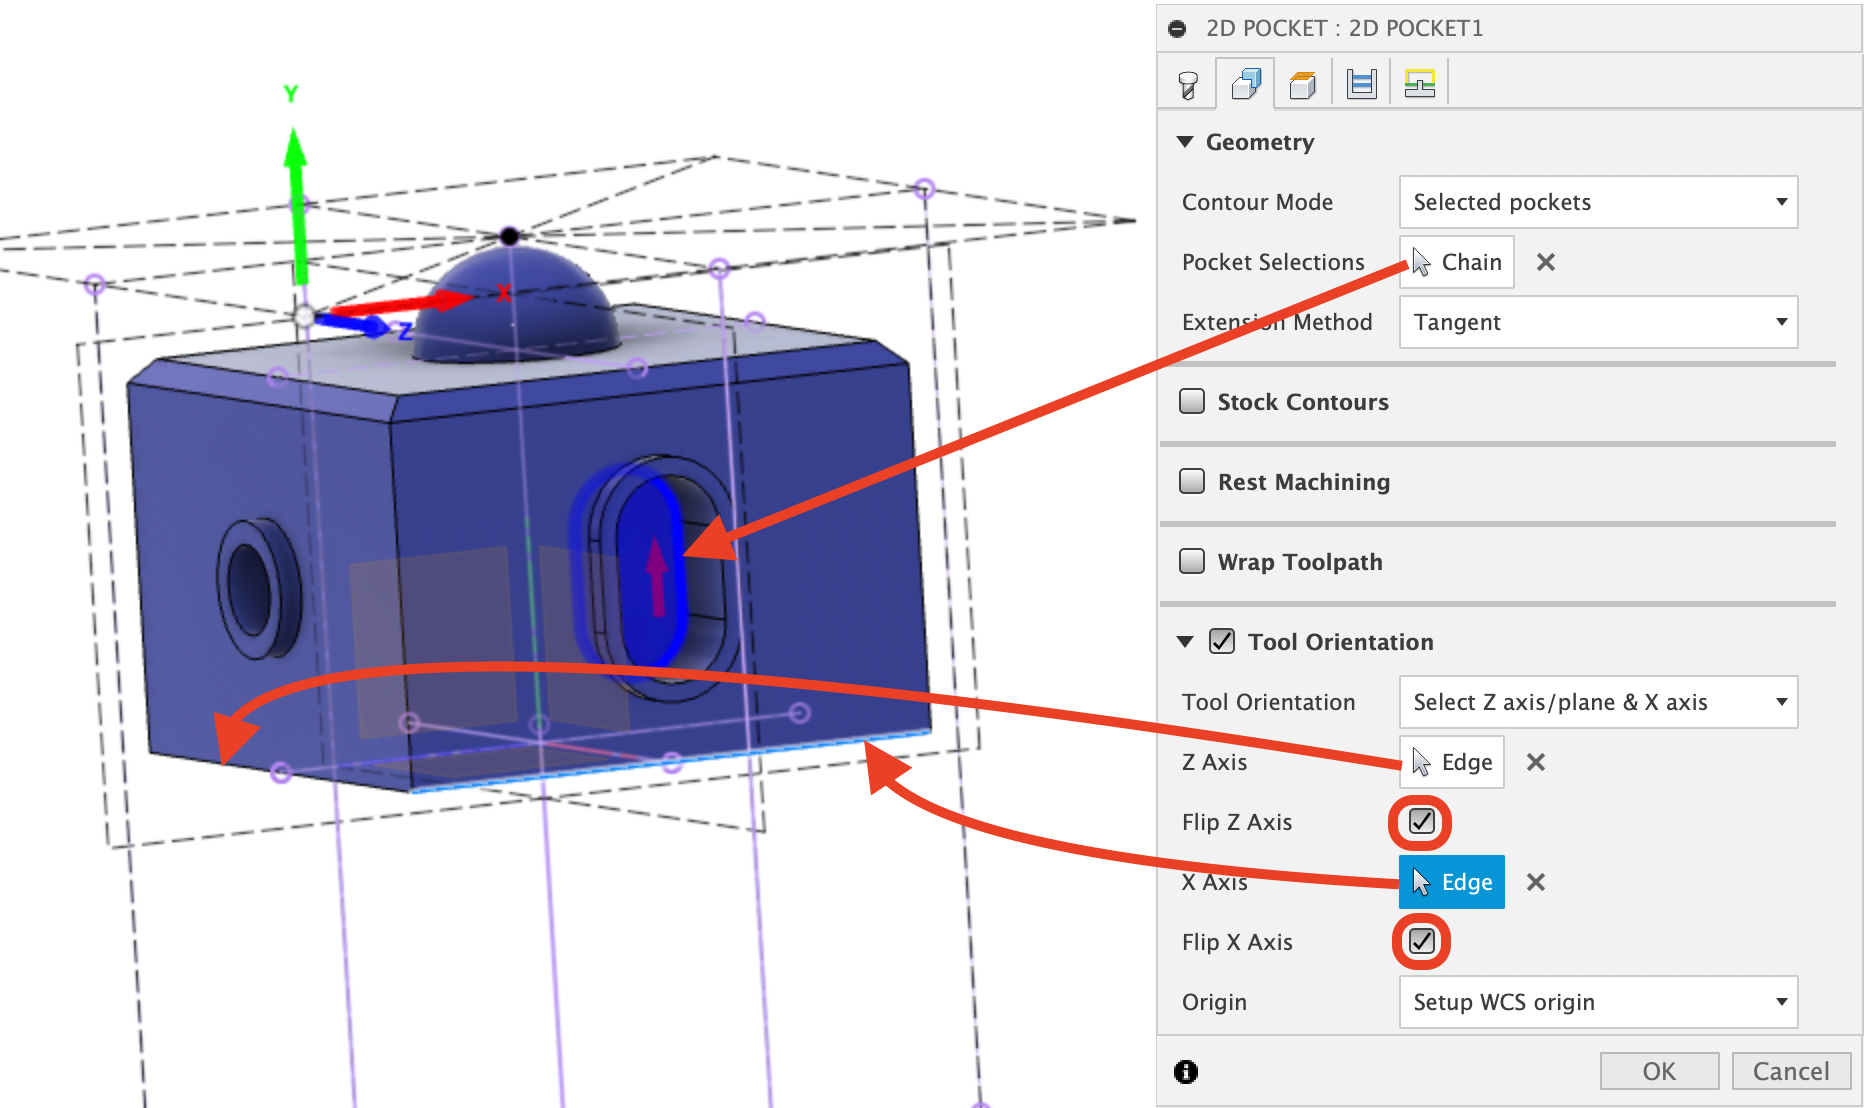
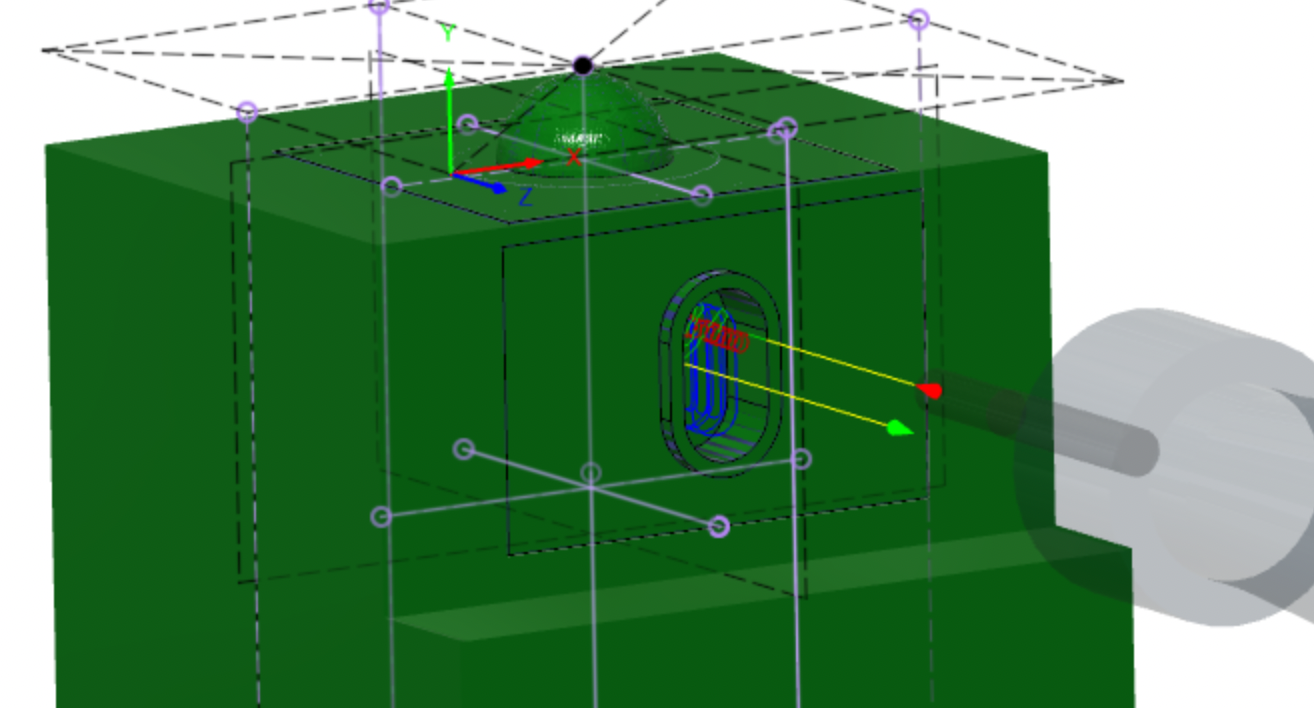
Next, move to the Geometry tab and begin by setting up the coordinate system. This time we are machining on a different face so we will need to orient using a new coordinate system. We will need to align the Z-axis perpendicular to the slotted face and we will want the Y-axis facing upwards (so that the machine is rotated back to having the B-table level). With the Tool Orientation box selected, make sure that the Origin dropdown box is set to “Setup WCS Origin” and that the Tool Orientation dropdown box is set to “Select Z axis/plane & X axis”. Then select the lower front edge for the Z-axis and the lower right edge for the X-axis. (Remember to check the “Flip _ Axis” buttons if you need to mirror one of the axes). Your coordinate system should once again look exactly like the following:
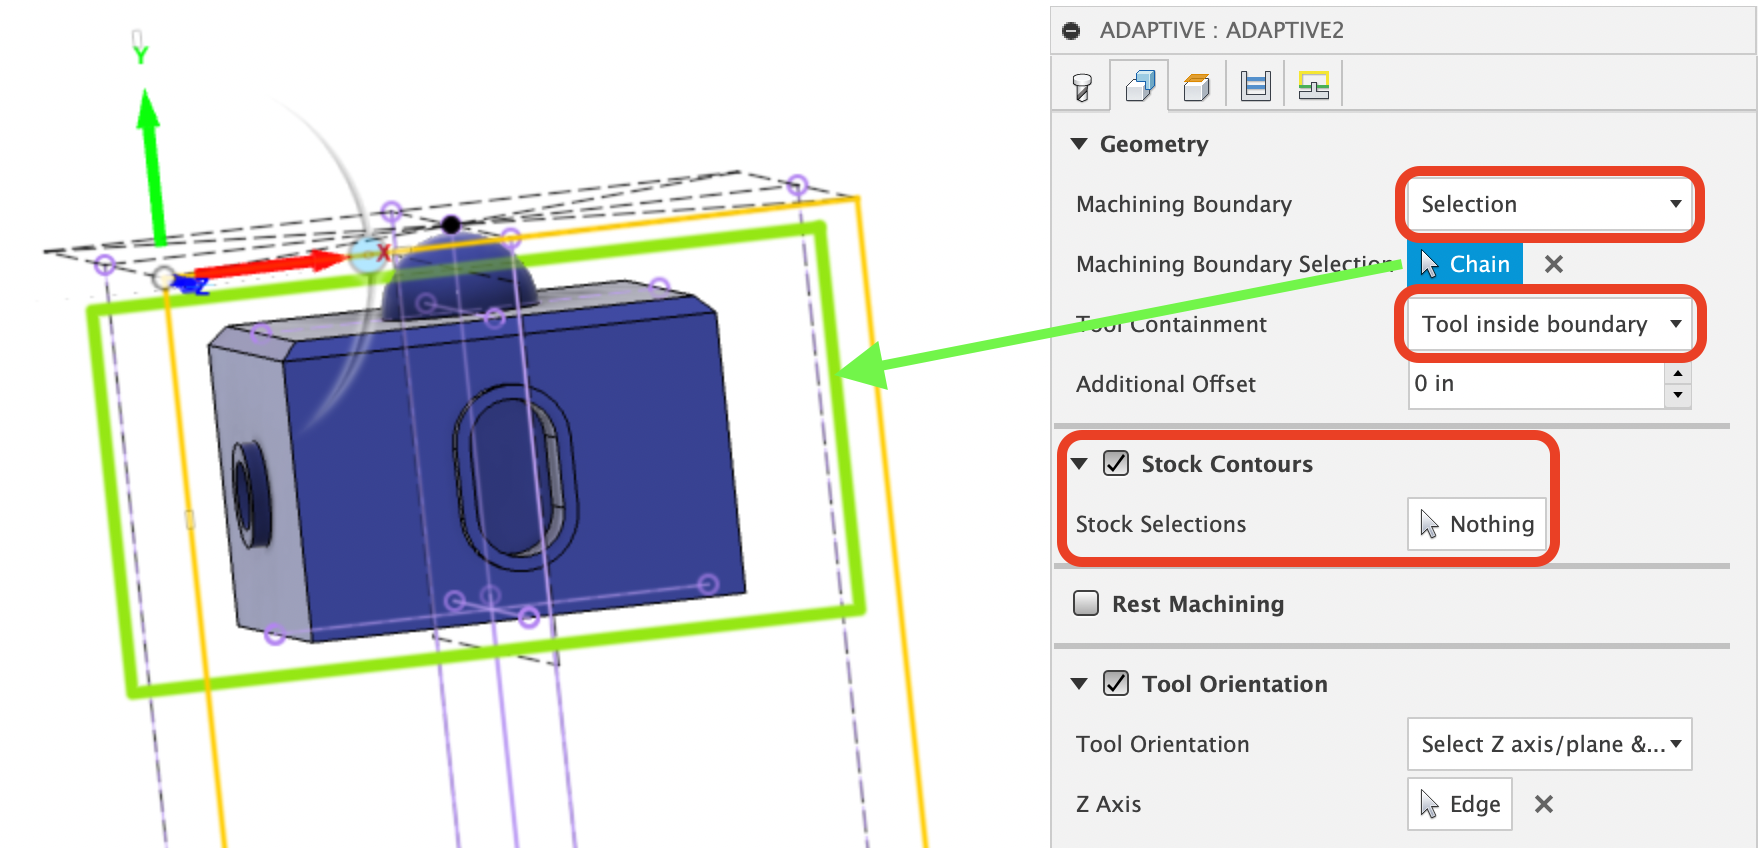
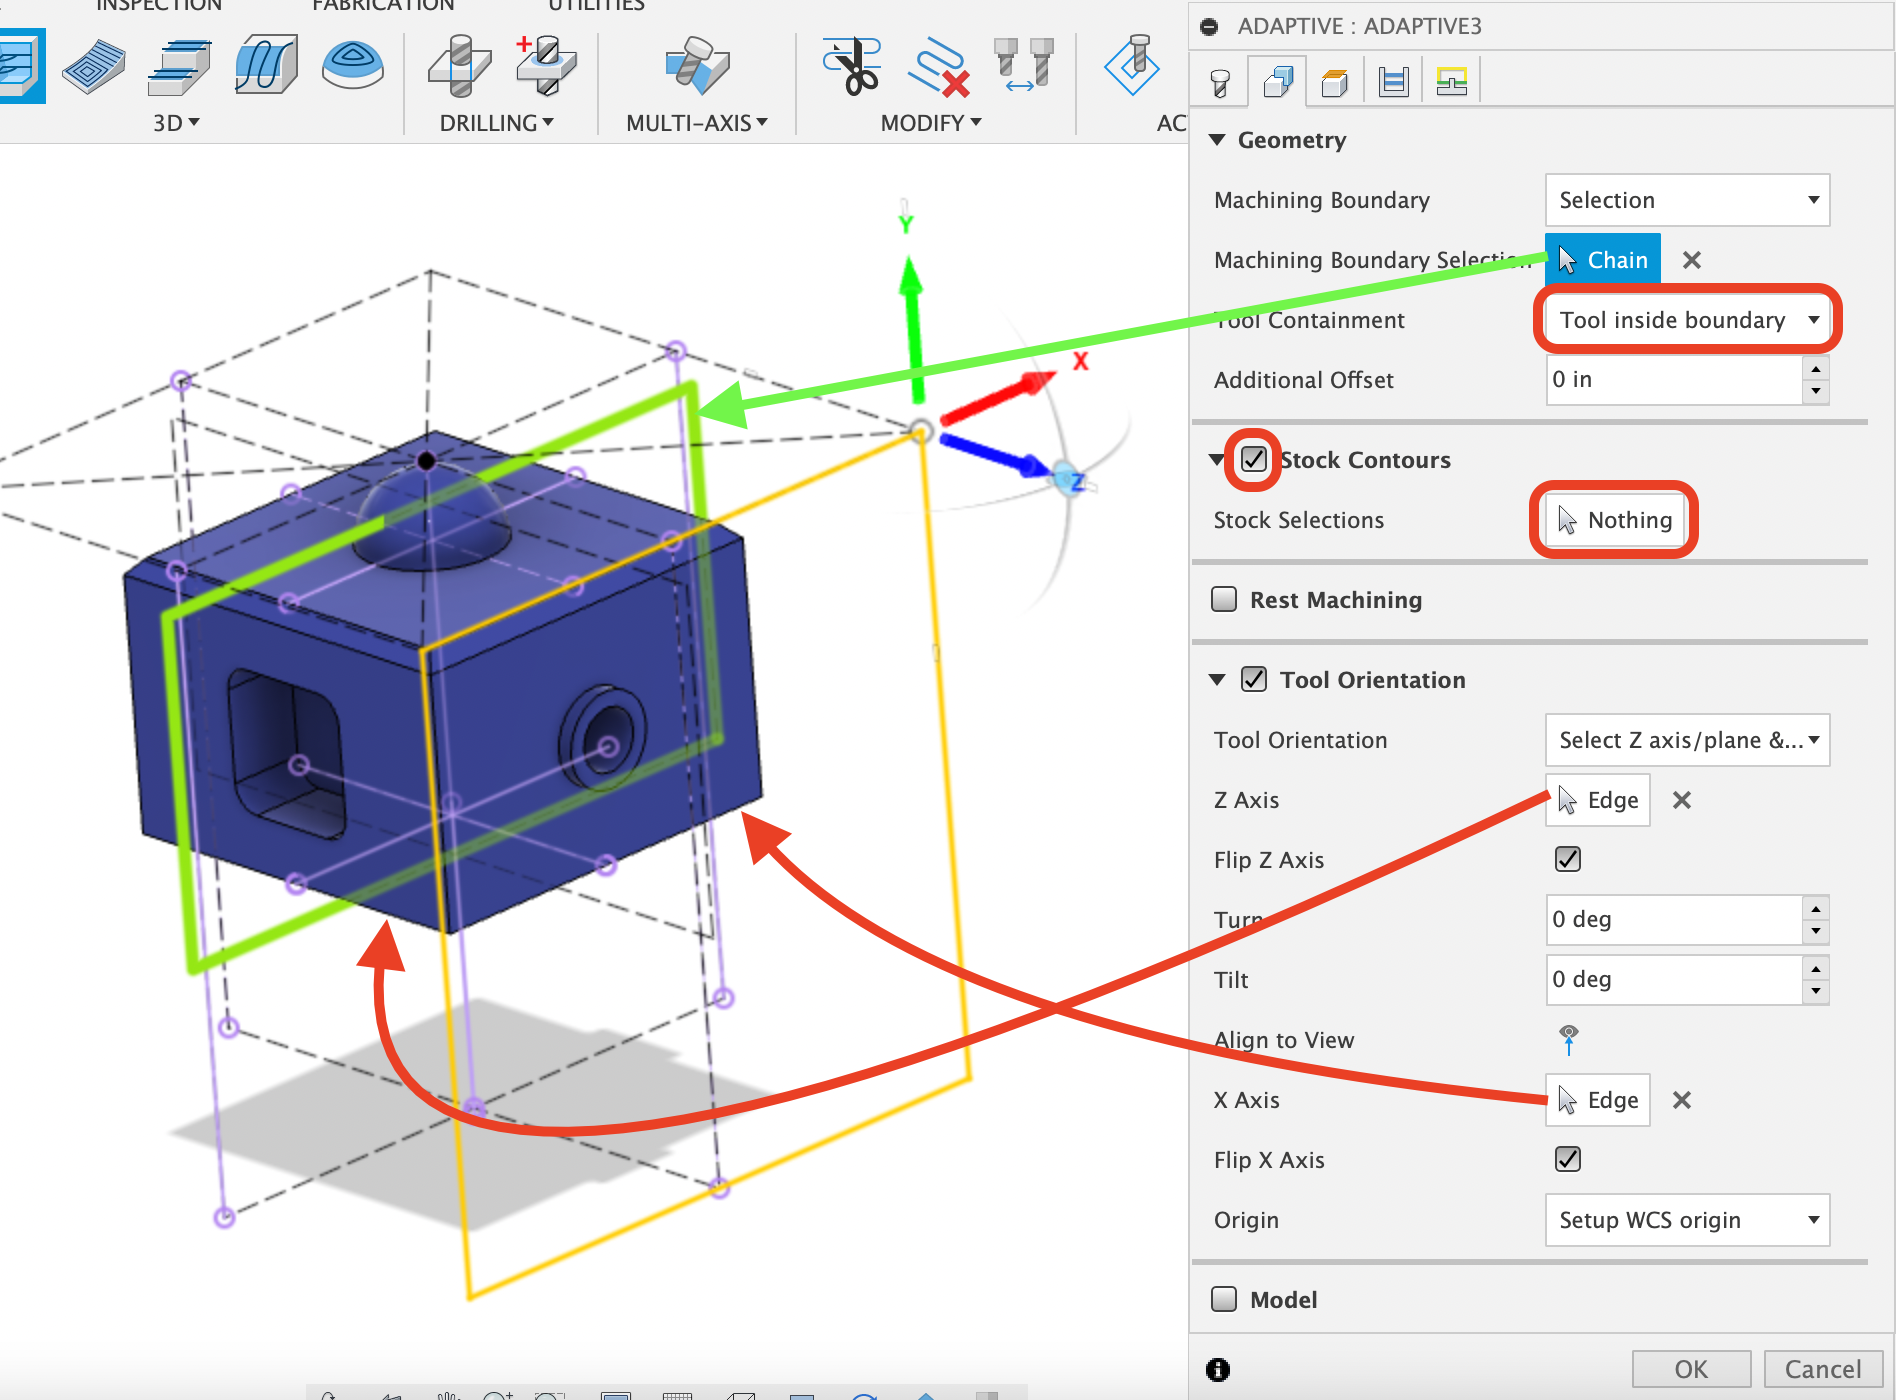
After the Tool Orientation is set up, we need to select constraints for the Geometry section of this tab. Change the Machining Boundary dropdown to “Selection” and Tool Containment to “Tool inside Boundary”. Then click the “Nothing” box next to Machining Boundary Selection and select the rectangle sketch that encapsulates the side of the part. (This sketch was created specifically to constrain tool paths so that the tool has plenty of clearance from the vise and work-holding). Also turn on Stock Contours by checking the box, but leave it set to “Nothing”. This will allow the software to reference the entire size of the stock material, but only machine within the sketch. (If Stock Contours was not checked, there could potentially be excess material remaining on the edges and top of this side). When your Geometry tab looks like the following, progress to the Heights tab:
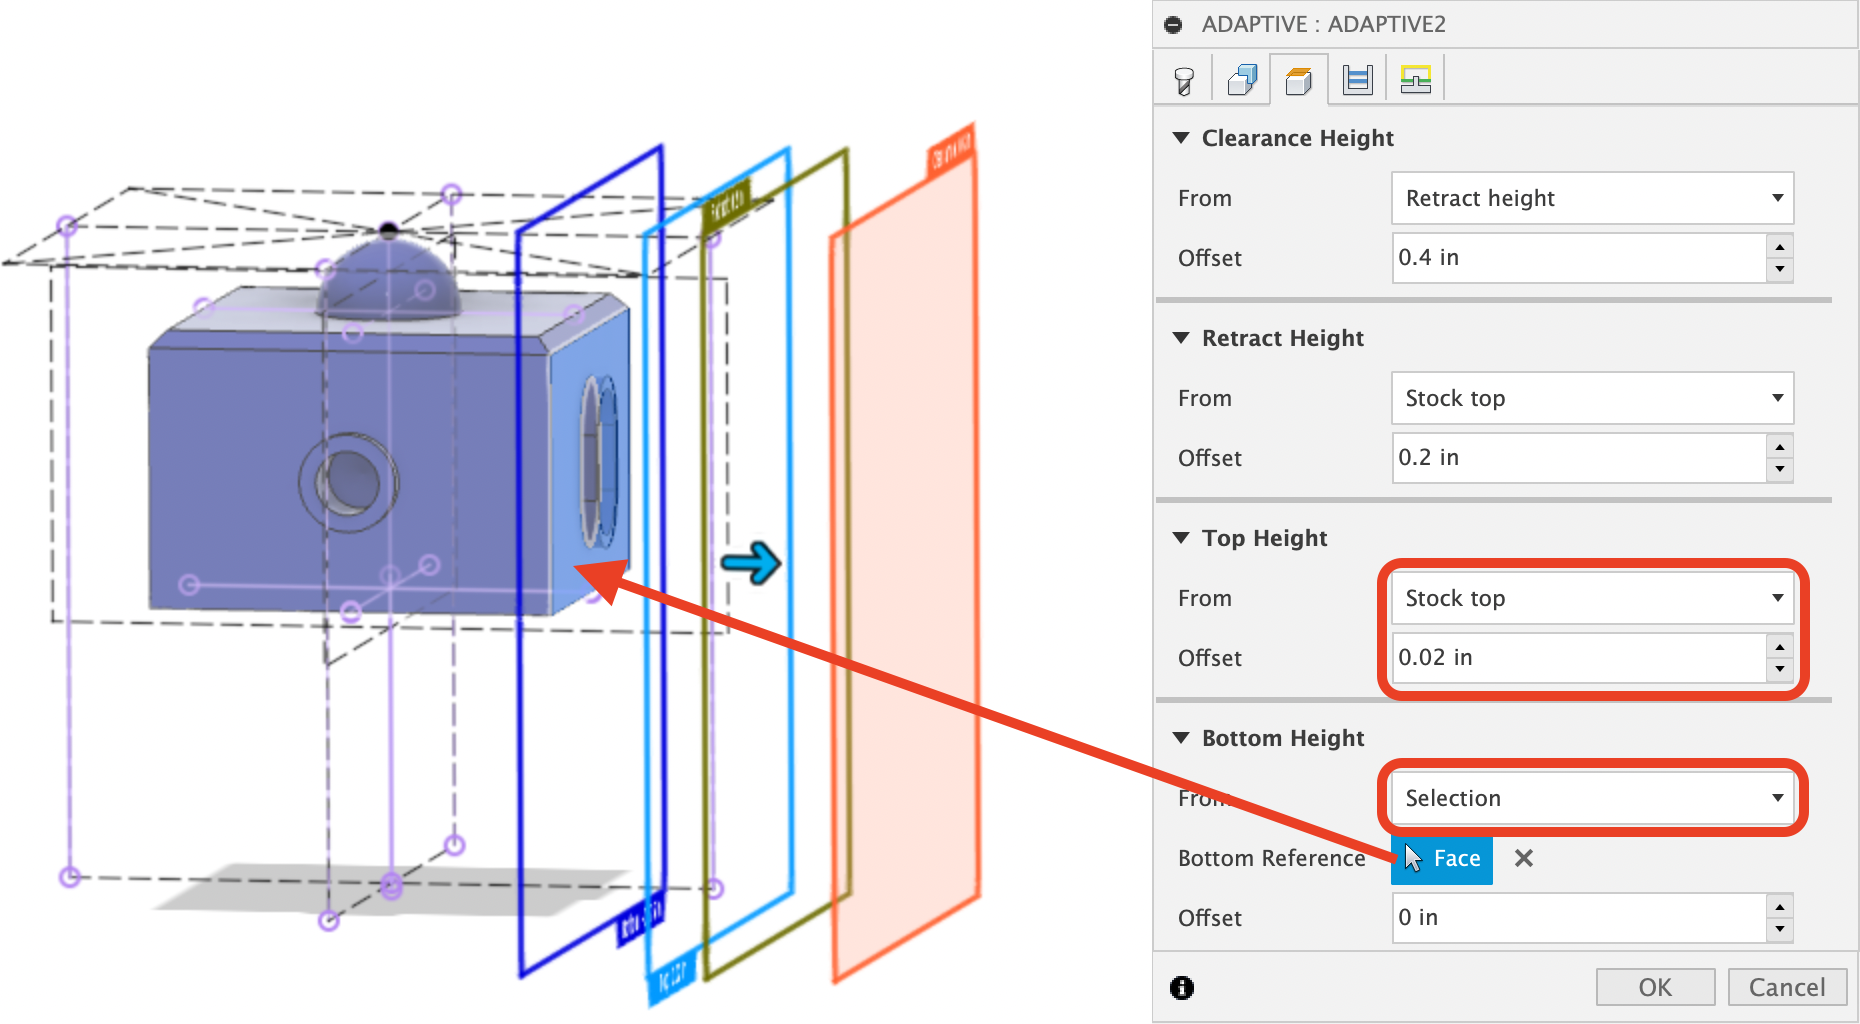
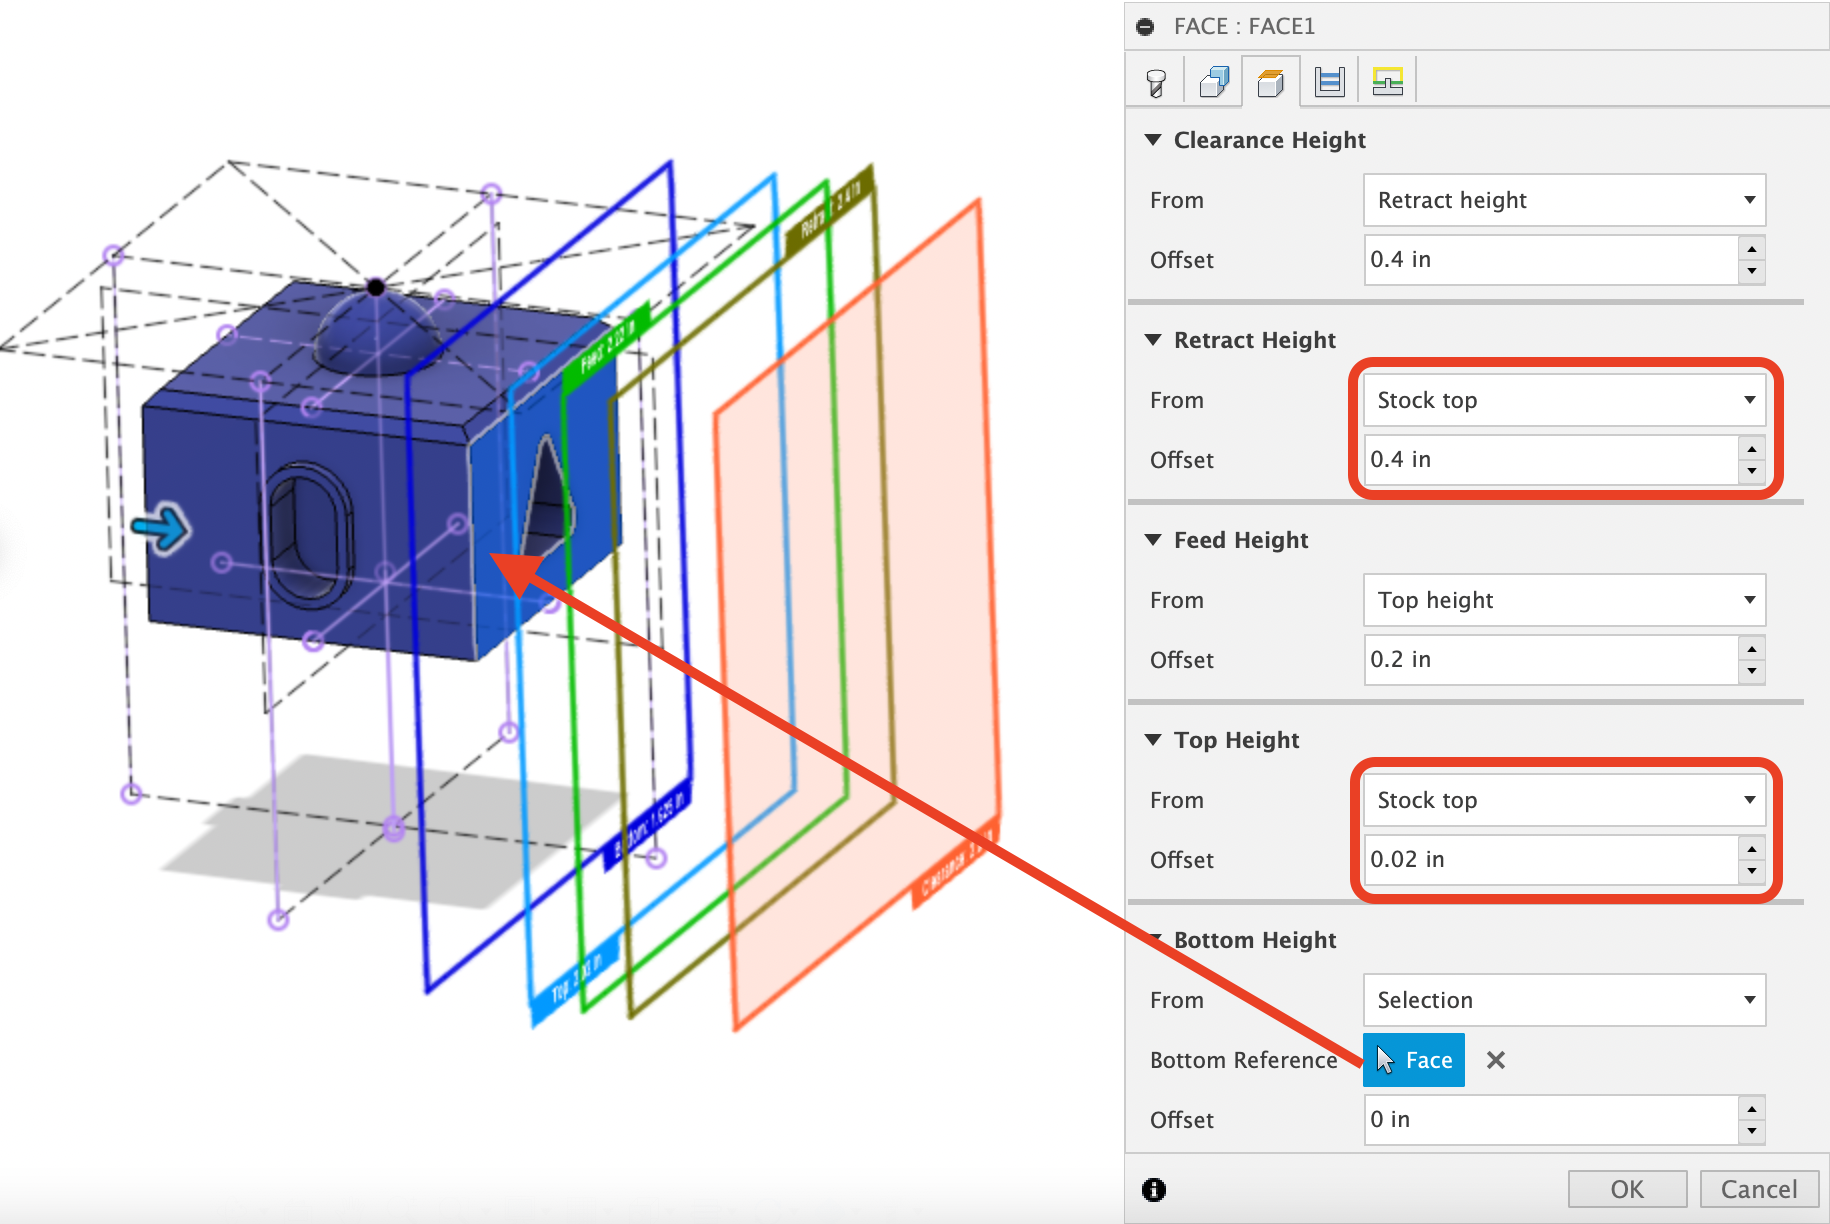
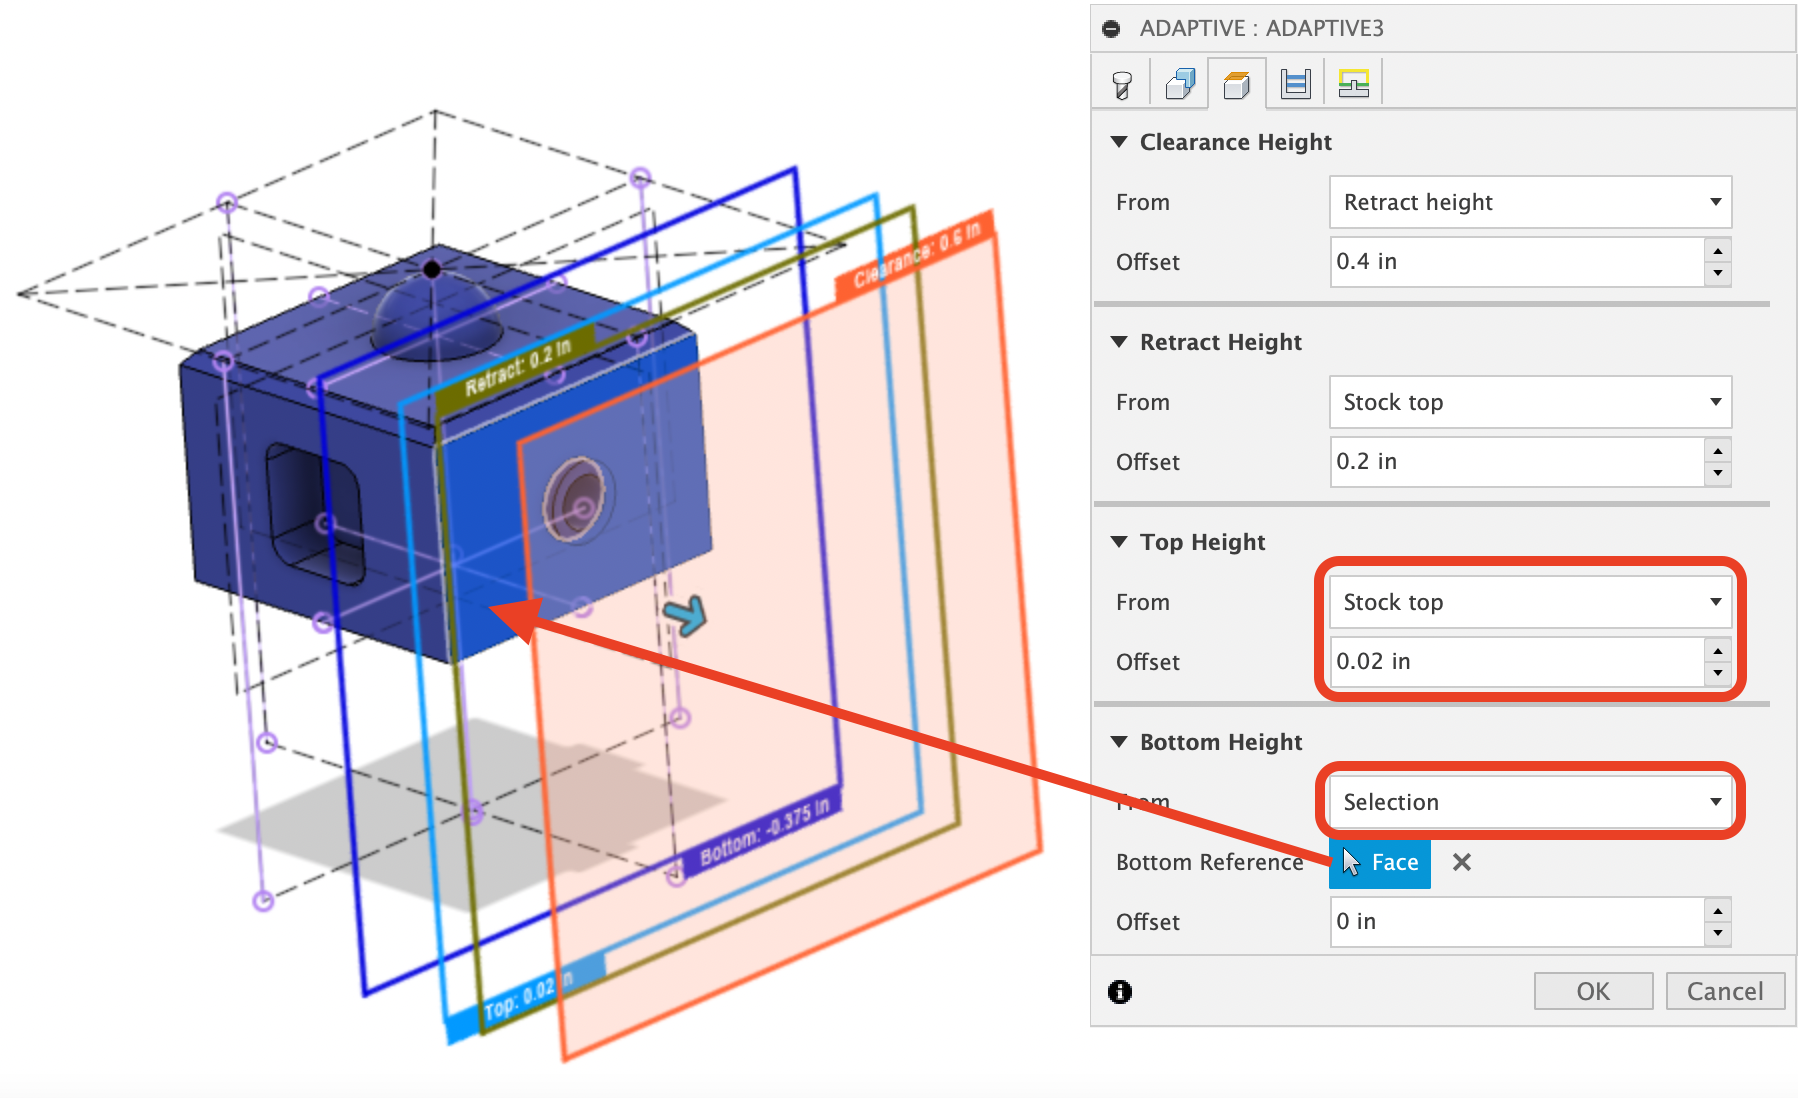
The Heights tab will be the same as our other toolpaths. We will want the Bottom Height to be the flat face of this side, Top Height will be set to “Stock Top” with a 0.02” offset (to account for variations in stock size), and Clearance Height and Retract Height will be left to their defaults. Once you Heights tab and screen look like the following, progress to the Passes tab:
In the Passes tab, we will adjust the values to almost match what we used in our Top Adaptive Clearing toolpath. (The defaults could work decently as well as wax is very forgiving. As you practice and learn more, the Passes tab and the Linking tab are good areas to experiment with different values to optimize both runtime and surface finish). This time we will turn off Stock to Leave since we do not plan on adding an additional finishing pass (we will need another toolpath to deepen the slot, however). The other change we will make is that we will adjust the “Fine Stepdown” to 0.005 in. This is because the protruding lip of the slot is rather short, and using a finer resolution will allow the toolpath to face off this feature. Your Passes tab should look like the following before progressing to the Linking tab:
In the Linking tab, we will once again change the Helical Ramp Diameter to 0.05 inches and increase the Ramping Angle to 10 degrees to save machining time. (As a reminder, these values will be too fast for harder materials like aluminum). Once your Linking tab looks like the following, hit “OK” to finish the toolpath and then save your work:
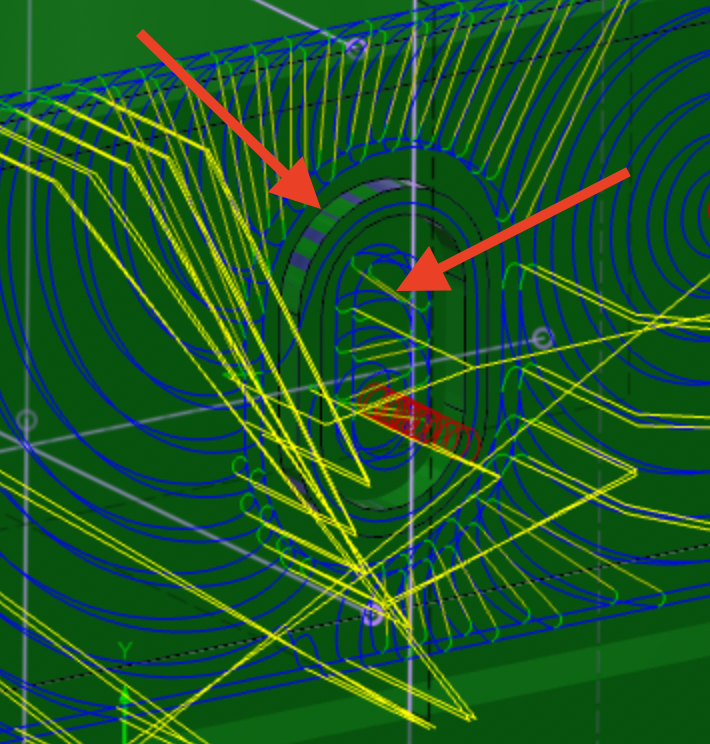
Rename this toolpath to something that is easy to remember, such as “Slotted Clearing” and then simulate the tool path - there are a few items worthy of noting in the simulation. The first is that since we selected a 3D Adaptive Clearing, the tool path will recognize the raised lip of the oval slot and remove material from inside it (a 2D Adaptive would not recognize this without selecting additional contours). The other thing to note is that while the center of the oval slot is cut, it is not cut to full depth since our Bottom Height was set to the main face of this side - so we will need another operation to cut to the full depth of the slot.
Section 4.4: Facing and Pocketing
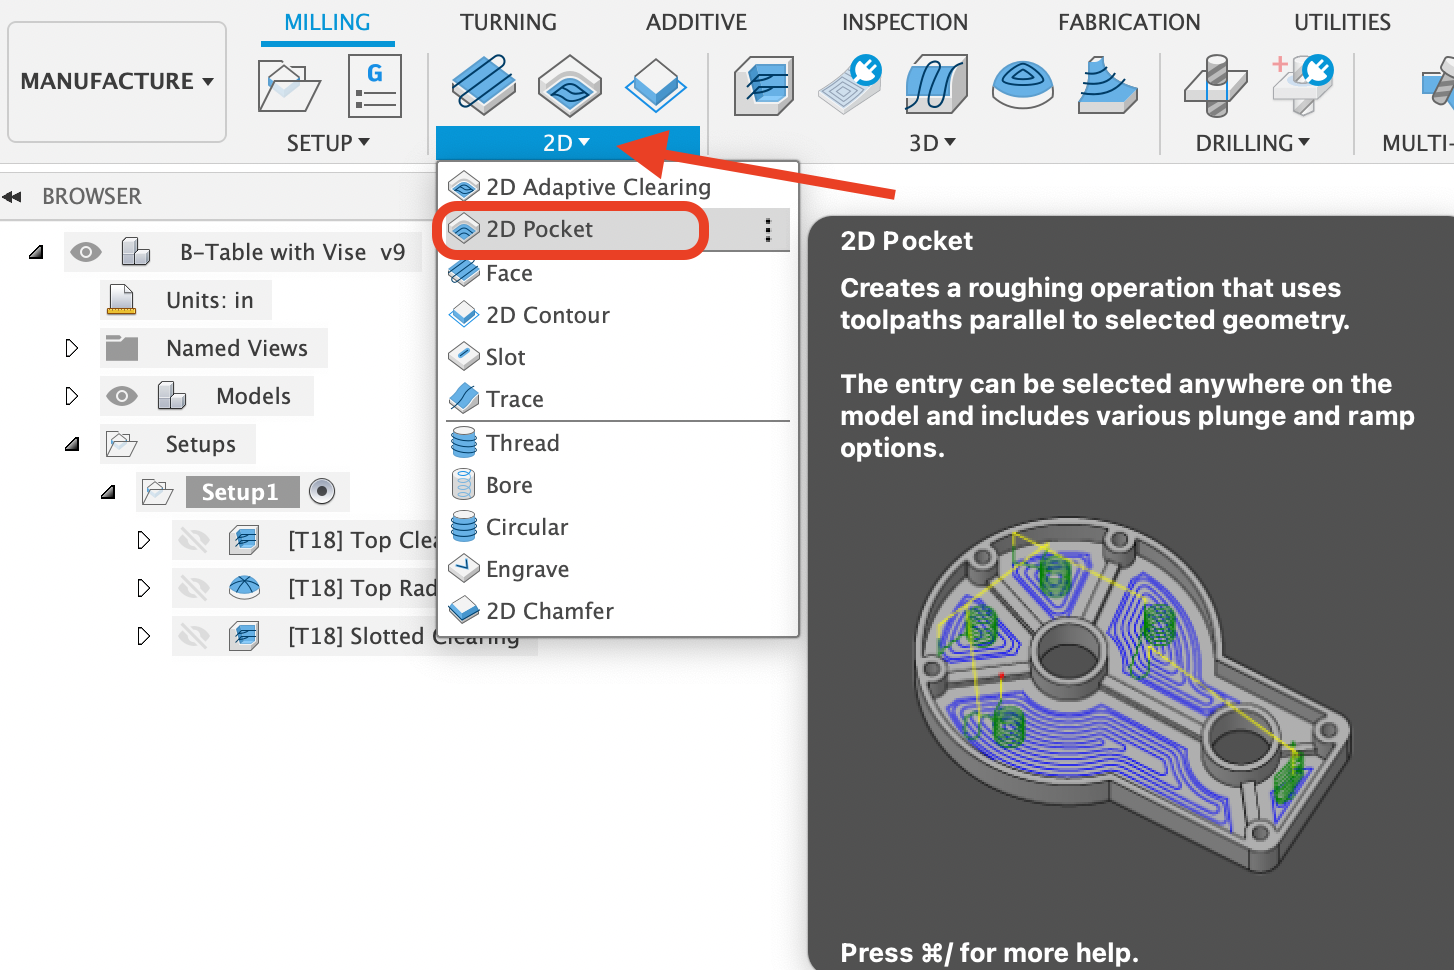
To finish cutting the full depth of the oval slot (or if we had wanted to complete the full feature with a single operation) a 2D Pocket Clearing toolpath is a great option. (We will also use these for the square recess and the triangle recess on two of the other sides of this part. We could also use a 3D Pocket Clearing, but that is typically more suited to a pocket without a flat bottom).
Begin by selecting the 2D Pocket Clearing toolpath from the 2D dropdown menu:
We are going to use the same tool and feeds/speeds in the Tool tab as we have been:
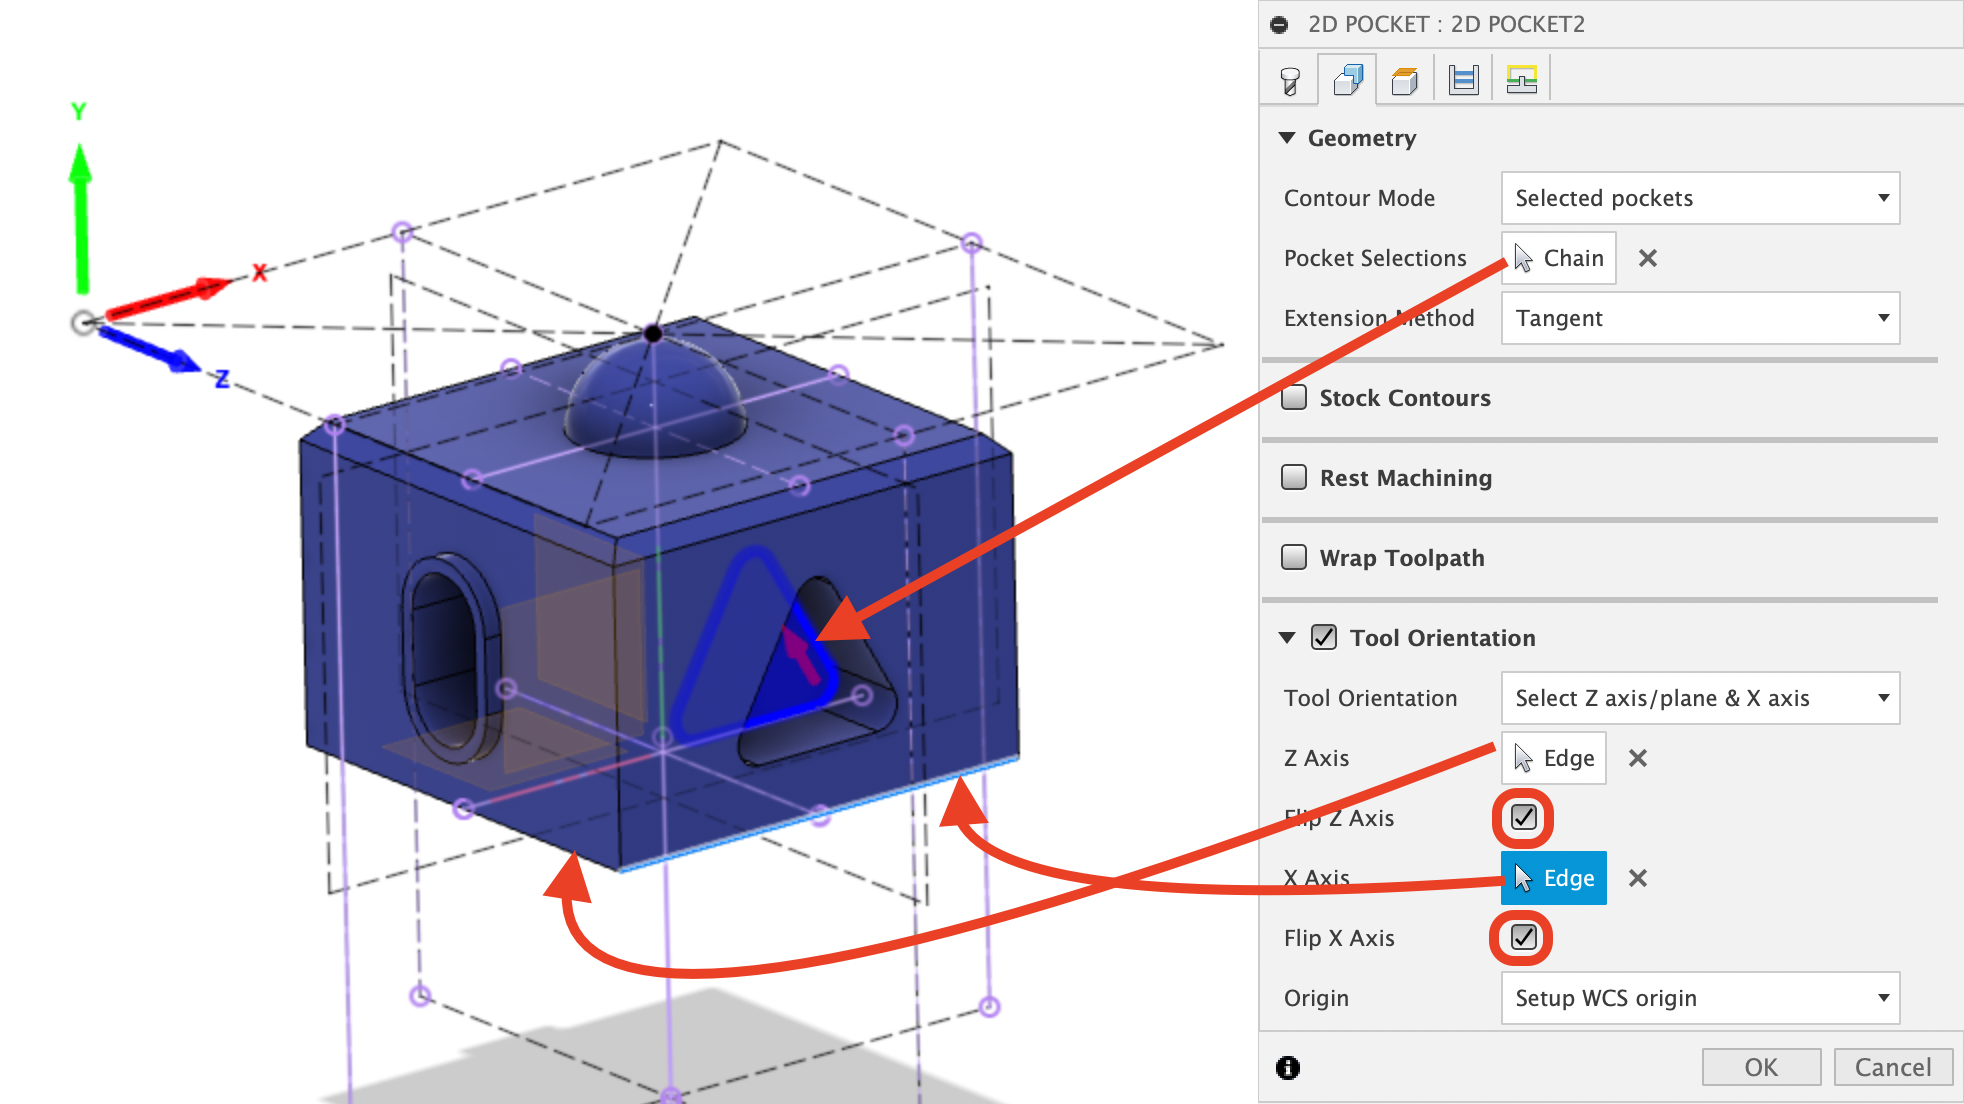
In the Geometry tab, set the Tool Orientation just as we did in the Adaptive Clearing for this side, then select the bottom edge of the slot recess for “Pocket Selections”. Ensure that your Geometry tab and screen look exactly like the following:
| Note |
|---|
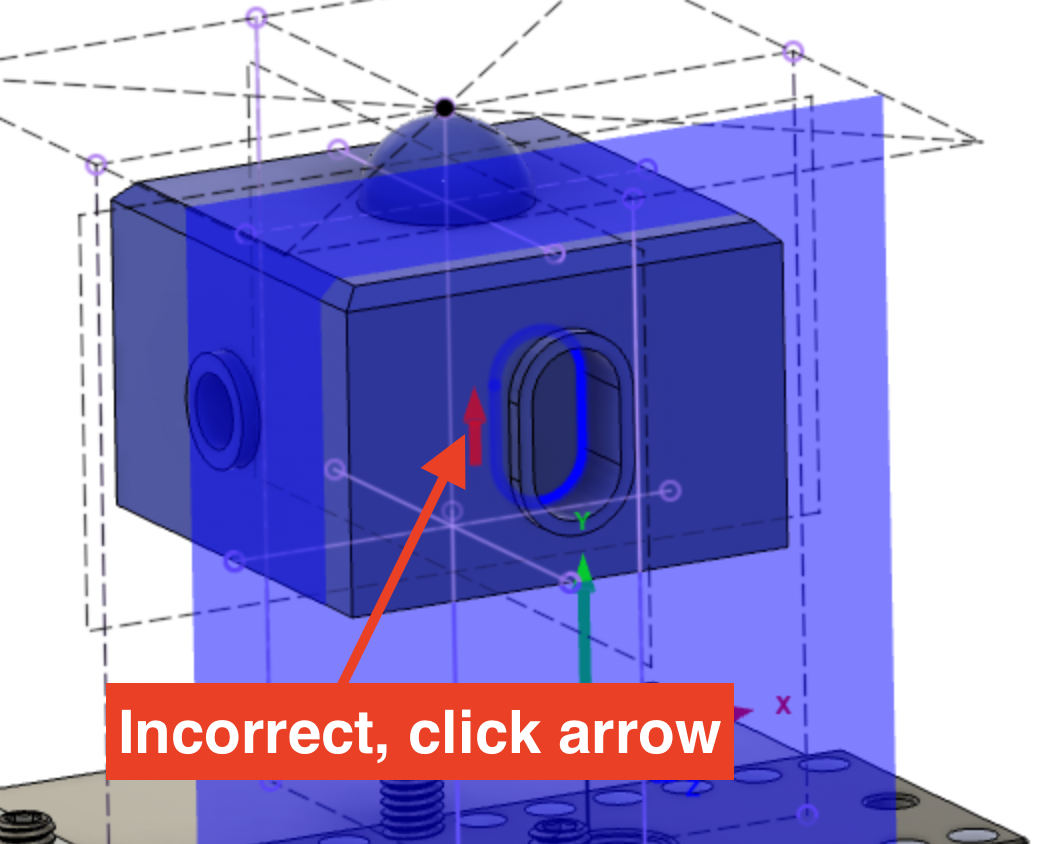
The inner area of the recess should be highlighted to show that is the area that will be cut. If it is shaded outside of the recess, it will incorrectly cut the exterior of the recess. To adjust if the toolpath cuts inside or outside, simply click the red arrow attached to the shaded area: |
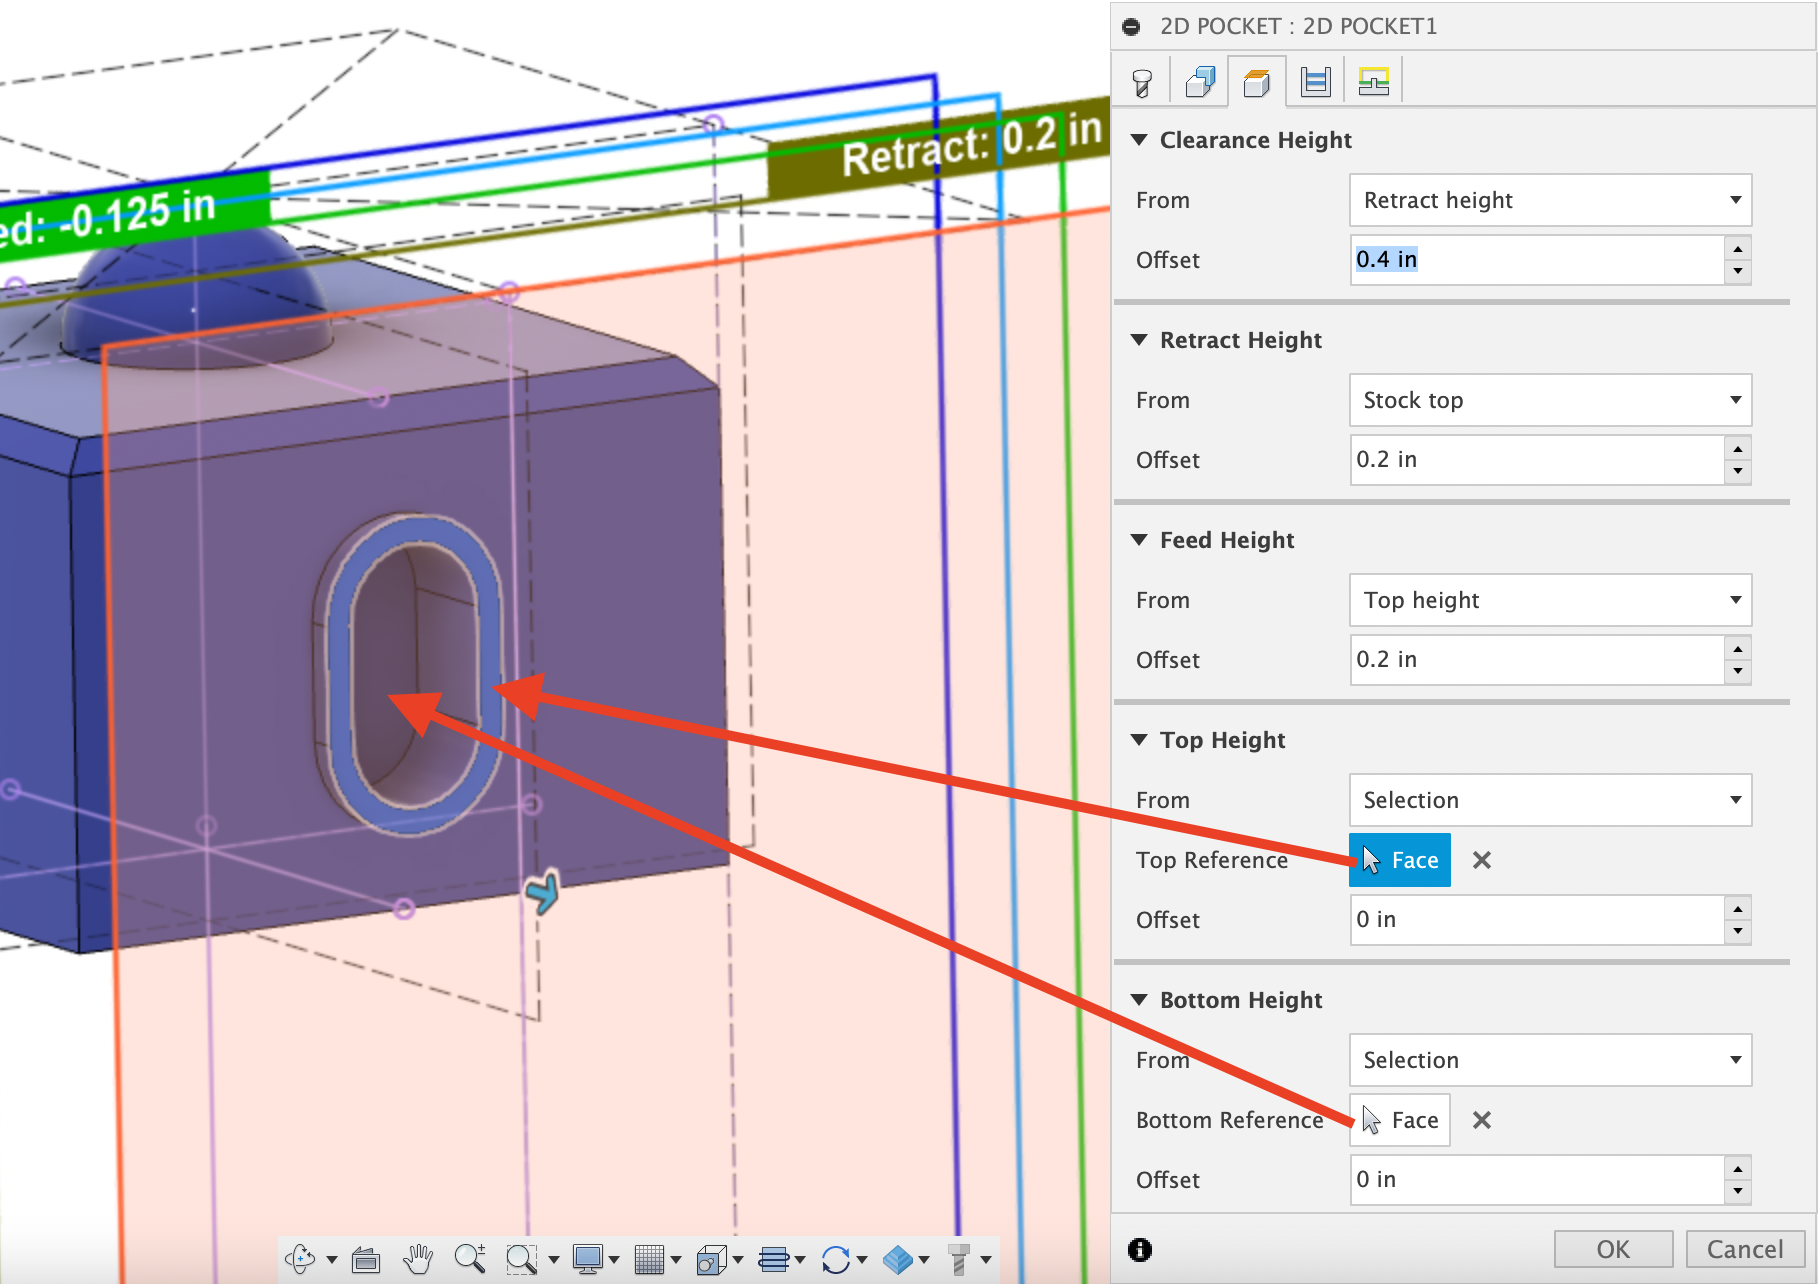
With the Geometry tab completed, move to the Heights tab and change the Bottom Height to “Selection” and choose the bottom surface of the recess. Since we have already removed material from this side, we can now lower our Top Height so that we don’t “cut air” where we have already removed material. In this case, change the Top Height to “Selection” and choose the lip of the recess. You can leave the Feed Height, Retract Height, and Clearance Height at their defaults. When done, you should have the following:
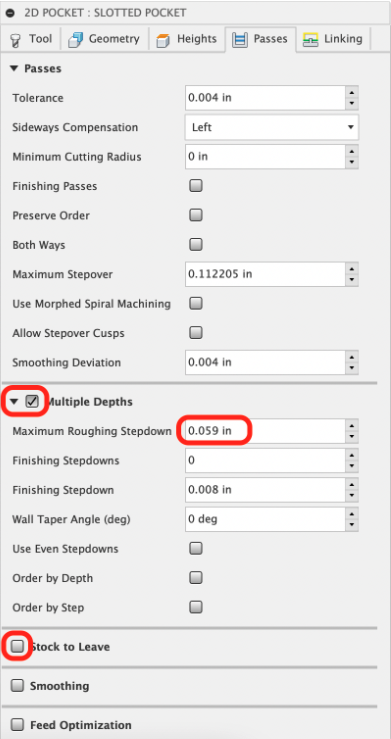
In the Passes tab, clear the “Stock to Leave” checkbox and then select the “Multiple Depths” checkbox. Change the “Maximum Roughing Stepdown” to 0.059” to ensure no depth of cut is too deep (we calculated this value from the Feeds and Speeds chart). All other defaults will be fine for this operation. Once your Passes tab looks the same as below, continue to the Linking tab:
In the Linking Tab, we will once again change the Helical Ramp Diameter to 0.05 inches and increase the Ramping Angle to 10 degrees for wax. All other defaults will remain as they are. Once your Linking tab looks like the following, hit “OK” to finish the toolpath and then save your work:
Click “OK” to finish this toolpath, rename the toolpath to “Slotted Pocket”, and save your work.
With the slotted side complete, we will next face the triangle side with a toolpath and then pocket the recess with a different toolpath.
| Note |
|---|
You will need to repeat these toolpaths for the square recess after changing the tool orientation. This tutorial will provide instructions for the triangle recess side only so that you can attempt the square recess side on your own. The triangle side will be a good reference if needed since the only main change is the tool orientation. |
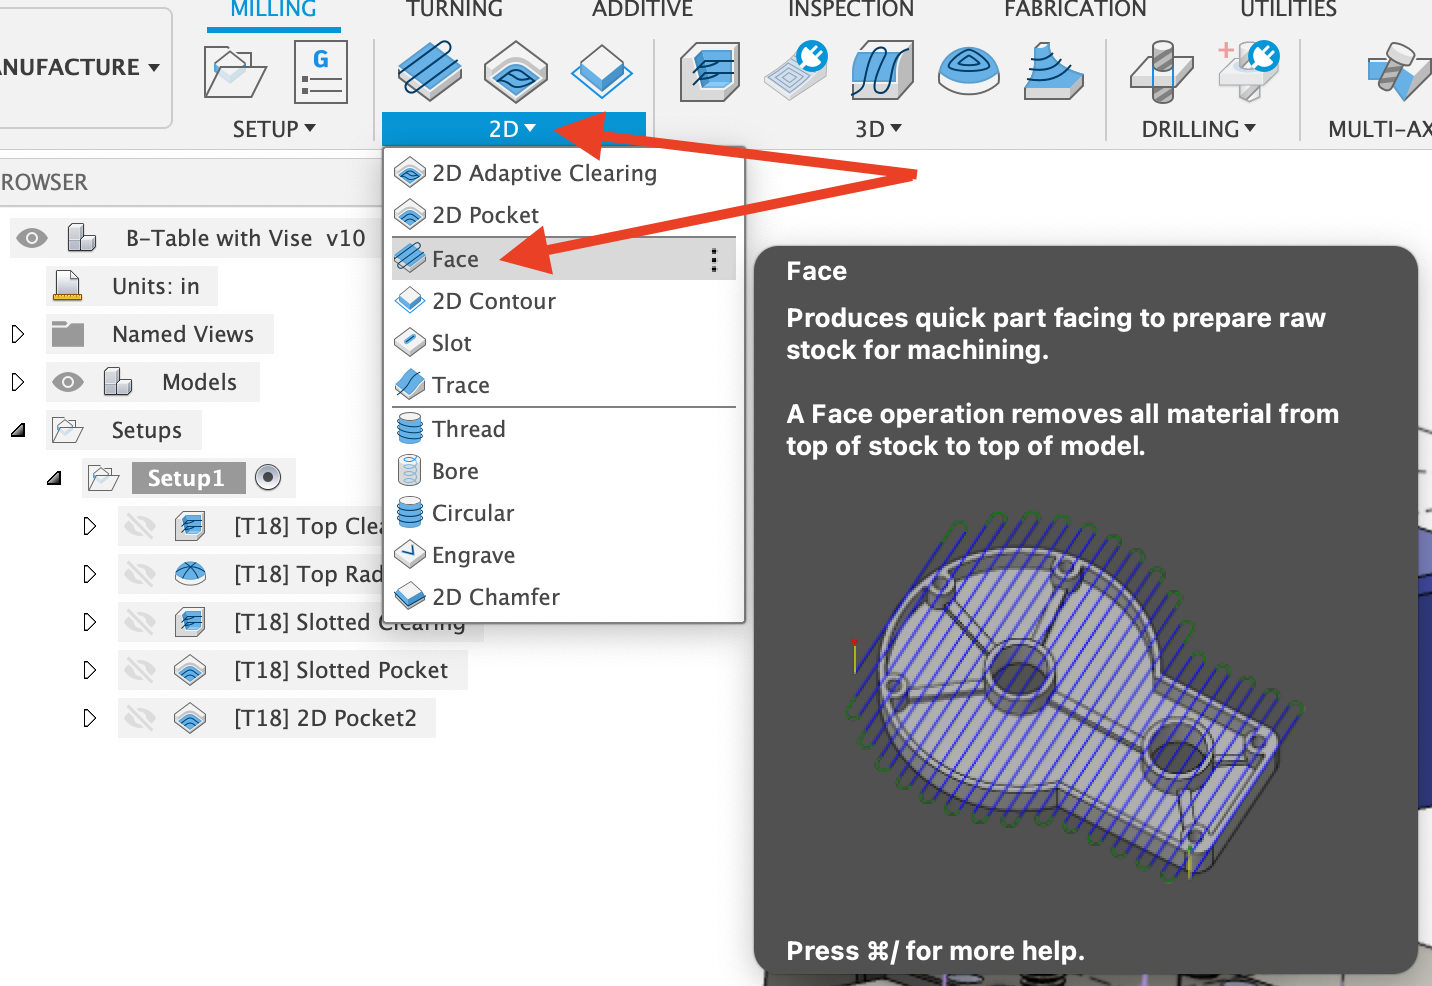
First, we will face the triangle recess side using a 2D Face toolpath. This will be used similar to the adaptive clearing with a few differences. Adaptive clearing is used for larger amounts of material removal where you want to maintain the same load on the tool throughout the entire path. Facing removes all of the material on a given plane using a back-and-forth motion; it is best suited to flat faces. Start by selecting the Face toolpath from the 2D dropdown menu:
In the Tool tab, keep using the same settings:
On the Geometry tab, set up the “Tool Orientation” as we have before, with the Z-axis perpendicular to the face we want to machine and pointing away from it, the X-axis horizontal, and the Y-axis pointing straight up from the vise. For the “Stock Selections” use the sketch that encapsulates the triangle side:
On the Heights tab, change the Bottom Height to “Selection” and select the face around the triangle recess. Next, change the Top Height to “Stock Top” with a 0.02” offset, and change the Retract Height to “Stock Top” with a 0.04” offset (so that it is spaced away from both the Top Height and the Feed Height).
On the Passes tab, ensure that “Stock to Leave” is not selected since we want to finish the face with this toolpath. Then select “Multiple Depths” and add a “Maximum Stepdown” of 0.059” to make sure the program does not try to cut the full depth in one pass:
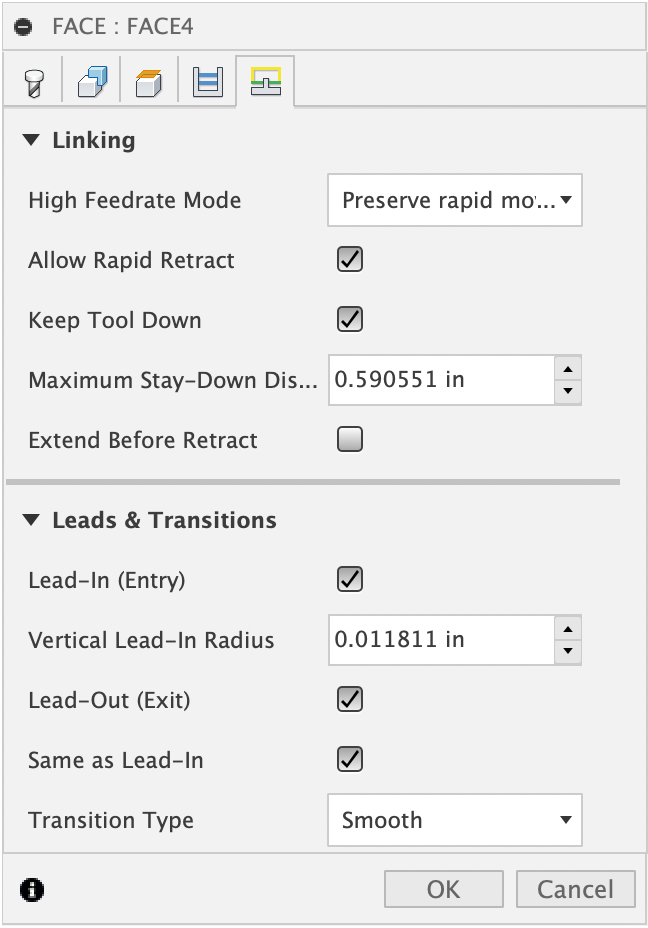
The Linking tab can also be left to all of the default settings:
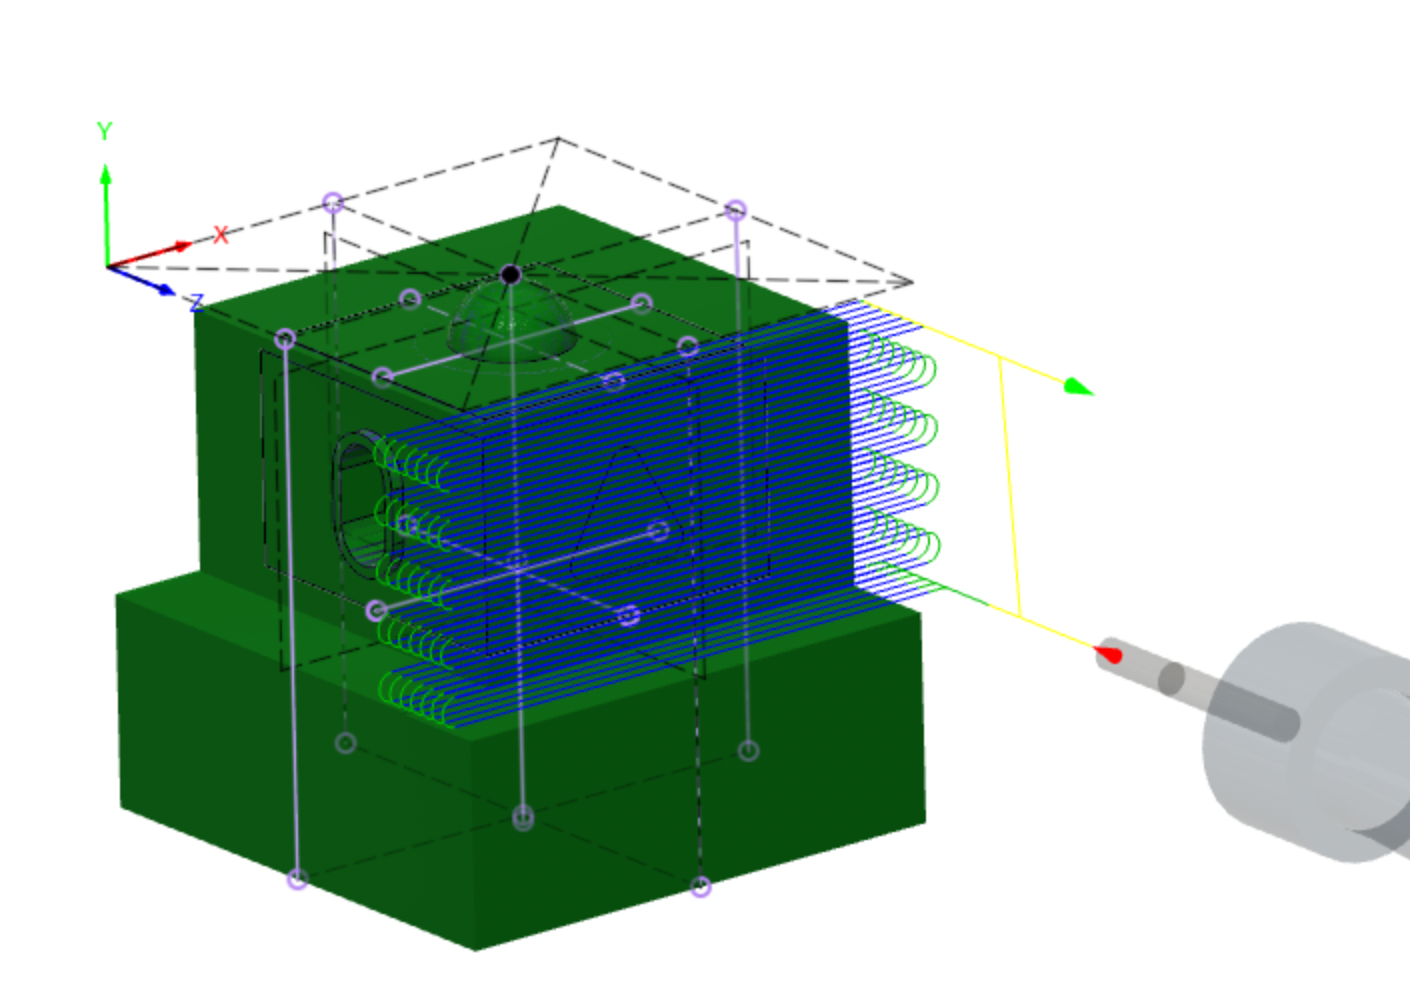
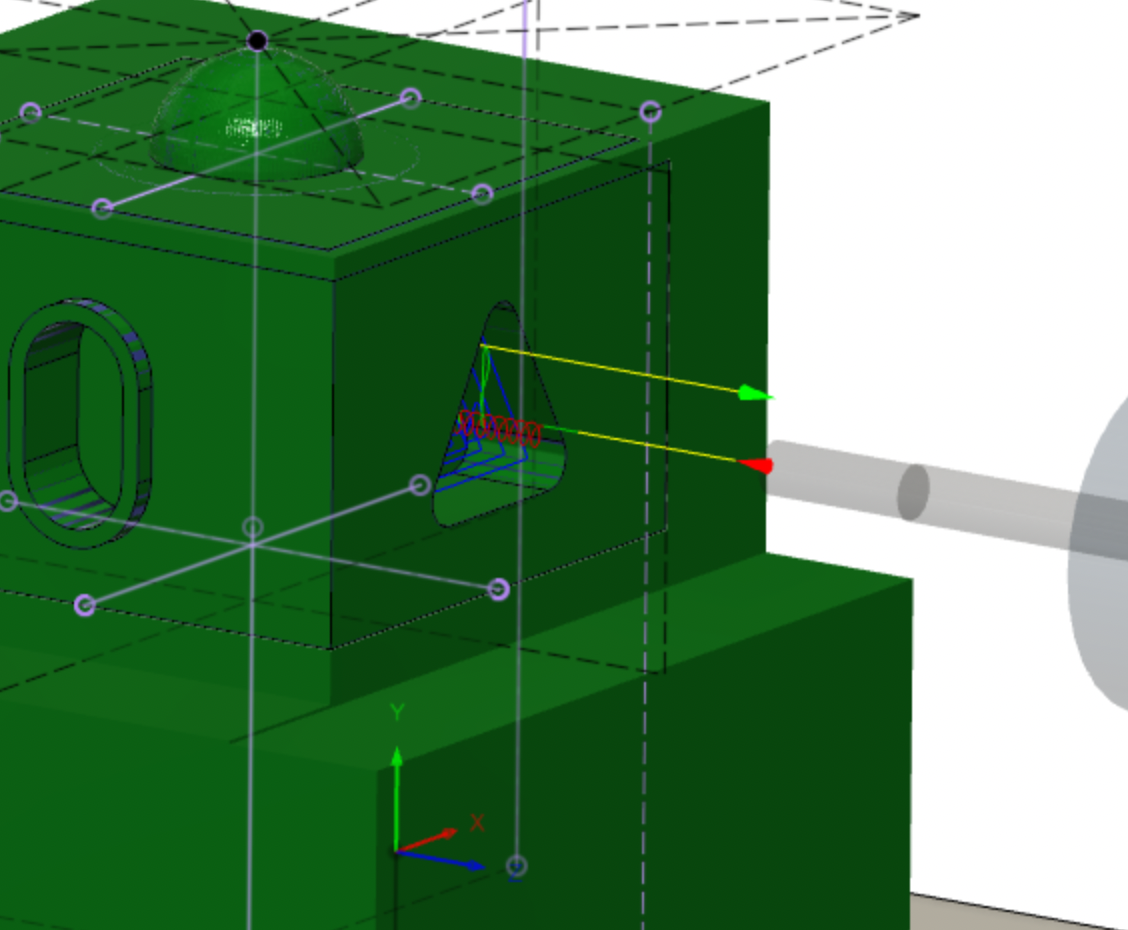
Click “OK” to finish this toolpath, rename the toolpath to “Triangle Face”, and save your work. Simulate the toolpath so that you can see how this differs from the adaptive clearing toolpaths - note the back and forth linear motion as well as the multiple depths:
Next we will create the triangle recess with a 2D Pocket from the 2D dropdown. On the Tool tab, use the same settings as before:
On the Geometry tab, set up the “Tool Orientation” as we have before, with the Z-axis perpendicular to the face we want to machine and pointing away from it, the X-axis horizontal, and the Y-axis pointing straight up from the vise. Select the bottom edge of the recess for the “Pocket Selections” and ensure the shaded area is contained within the pocket:
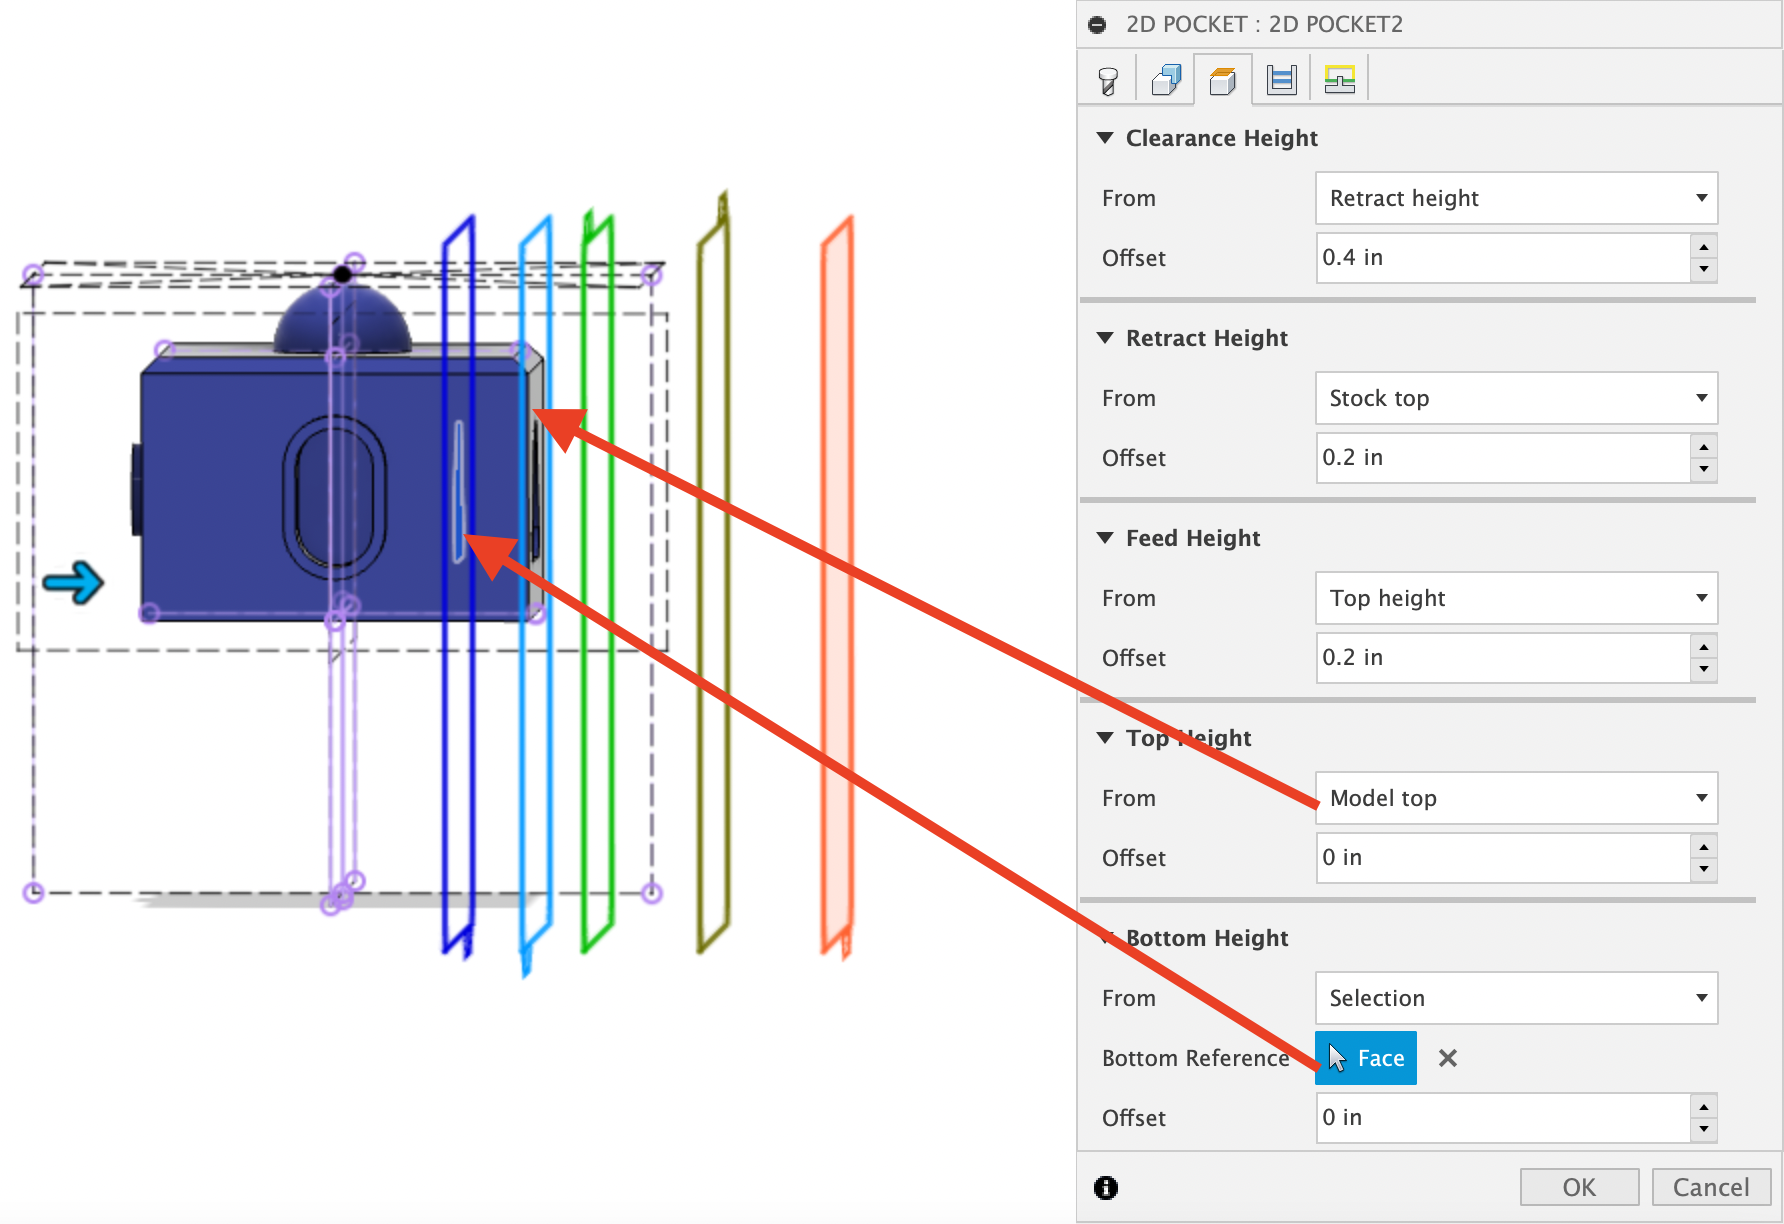
In the Heights Tab, set the Bottom Height to the bottom of the recess, set the Top Height to “Model Top” (to pick up where the facing left off), and set the other heights as shown to provide adequate clearance:
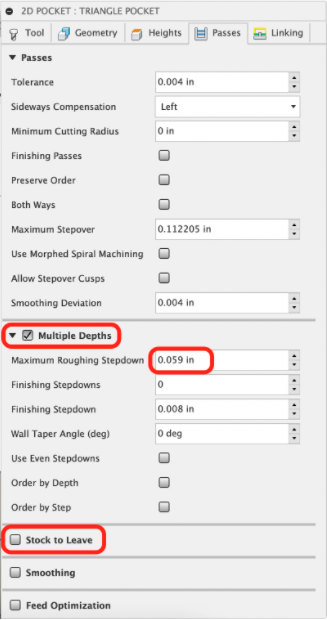
In the Passes tab, select “Multiple Depths” and add a “Maximum Roughing Stepdown” of 0.059” like the previous pocketing operation to ensure we don’t cut too deep on each pass. The remaining options can be left to the default settings, but be sure to uncheck “Stock to Leave” since we want to machine the full recess:
On the linking Tab, we will once again change the Helical Ramp Diameter to 0.05 inches and increase the Ramping Angle to 10 degrees for wax. All other defaults will remain as they are. Once your Linking tab looks like the following, hit “OK” to finish the toolpath and then save your work:
Click “OK” to finish this toolpath, rename the toolpath to “Triangle Pocket”, and save your work.
| Note |
|---|
As previously mentioned, you will now need to program the square recess and face the square side on your own for practice. If you need assistance, refer to the instructions for the triangle face and the triangle pocket. Everything will be setup the exact same, but you will need to remember to change the Tool Orientations to the square recess side. Challenge yourself to program these toolpaths without the instructions first, and then use the instructions for the triangle side to check your work! |
Section 4.5: Circular and Bore Toolpaths
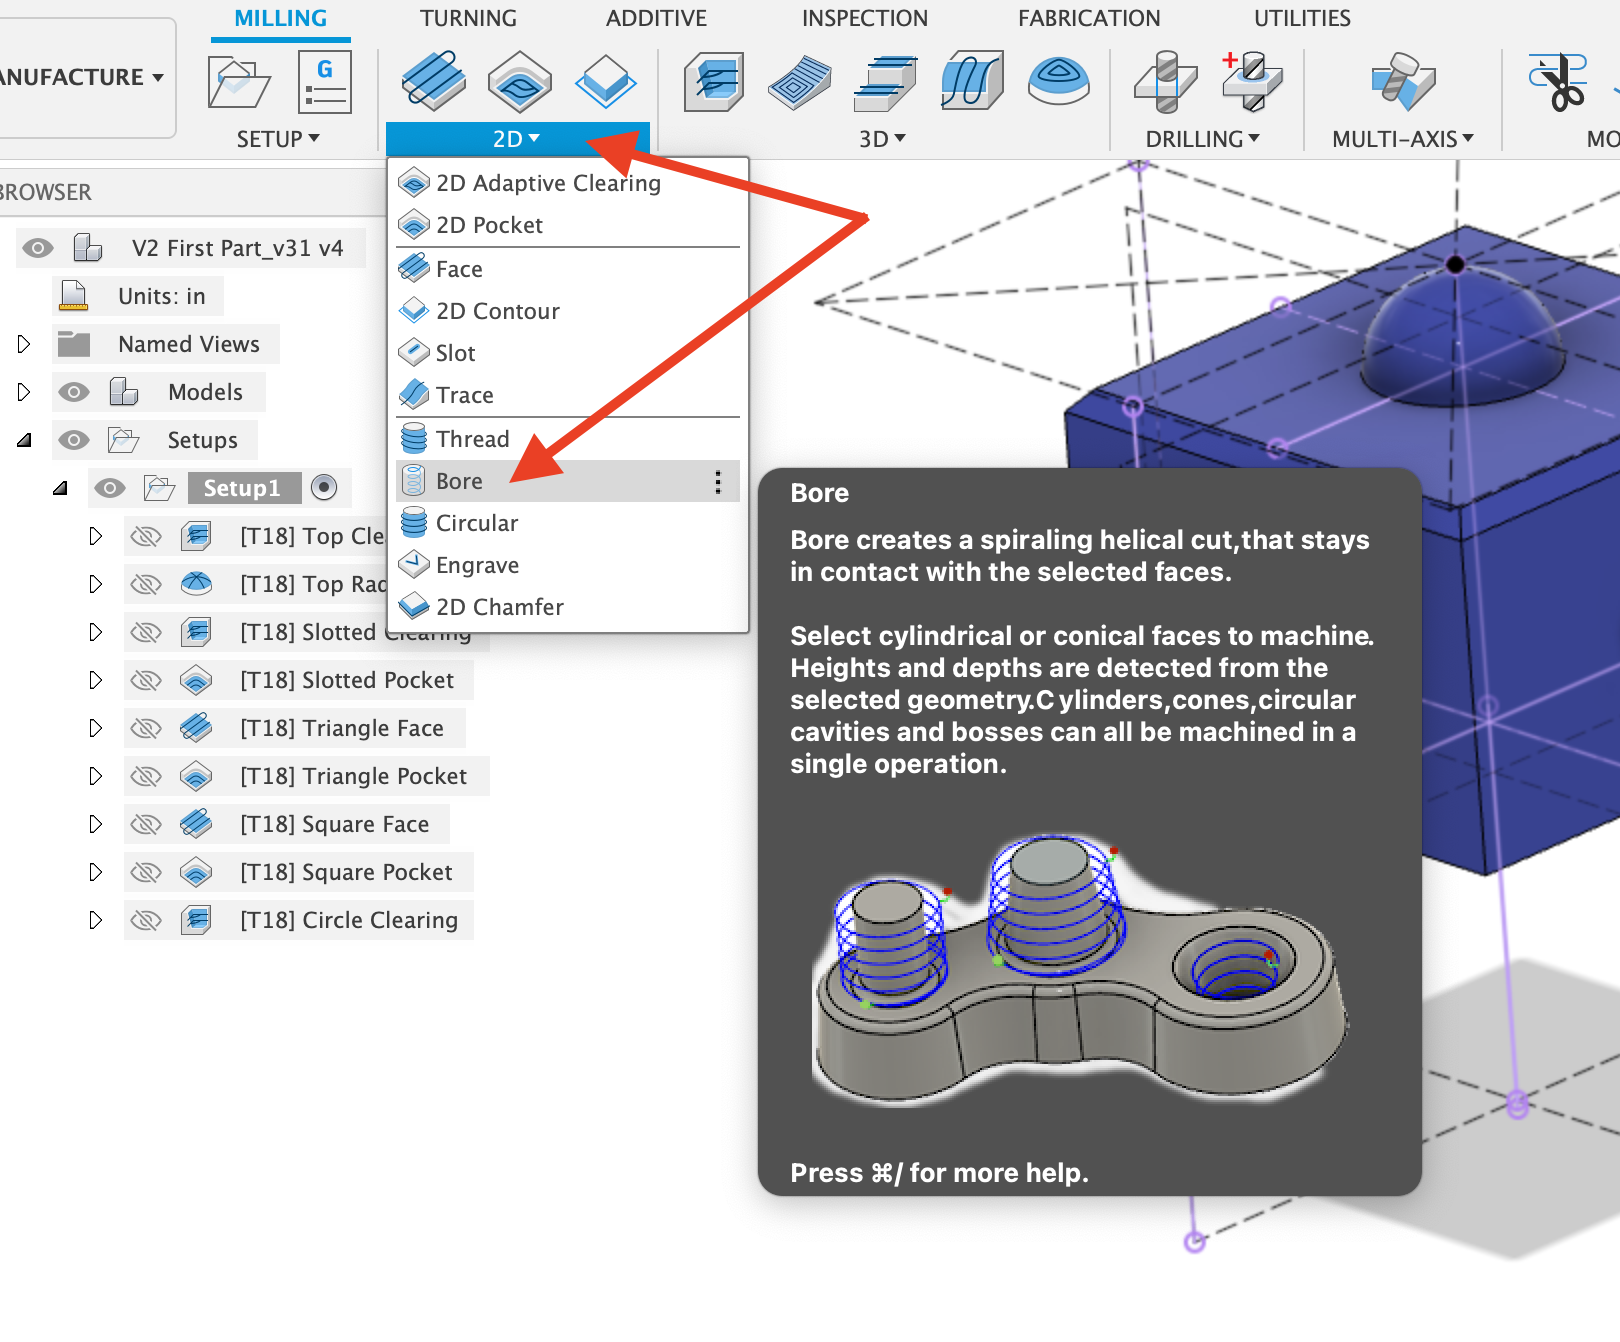
Now that we have all of the other faces complete, we are ready to complete toolpaths for the circle side. We will start by clearing the majority of the material with 3D Adaptive Clearing while leaving some material around the lip of the recess. Then we will use 2D Circular and 2D Bore to create smoother and more concentric finishes on the cylindrical features. (These toolpaths excel at cylindrical features and can be used interchangeably for simple parts. Bore cuts more with the bottom of the tool and Circular cuts more with the side of the tool).
We will begin with a standard 3D Adaptive Clearing using the same Tool tab settings and changing our Tool Orientation. We also need to turn on Stock Contours, change Tool Containment to “Tool inside” and select the sketch like before:
On the Heights tab, set the Bottom Height to the main face, and the Top Height to “Stock Top” with a 0.02” offset (the other defaults are fine):
We will set the Passes tab up the same as earlier with one exception - this time we want to leave radial material behind to clean up with the Circular toolpath in “Stock to Leave” (but not axial since we want to cut down to the face):
In the Linking Tab, we will once again change the Helical Ramp Diameter to 0.05 inches and increase the Ramping Angle to 10 degrees for wax. All other defaults will remain as they are. Once your Linking tab looks like the following, hit “OK” to finish the toolpath and then save your work.
Rename this toolpath to “Circle Clearing” and then simulate the toolpath. You will notice that because we selected “Radial Stock to Leave”, there is extra stock remaining around the cylinder. Additionally, since the bore is relatively small, and we left radial material, there is no material removed from inside the recess. This is because with the requested stock to leave, there is not room for the tool to fit within it - leaving material for us to remove during the Bore toolpath:
Next we will begin the circular recess by selecting 2D Bore from the 2D dropdown menu and reusing the same Tool tab parameters:
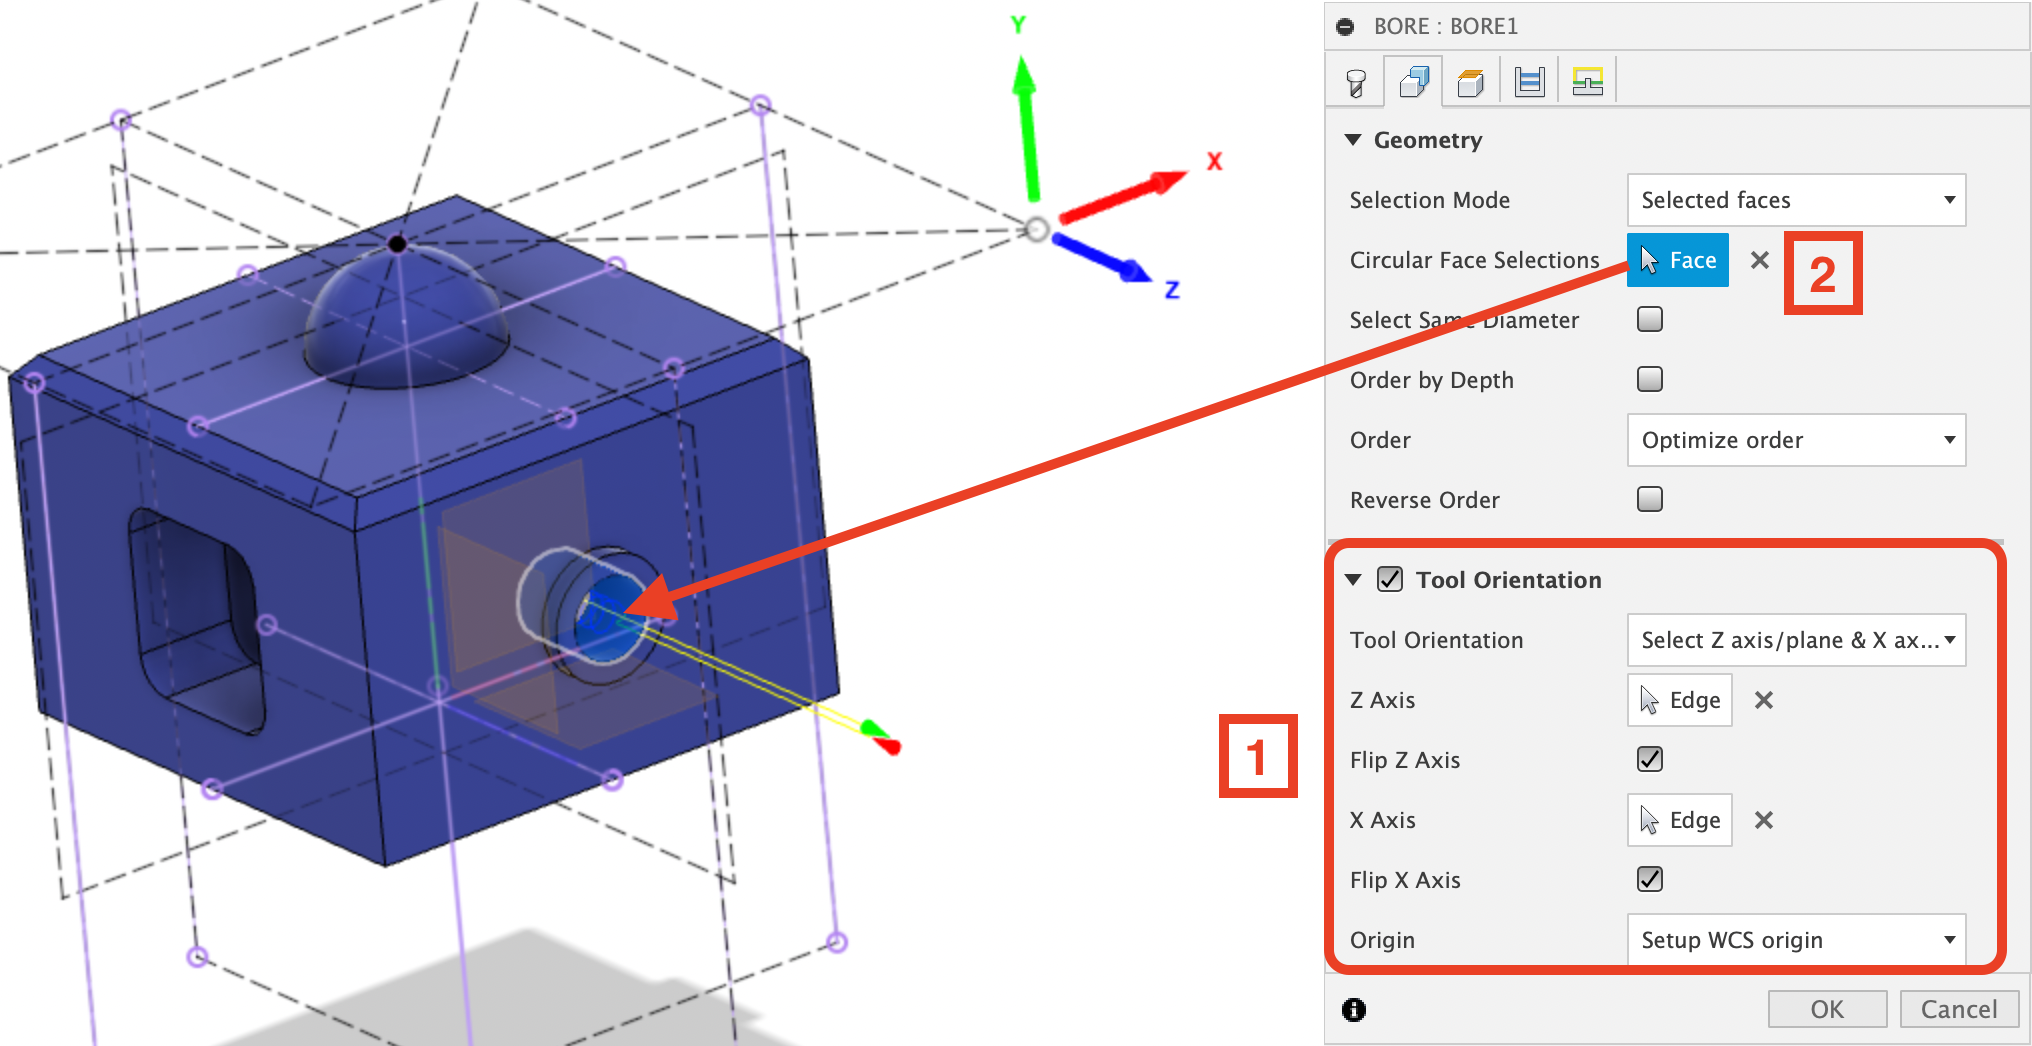
In the Geometry tab, set your Tool Orientation like we have been and then select the inner wall of the circular recess:
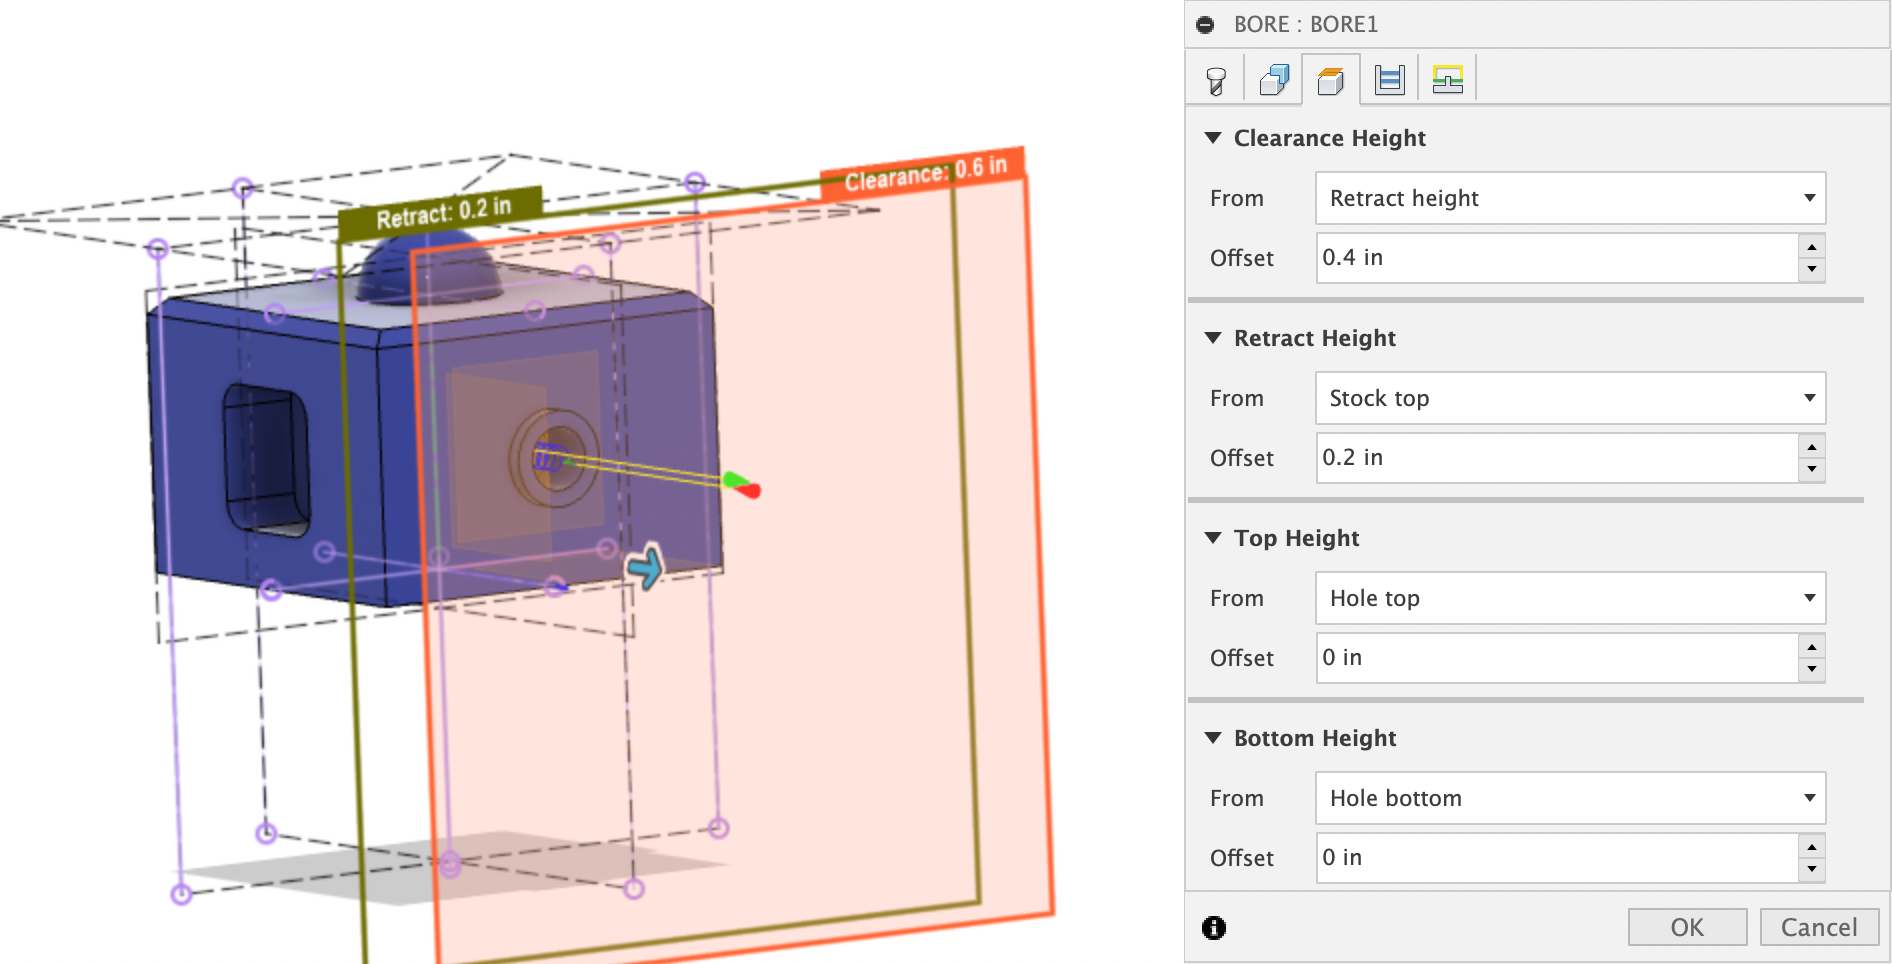
In the Heights tab, everything can be left to the defaults since Fusion derives them from the hole feature in the model:
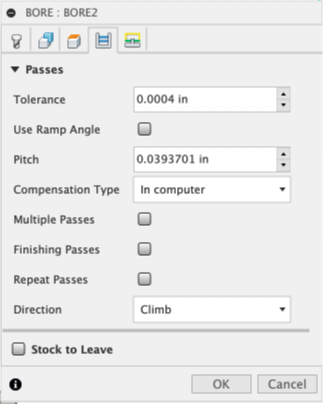
In the Passes tab, we can leave all of the defaults as they are. (For reference on future designs, the pitch is controlling the rate at which the tool spirals into the bore):
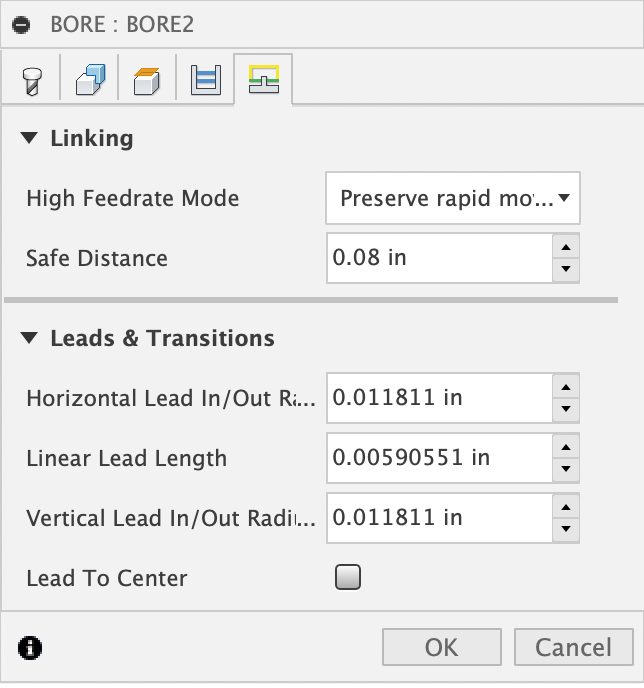
The Linking tab can also be set to it’s default values:
Hit “OK” to finish the toolpath, then save your work and rename this tool path as “Circle Bore”
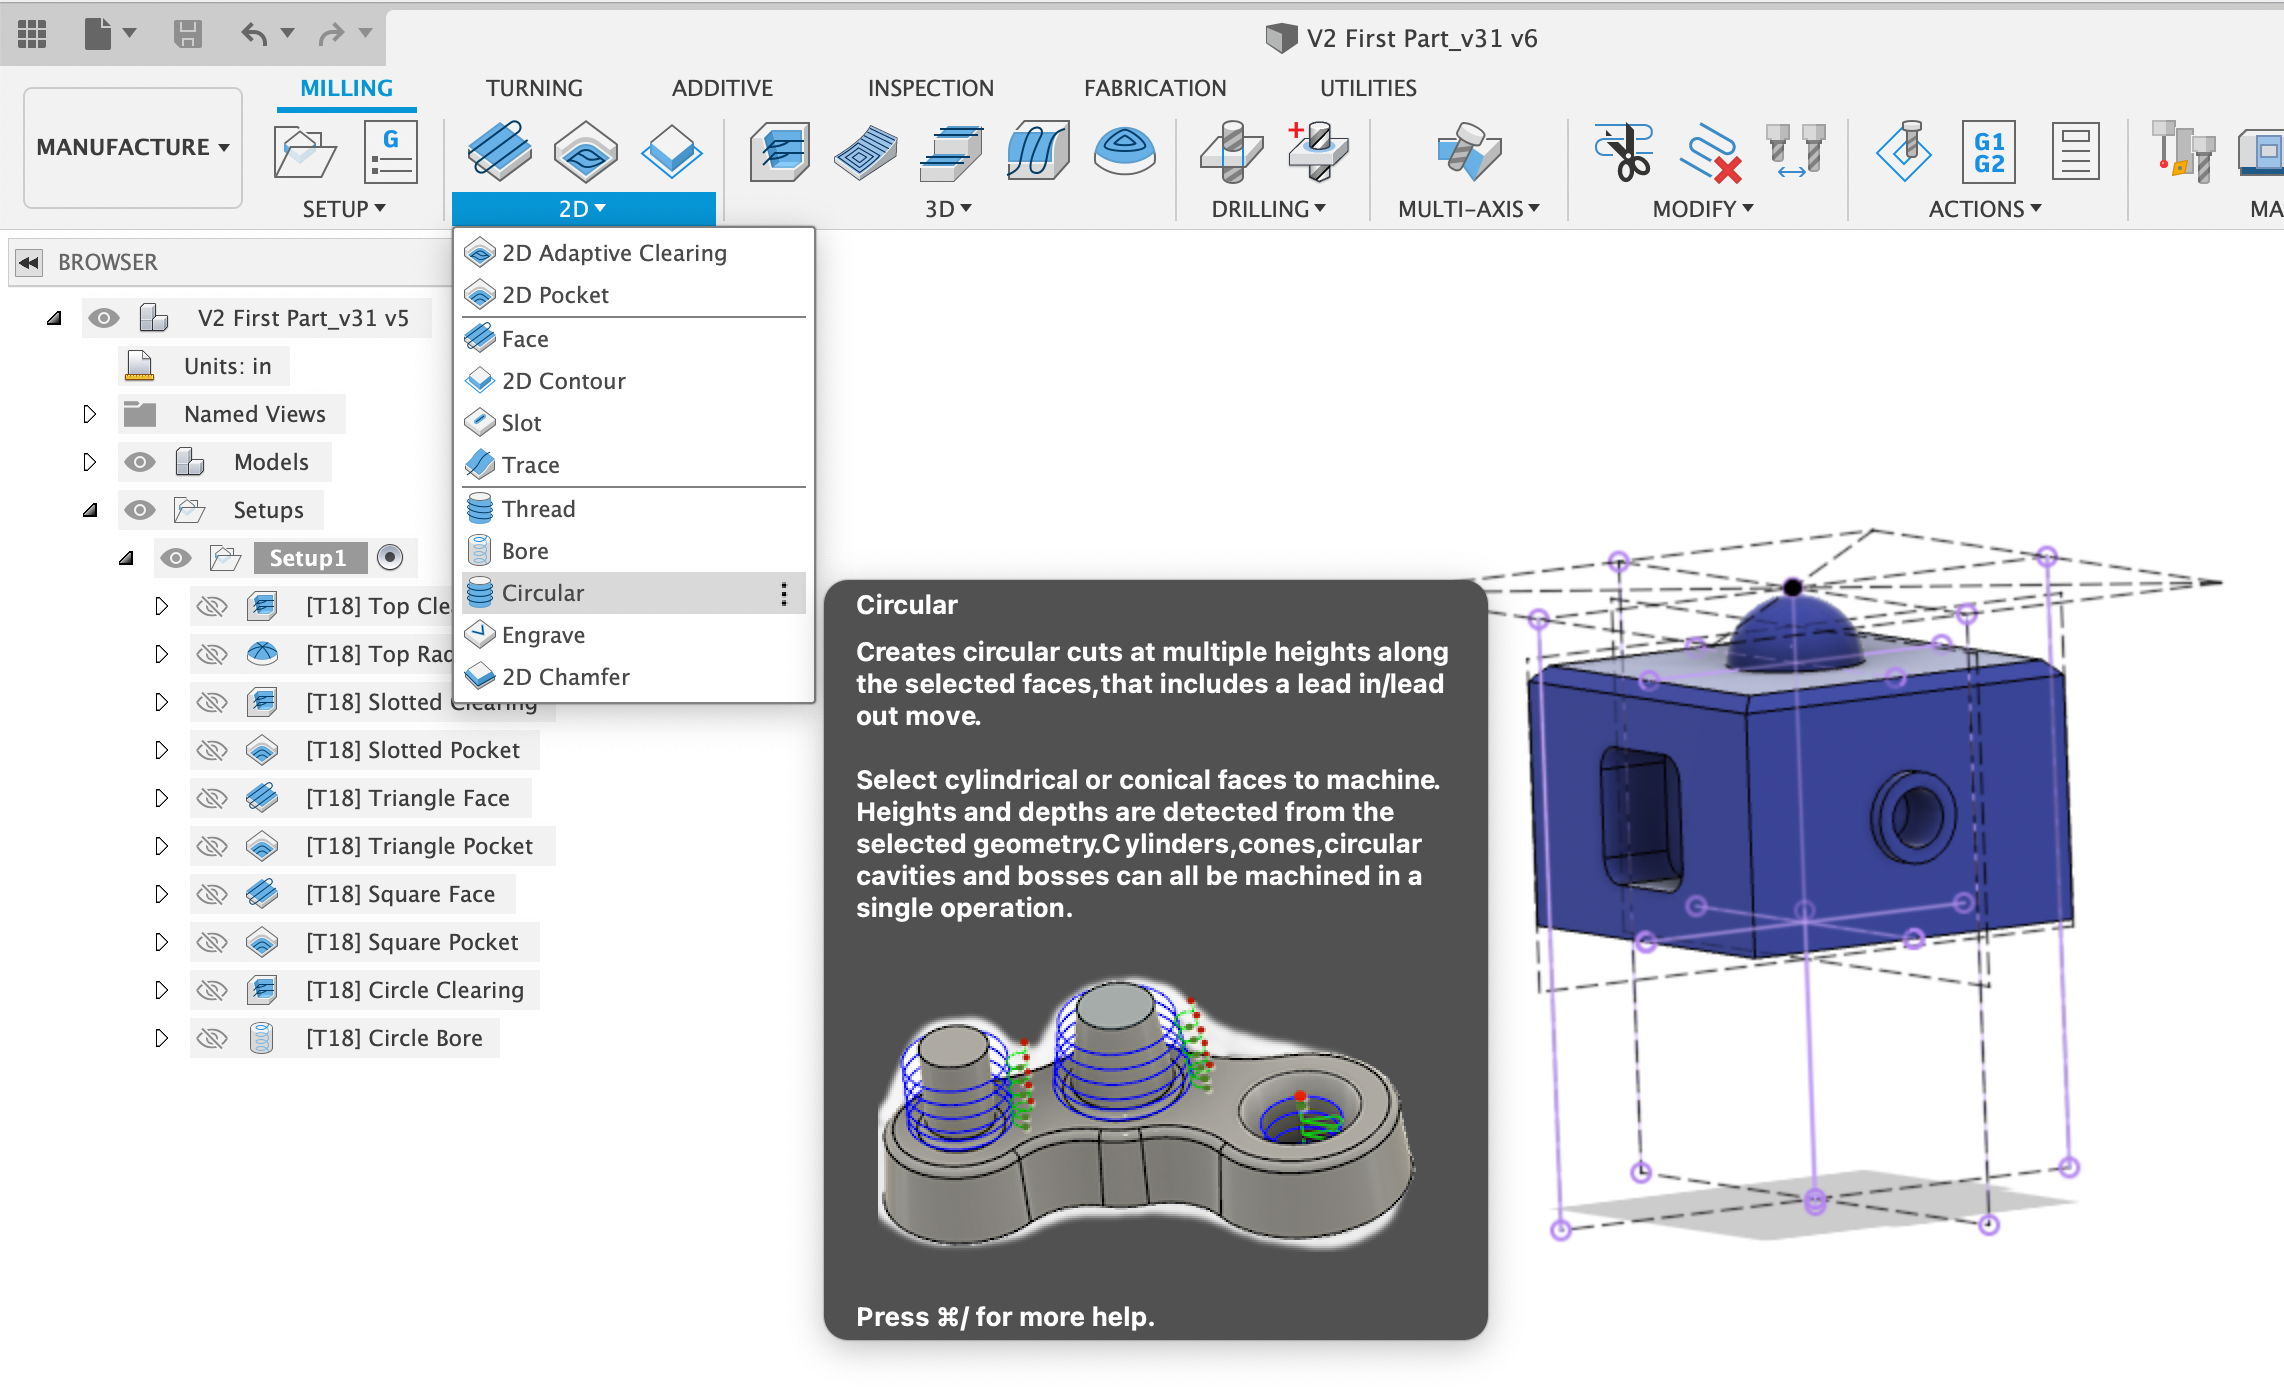
The final operation for the circle side is cleaning up the material we left around the lip of the recess. For this, we will select Circular from the 2D dropdown menu and reuse our settings in the Tool tab:
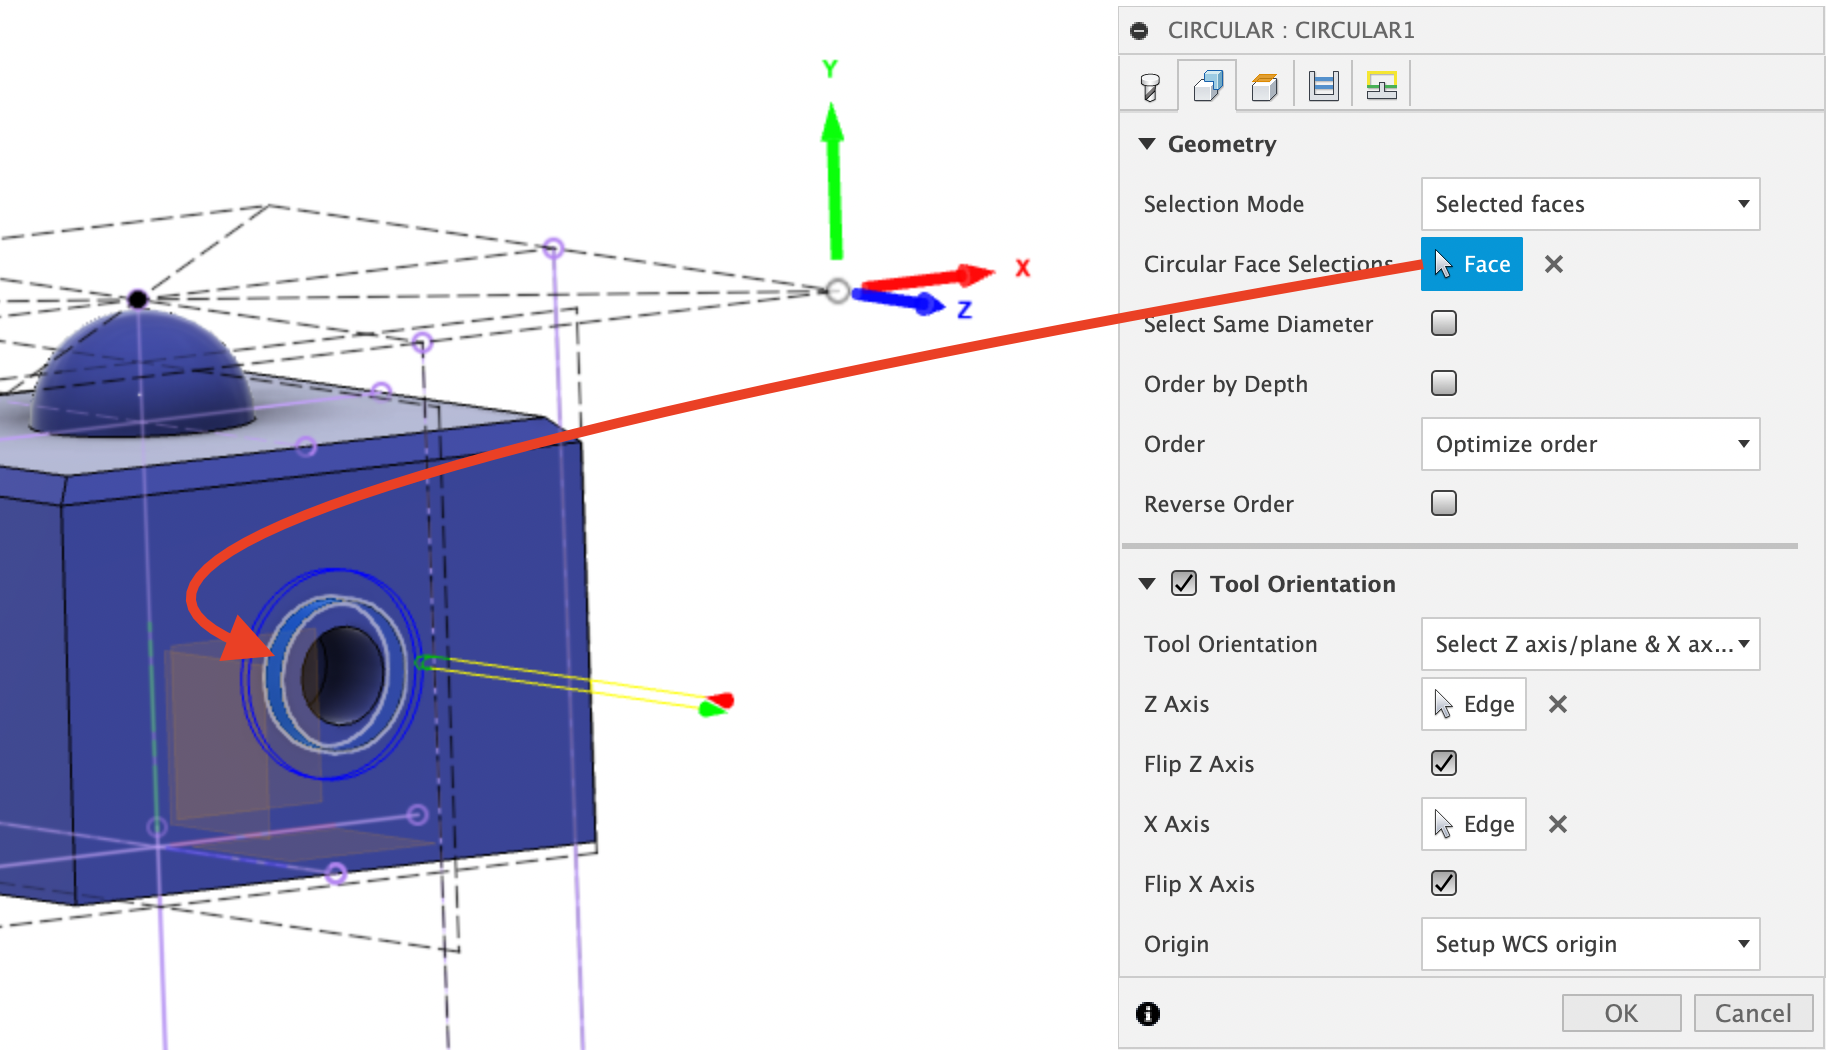
In the Geometry tab, set your Tool Orientation like we have been and then select the outer wall of the cylinder:
In the Heights tab, everything can be left to the defaults since Fusion derives them from the cylinder and we have already faced this side of the part:
The Passes tab can also be left to the defaults, but note that Circular does not use a pitch to spiral into the material, instead it uses a stepdown amount and cuts a full ring before moving deeper into the part. (If you want, you could change this stepdown to the same 0.059” that we have been using, but the default 0.04” is even safer and fine to use):
The Linking tab can also be left to the default settings:
Click “OK” to complete the Circular toolpath, save your work, and rename the toolpath “Circle Circular” :)
Simulate both the Bore and the Circular toolpaths with the video speed slowed down - notice that the Bore continually ramps into the part, but the Circular makes a full loop at the same elevation and then steps down. Depending on what parts you mill in the future, one may be more advantageous than the other.
Section 4.6: Swarf Toolpath
Note: At the beginning of April, 2022 Fusion 360 restructured what toolpaths are available within the core license. This restructuring moved all simultaneous 4 and 5 axis toolpaths to the manufacturing extension. The toolpath created in this section is a 5 axis toolpath called a Swarf, which will no longer be possible with the core license. If users do not have access to the manufacturing extension this section can be skipped.
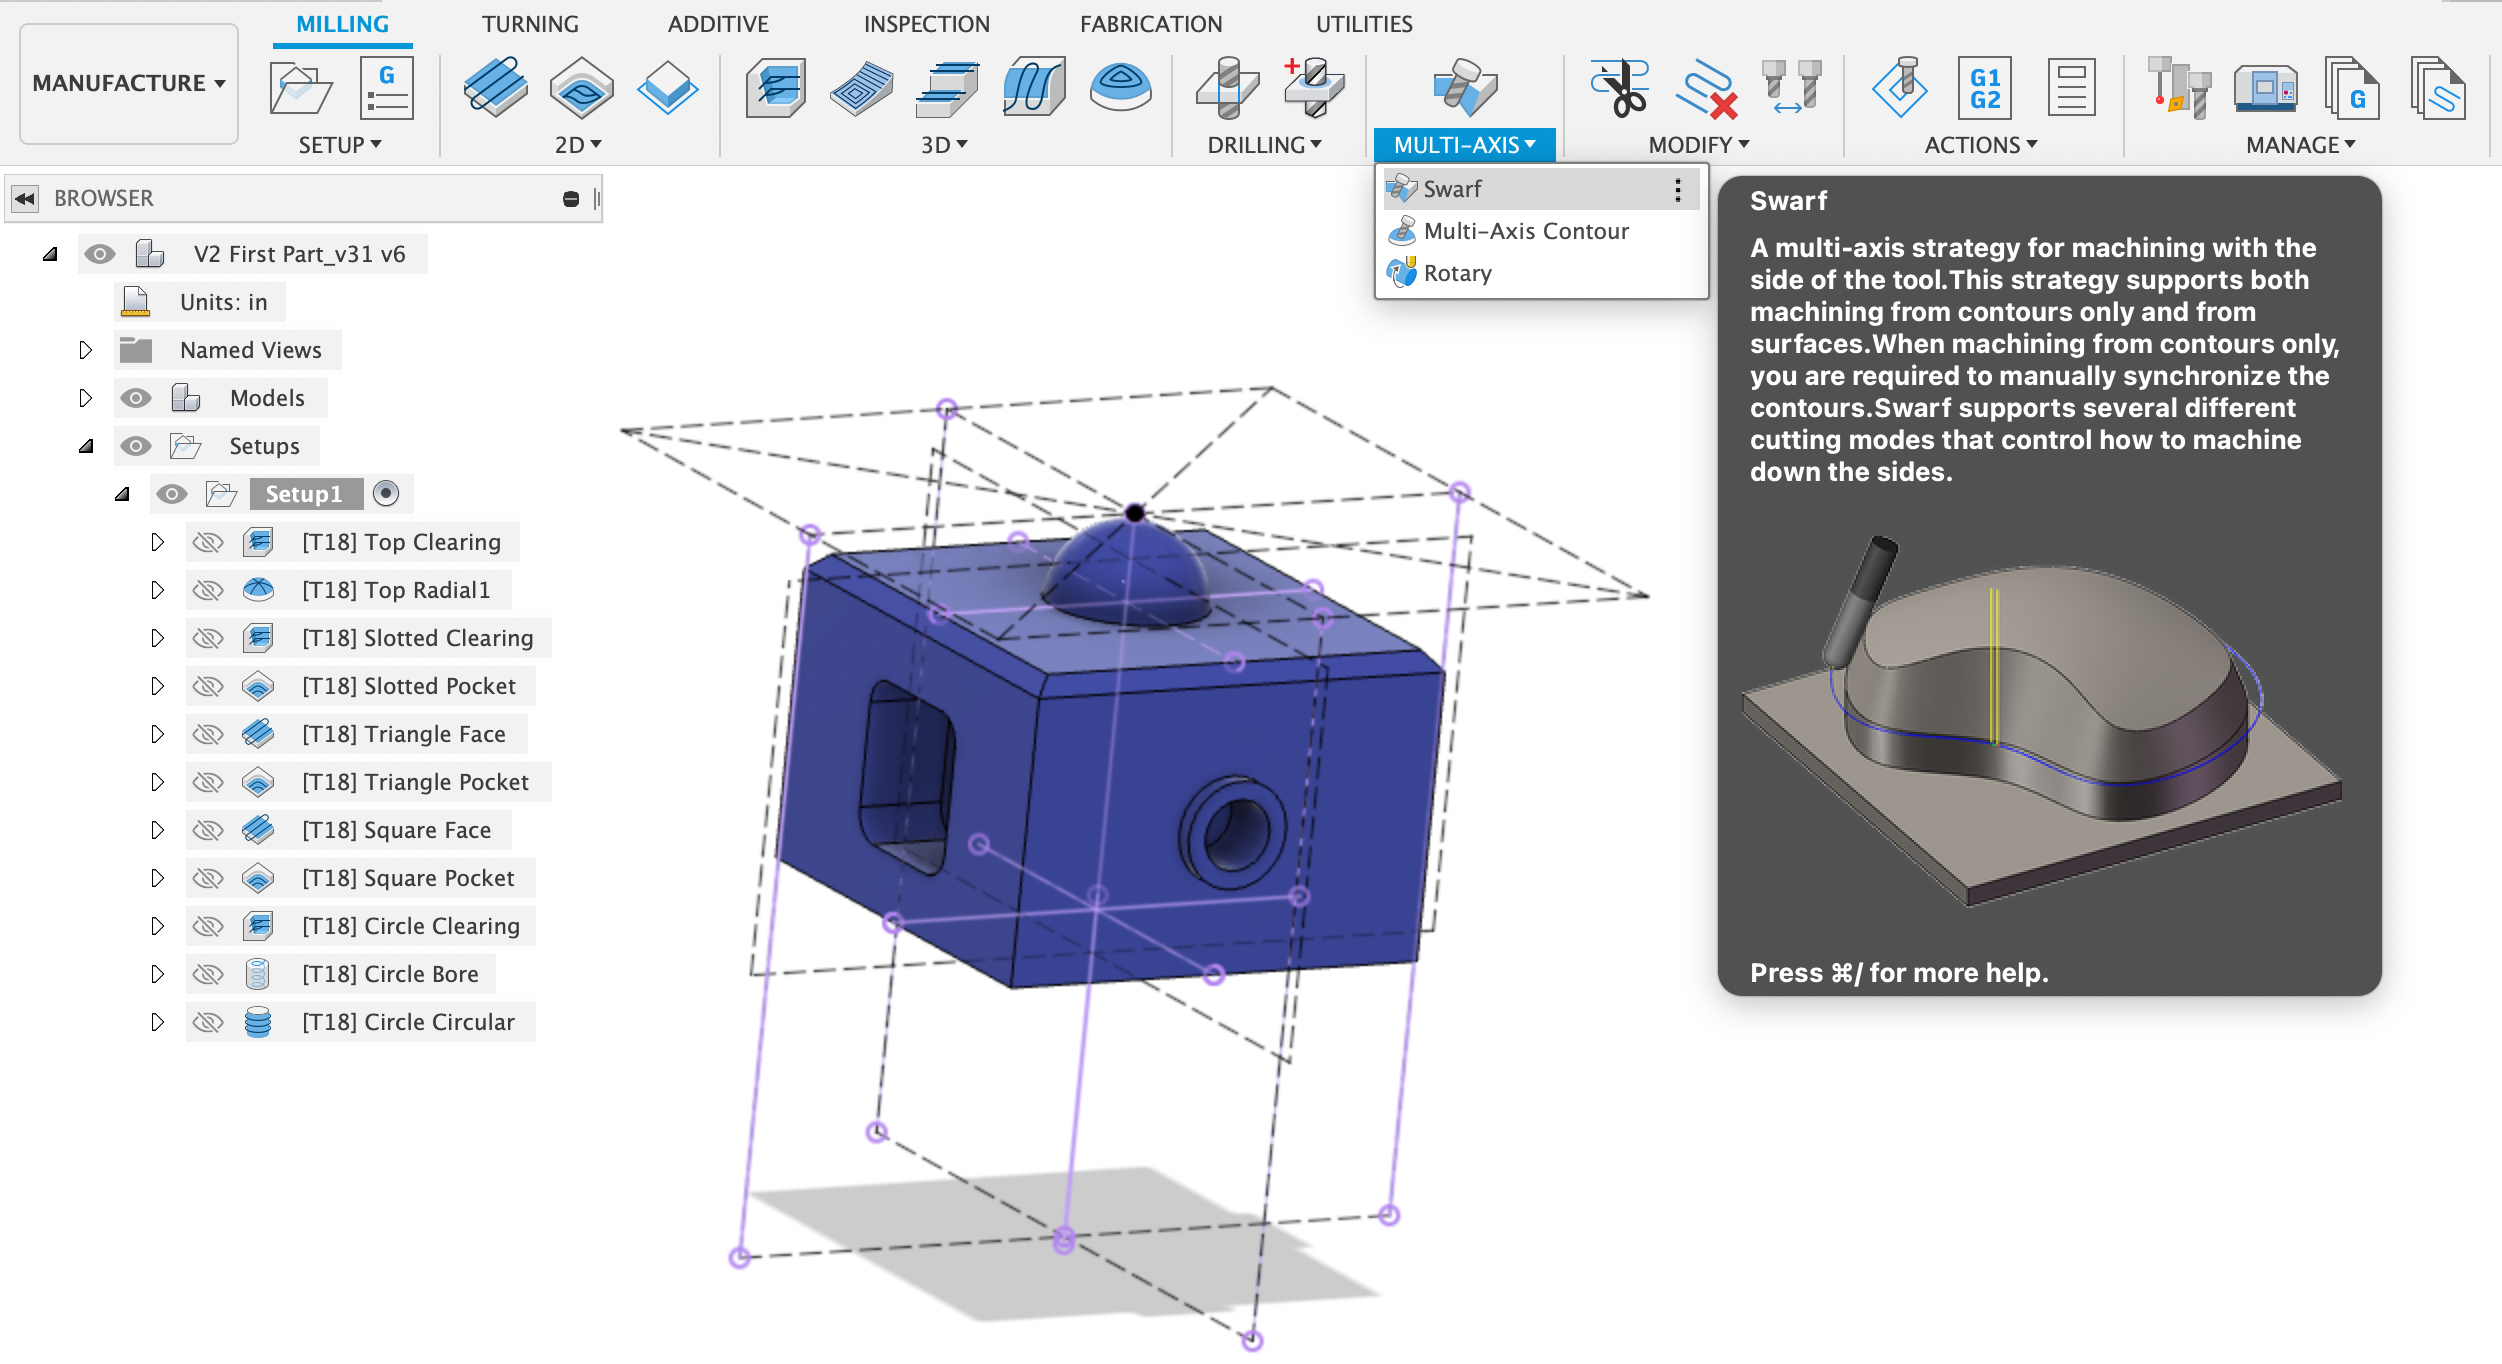
To create the chamfer around the top of the part, we will use the Swarf toolpath. This is referred to as a “Multi-Axis” toolpath as it uses more than 3 axes simultaneously. The Swarf will allow us to machine the full perimeter of the chamfer from the top of the part and use the side of the tool instead of the tip. The cutter is going to approach the part from the top, then the part will rotate so that the chamfered edge is cut around the perimeter.
To begin, select the Swarf toolpath from the “Multi-Axis” dropdown menu and use the same Tool tab settings:
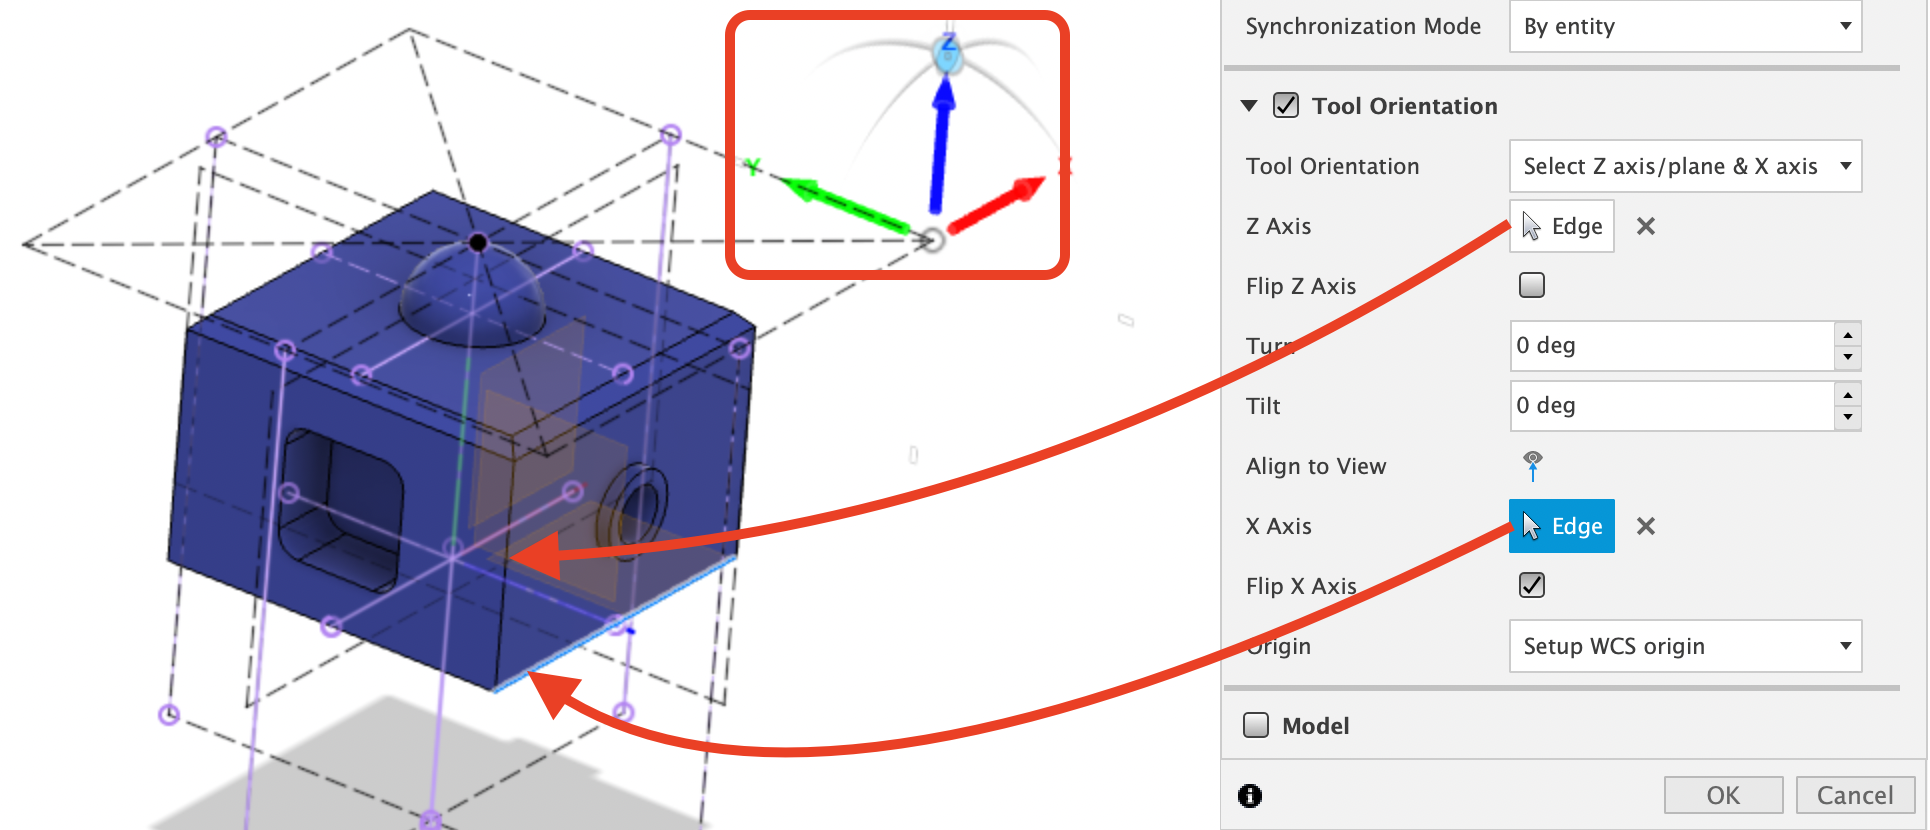
In the Geometry tab, we now want to change the orientation so that the tool approaches from the top. Select the front left corner for the Z-axis and the bottom front corner for the X-axis. You will likely need to flip one or both of the axes; when done, your orientation should look like the following:
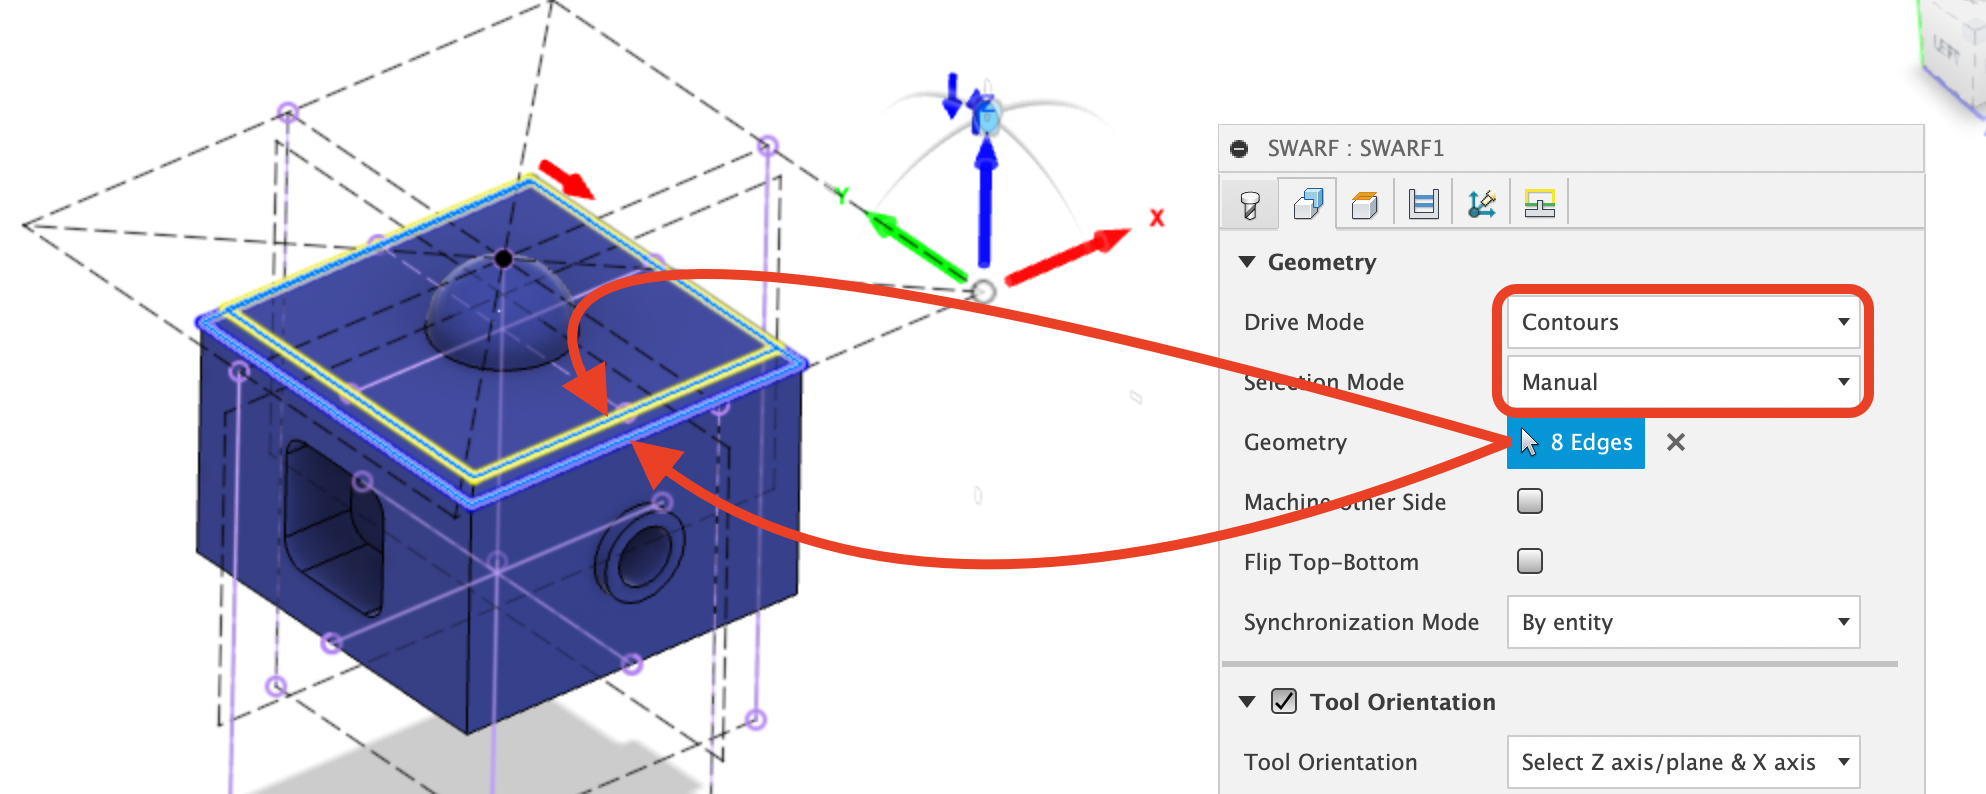
Next, select the geometry to be machined by choosing “Contours” as the Drive Mode and “Manual” as the selection mode. Then click the “Nothing” box next to Geometry and select all 8 of the top and bottom edges of the chamfer in any order. The top edge should be yellow to indicate that it is the top profile. The bottom edge should be blue to indicate that it is the bottom profile. Use the “Flip Top-Bottom” button to flip the relationship of these edges if they are wrong.
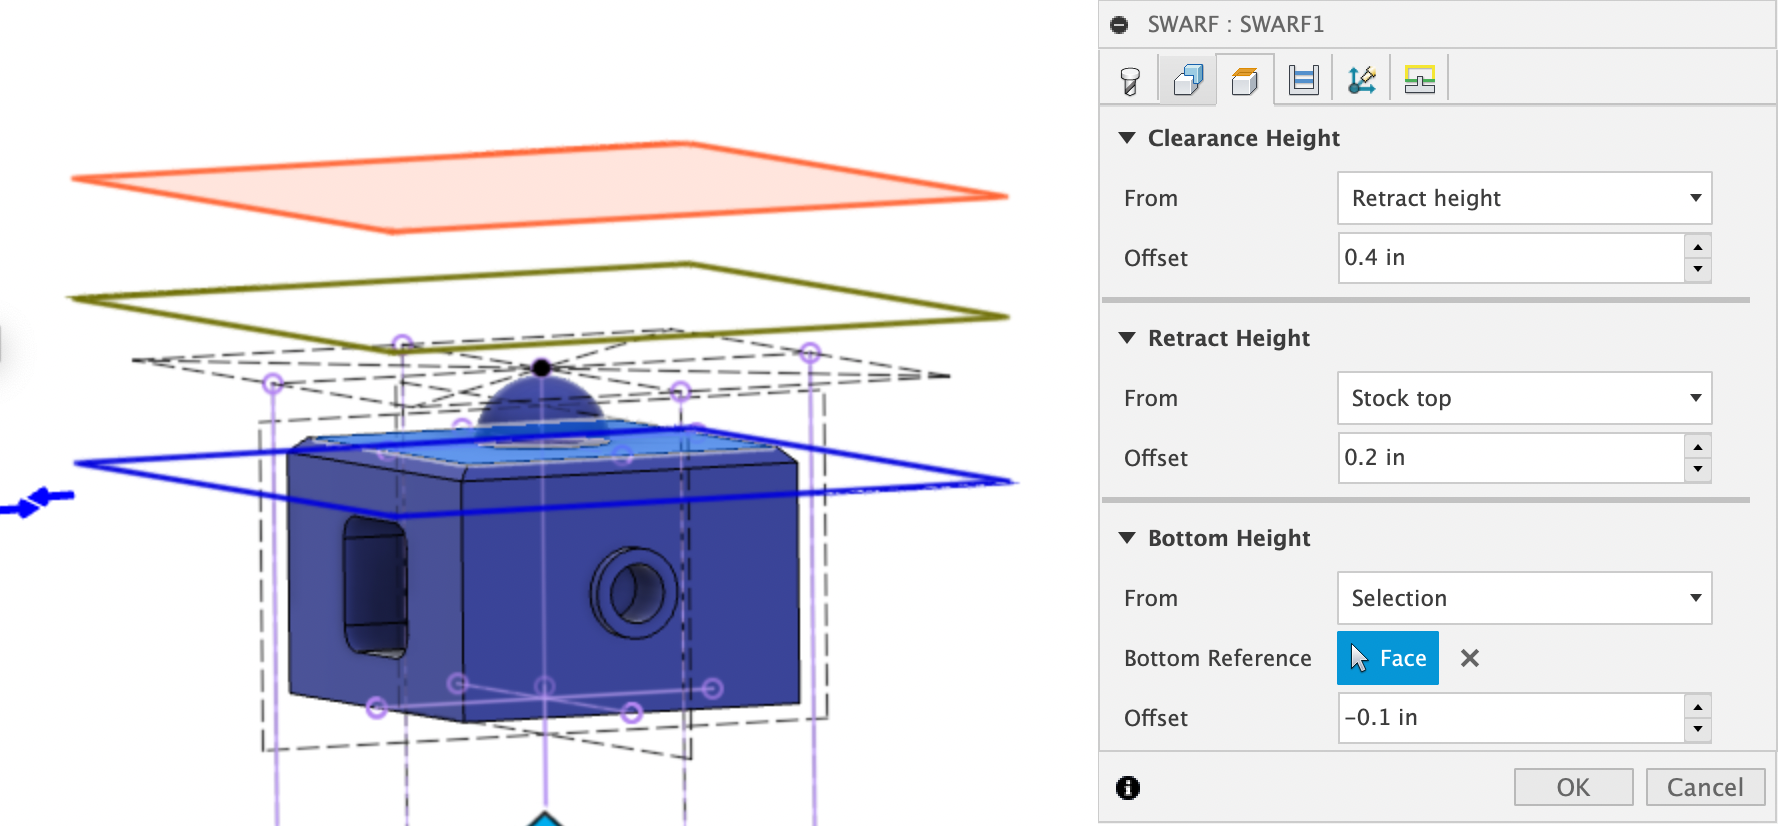
In the Heights tab, change the Bottom Height to “Selection”, select the top face of the part, and then give it a -0.1” offset. This will ensure that the tool has the needed depth to machine down from the top face. The other heights can be left as their defaults:
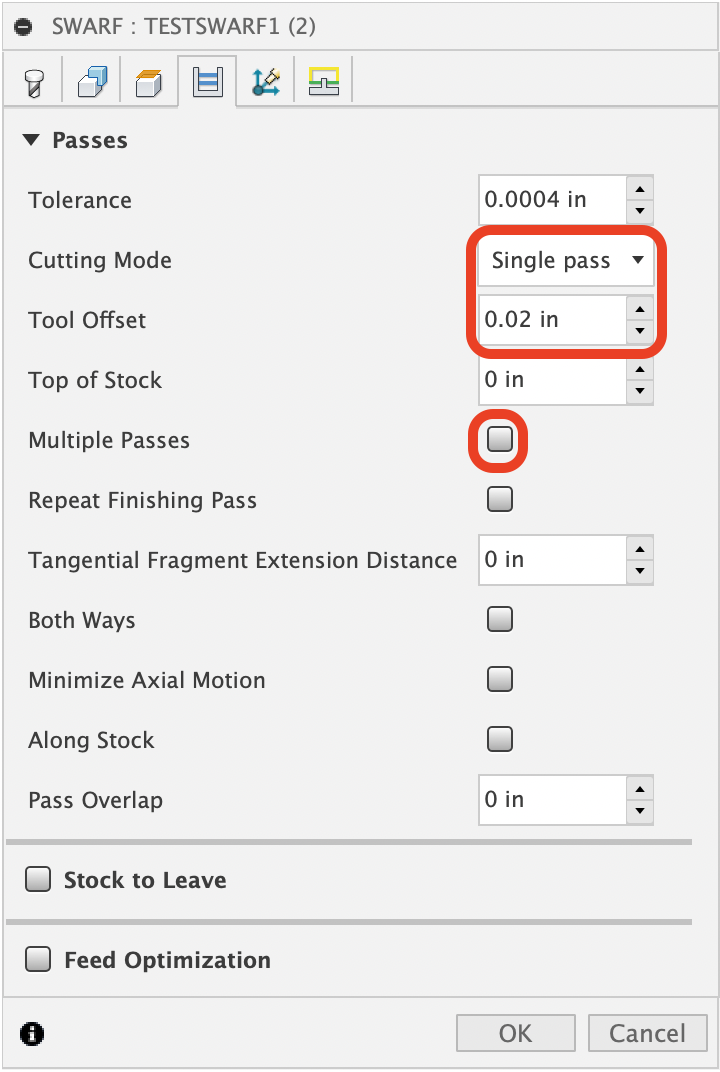
In the Passes tab, use the settings as shown below:
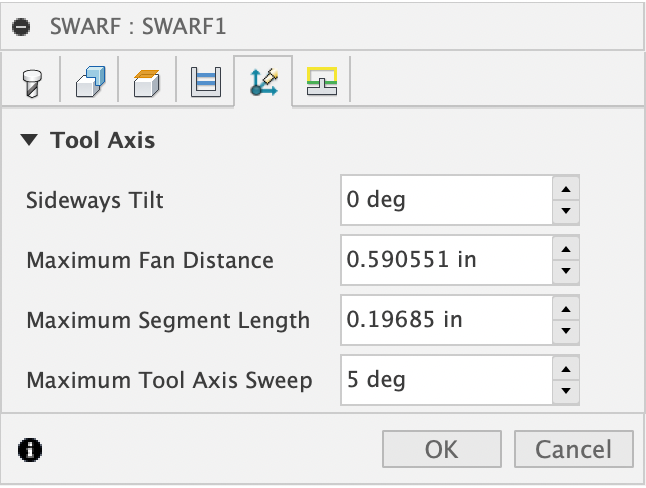
We now have an additional tab labeled “Multi-Axis”; we can leave all of these settings to their defaults:
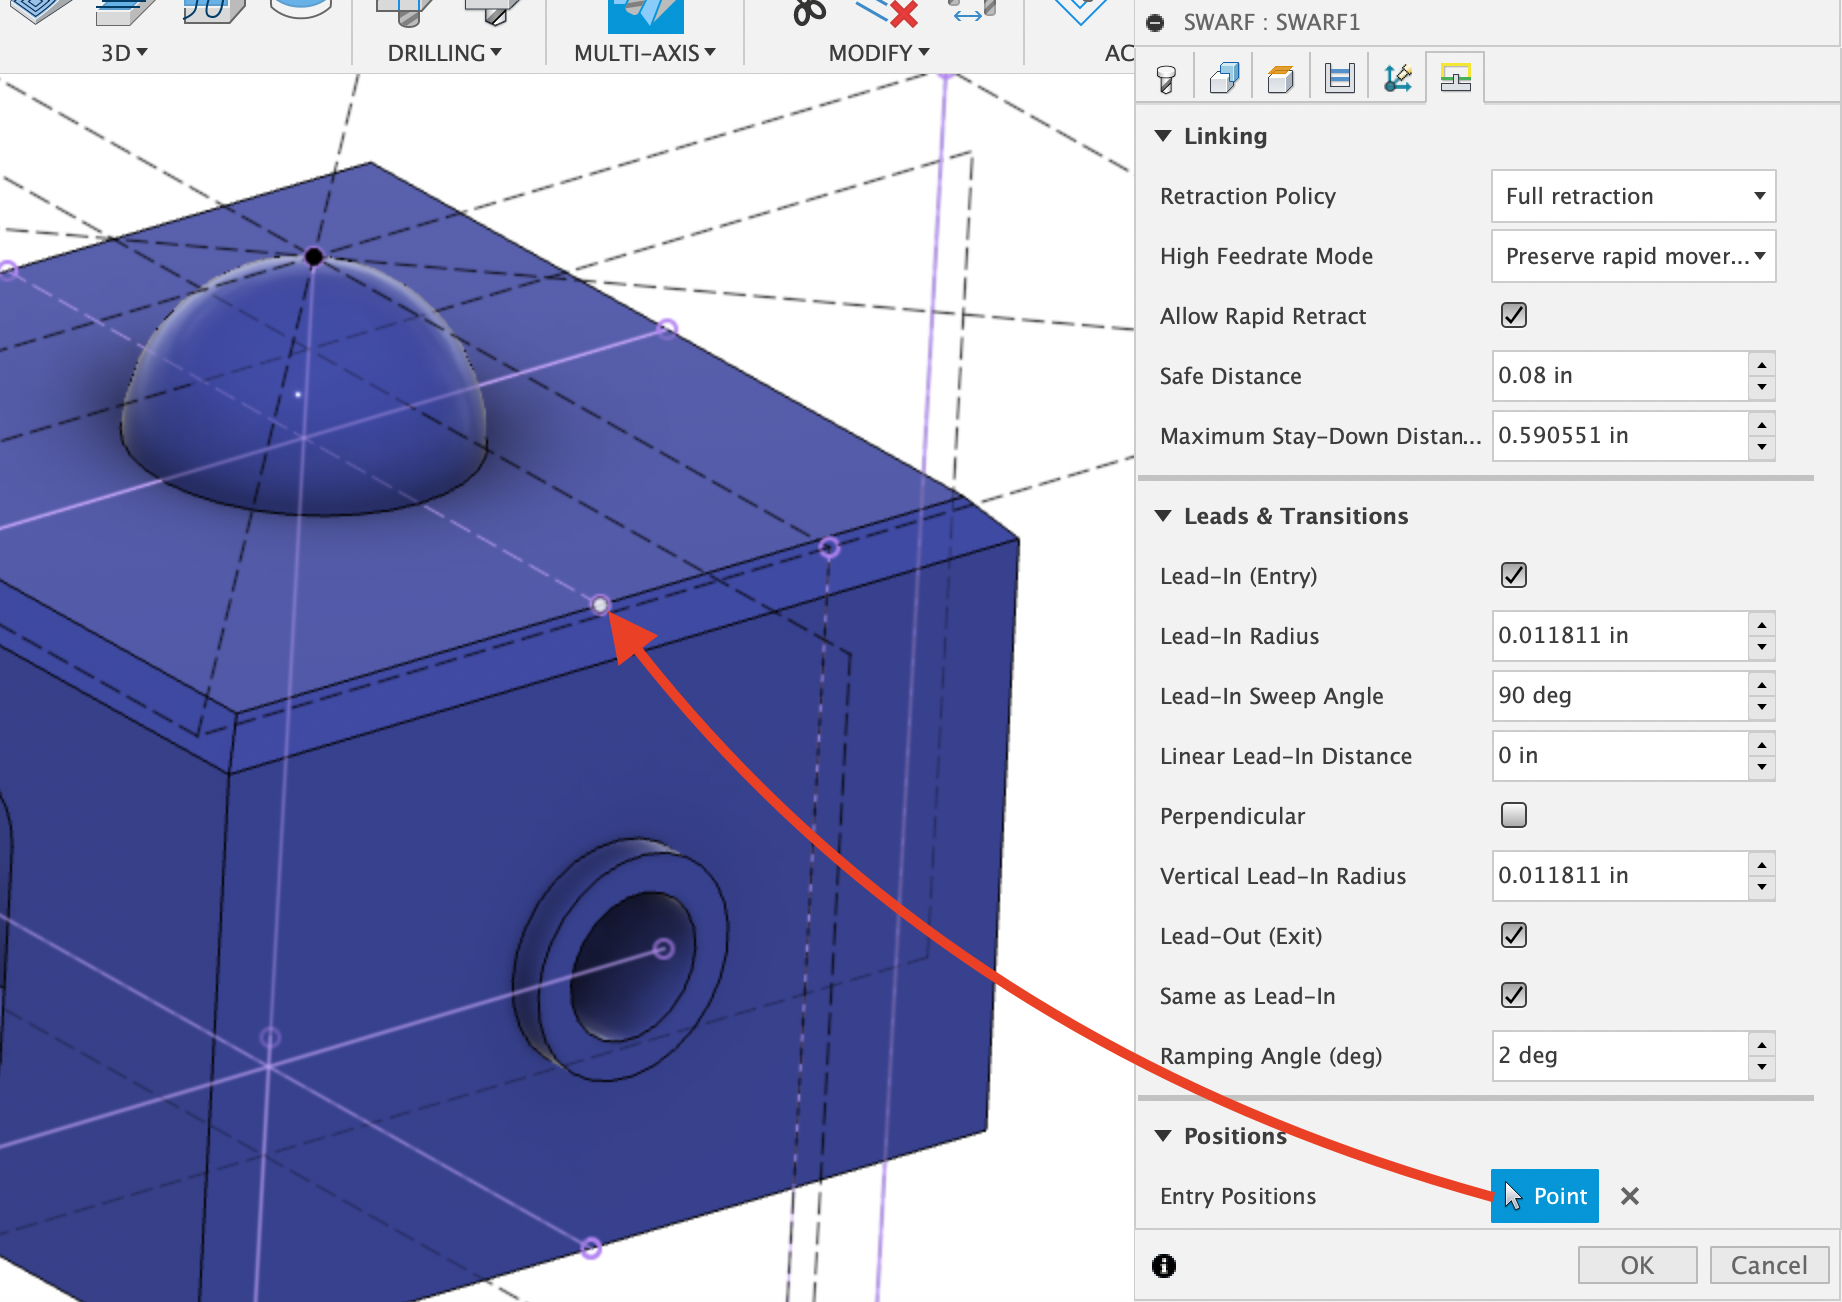
In the “Linking” tab, we can keep all of the default settings except for “Entry Position”. This tells the machine where to start/end the toolpath and it will default to a corner. For this toolpath, the start point was moved to the middle of one of the sides so that the tool ramps smoothly into the material:
Click “OK” to complete the toolpath and save your progress. Since we only have one swarf command, you do not need to rename it. Simulate the toolpath to get an idea of how the tool will move in relation to the stock. When machining the actual part, the tool will be mostly stationary and it will be the part that is moving most with respect to the tool.
At this point, you can highlight and simulate all of the toolpaths if you would like to preview the full part.
Section 5: Post Processing
In order to create machinable code from the the toolpaths that have been created the code has to be post-processed into G-code. This is the process that Fusion’s software uses to transform the toolpaths into code that the Pocket NC can use.
The toolpaths may be post processed (“posted”) individually or several of them may be selected at once and post processed together. It may be helpful to post process your programs one toolpath at a time until you are confident that they are doing what you want them to do. It is much easier to troubleshoot smaller programs than large ones.
Once you are sure that they are working correctly, it will save time to group as many toolpaths together as possible by posting all of the paths that use the same tool and the same stock setup together.
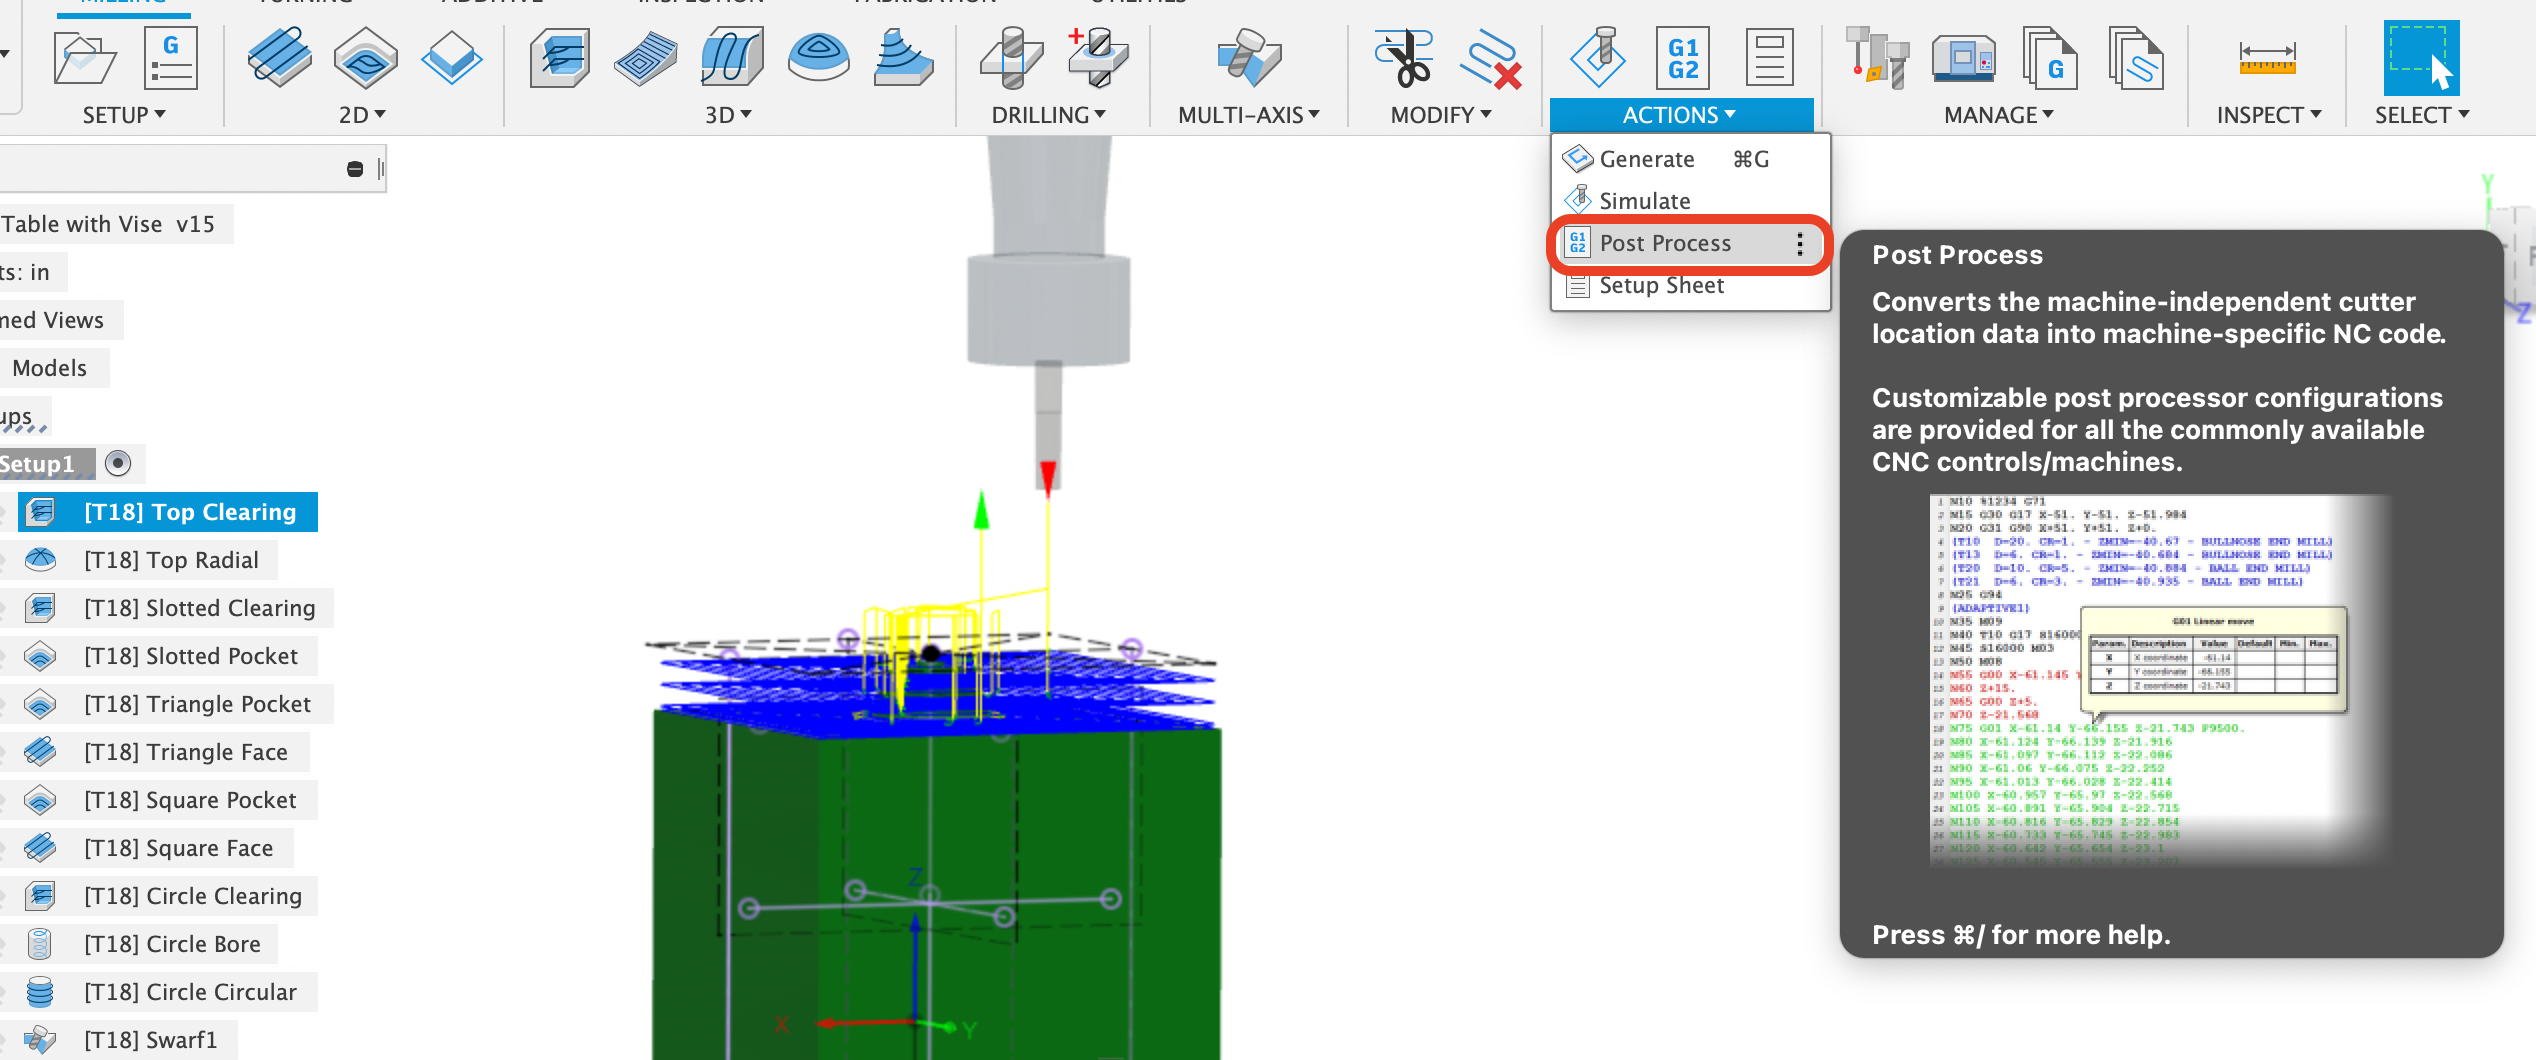
Post process a single toolpath by clicking on it and then clicking “Actions” > “Post Process”. Alternatively, you may right-click on the toolpath and select “Post Process” from the menu.
To post process all of the toolpaths, click the setup (with the default naming “Setup1”) then select “Post Process” using either of the methods mentioned above.
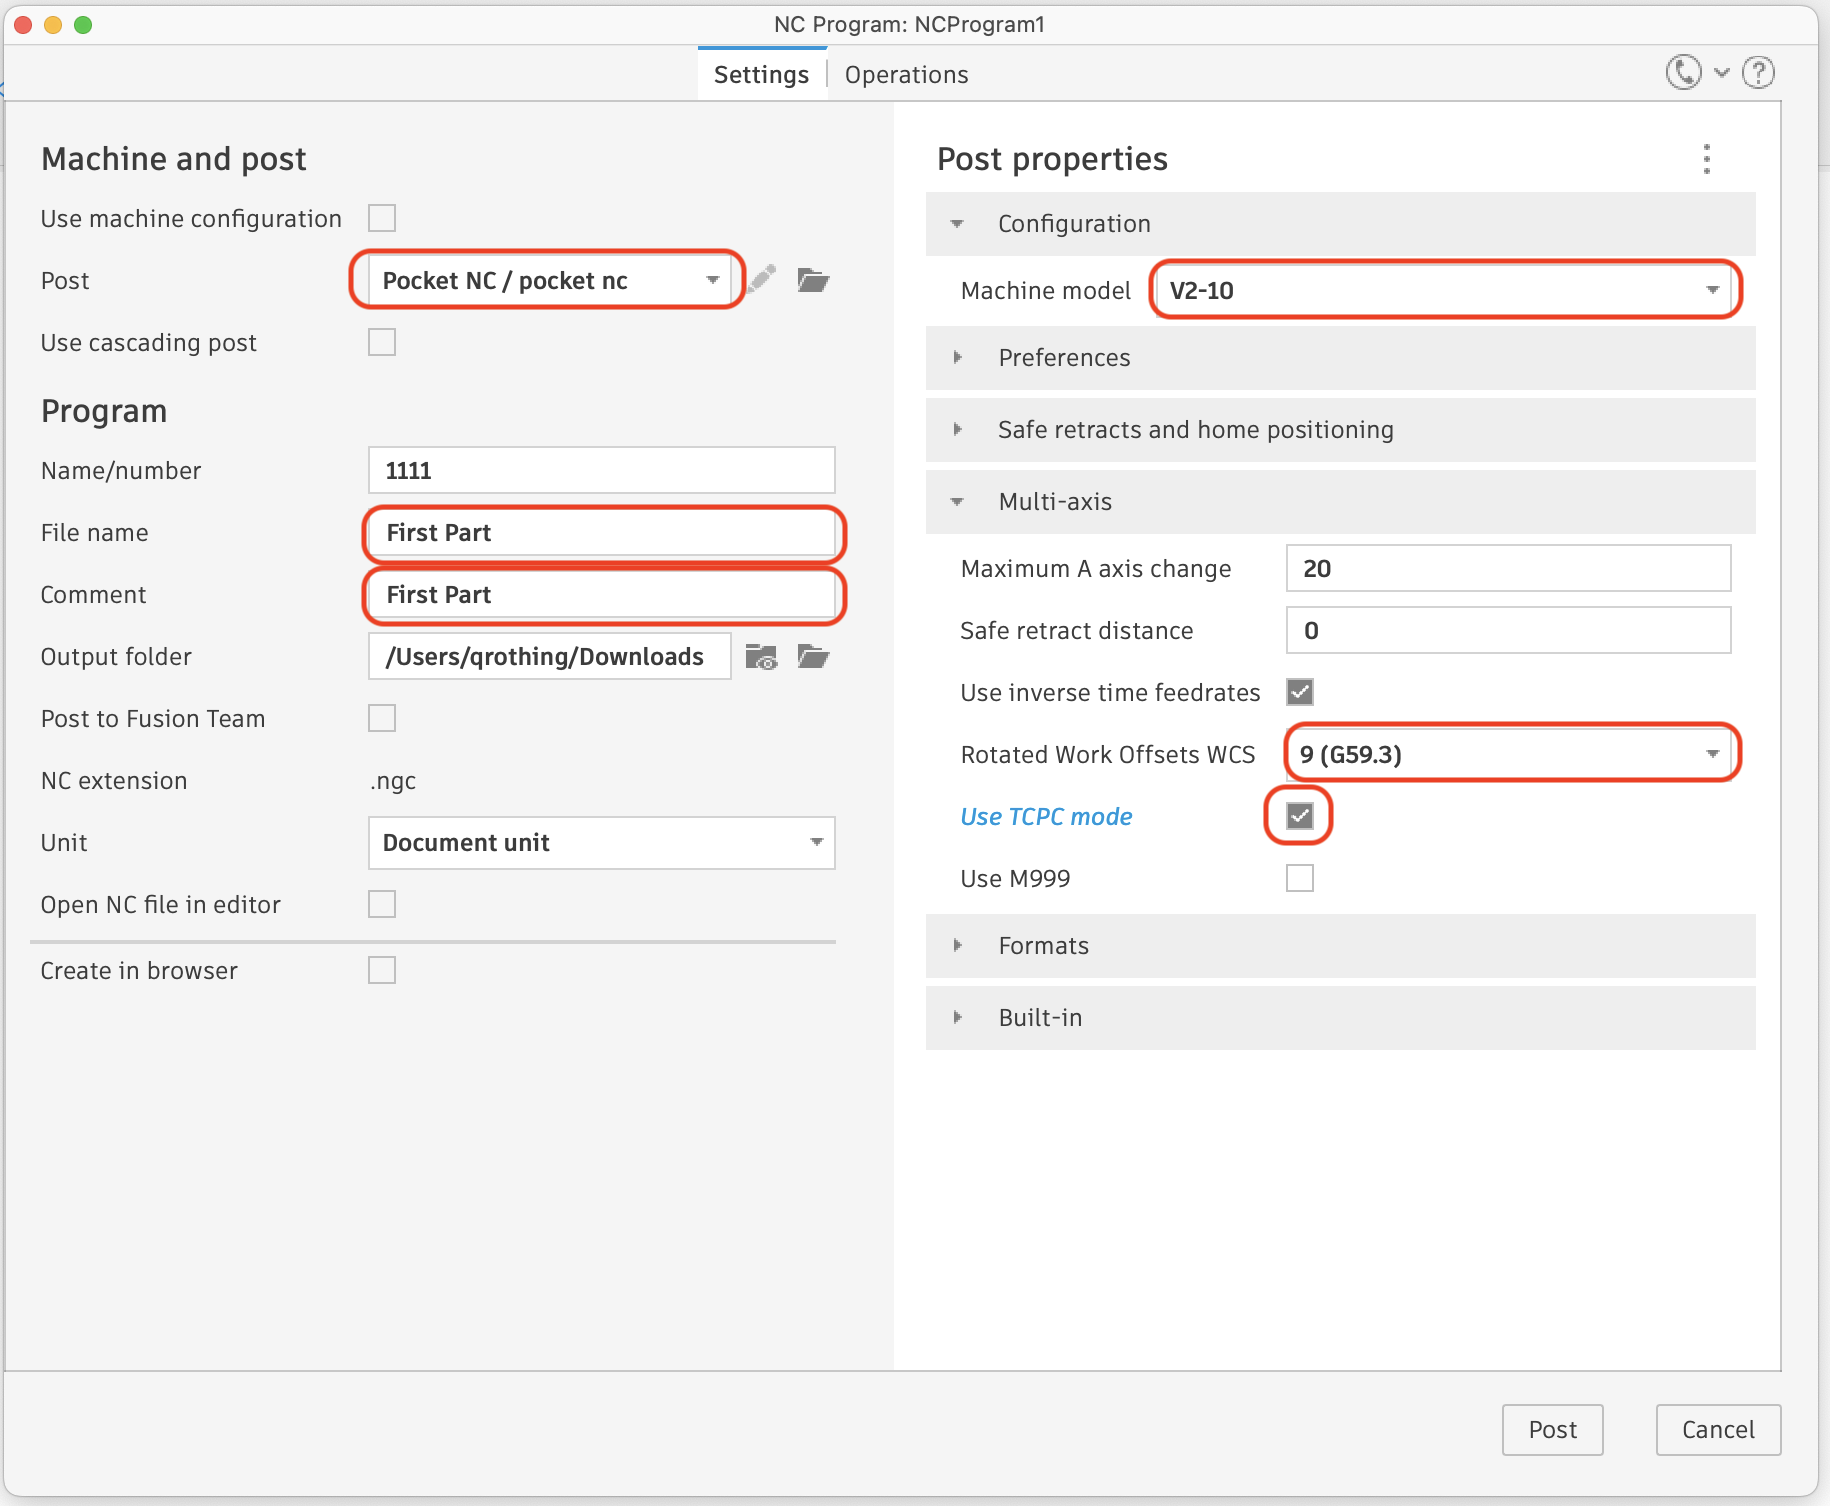
Once you click the “Post Process” button, a dialogue box will appear where you can choose which post processor to use, which machine model to use (V2-10 vs V2-50), and add comments to the code. You must select the “Pocket NC” post processor from the list and then the machine model. (Every CNC machine has unique geometry, speeds, number of axes of motion, and other boundary conditions, so every machine has a slightly different post processor. The code will not work correctly on the Pocket NC mill if it is not written with the Pocket NC post processor. Once you select this once, it should stay as your default).
Any program comments that you add here will be added to the beginning of the code. They will not be executed by the machine. This is good place to record the part name, revision number, date, the code’s author etc. for future reference. You will also need to select WCS number 9 (G59.3) from the list next to “Rotated Work Offsets WCS” and enable “Use TCPC mode”. You can also adjust your “Output Folder” to change where the file will be saved. When done, you Post Process window should look exactly like below (unless you changed the Program Number or Comment):
Once you have selected the correct post processor, click “Post.”
Your computer’s file browser will open asking you to name the program file (it will also allow you to change where it will be saved). Give the program a descriptive name. The file extension should be left as .ngc. The file should be written to either a local file directory on your computer or a removable storage de such as a USB flash drive.
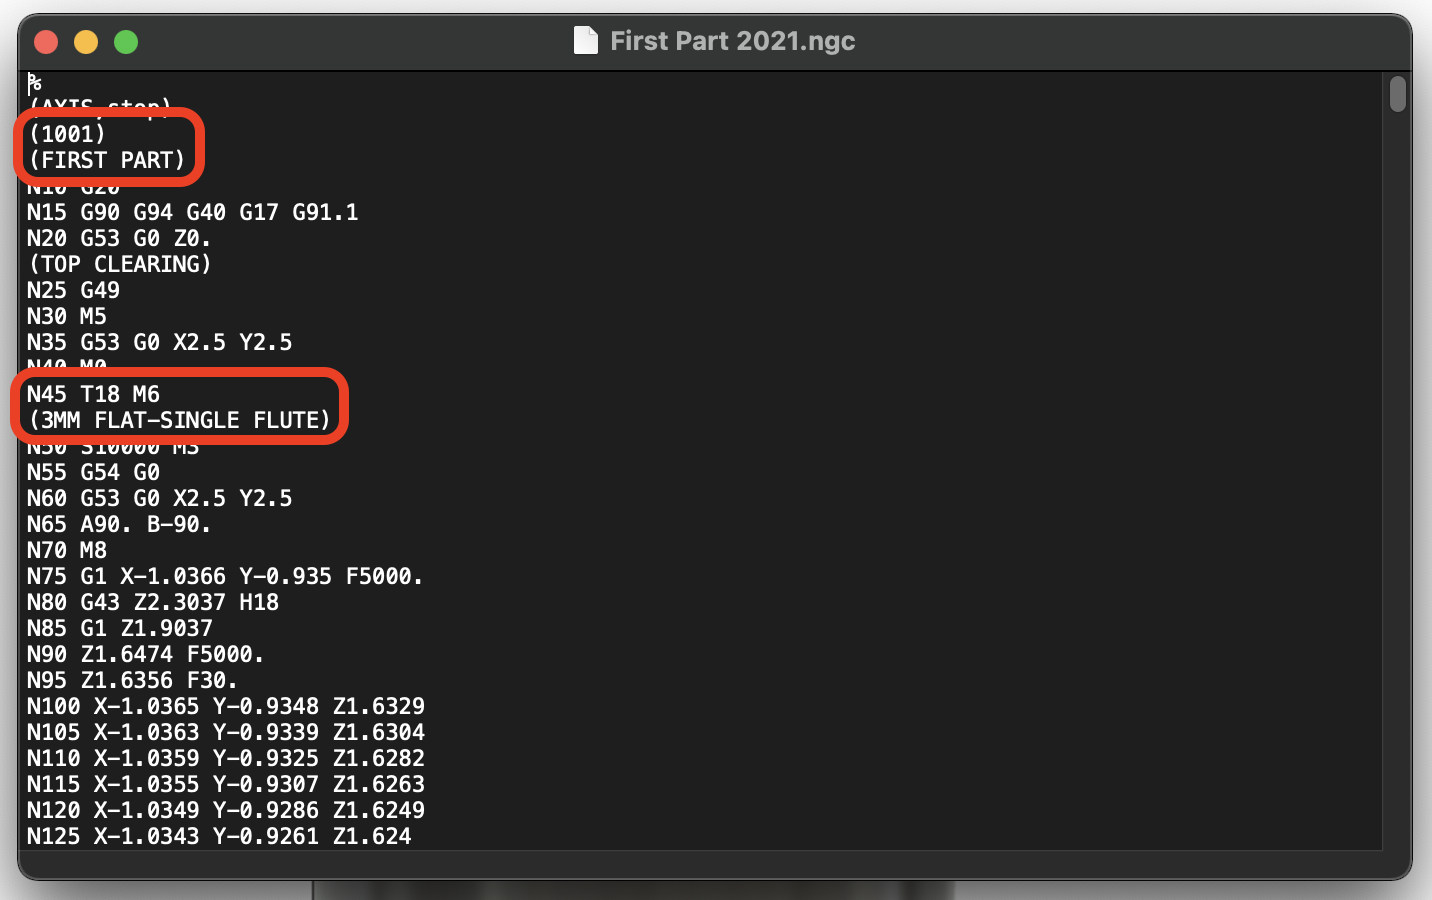
Click “Save” to post process the toolpath and write the G-code file to the specified location. You can open the file with a text editor program to verify your program number, program comment, and the tool used. (You can also edit your G-code here, just remember to save it afterwards). When opened in a text editor program, the file will look like the following on a Mac and slightly different on a Windows computer:
Section 6: Setup and Running the Program
Section 6.1: Loading the Tool
Use the 3mm single flute Datron cutter with the 1/8” shank for this part (or the 1/8” single flute Harvey if your machine was shipped before 6/1/2021).
For this part we need 1” of the tool sticking out of the tool holder:
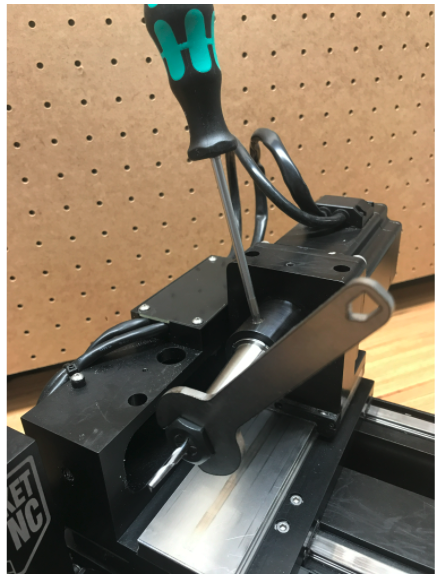
In a V2-10, mount the extended tool holder (about 3” long) in the spindle so that the two tabs and notches align. To tighten and fully seat the tool holder, begin tightening one setscrew until it begins contact with the tool holder and then do the same with the other 2 setscrews. After that, continue tightening from one setscrew to the next until they are all fully tightened (a video of this process can be found here). Insert the tool into the collet until the end of the tool is 1” from the end of the holder and then tighten the collet nut. Ensure all of the setscrews and the collet nut are firmly tightened (you can leave an allen/hex key inserted in one of the setscrews to create some leverage for tightening/loosening the collet nut):
On a V2-50, rotate the spindle’s lever arm to the “open” position and insert the tool until the end of the tool is 1” from the end of the spindle, then rotate the spindle’s lever arm to the “closed” position to lock it in place. (In a V2-50, it is very important to keep both the tool and the collet clean and oil free so that the tool does not slip). For more information on switching tools or collets with a V2-50, please watch our YouTube video here.
After loading the tool, boot up and home the machine and then measure a Tool Length Offset for the tool you are using (the 3mm Datron is Tool #18 and the 1/8” Harvey is Tool #10 - this will match what you used in your toolpaths). For information on navigating the Using Interface please refer to the Kinetic Control Software Overview for more information - the “Tool Offsets Section” of the linked tutorial describes how to set the tool length offset. (For video walkthroughs, please visit our Getting Started playlist on YouTube). Navigate to the Tooling tab of the user interface and select Measure Tool 18 (Datron) or 10 (Harvey). The spindle moves forward on the X axis to load the tool, press the green flashing button on the front of the Pocket NC and the tool will probe and the value will populate in the TLO column of the tooling table for that tool.
Section 6.2: Mounting the Vise
(For additional information on the vise and workholding in general, refer to the workholding tutorial)
With the machine homed, insert the vise into the rotary B-table with the movable jaw facing towards the front of the machine. Position the gripper screws so that they are in the second largest position on the fixed jaw and the standard position on the movable jaw, and then secure the vise in place with two M4 x 10 screws (and pins if you wish). Your setup should look exactly like below:
Section 6.3: Mounting the Stock
This part is designed to be cut out of the 2” x 2” x 2” cube of wax that came with your machine. We will want to center the stock as best as possible left-right in the vise to make sure we have an equal range of motion for each side. The best practice is to use calipers or a tape measure to make sure that the stock is centered.
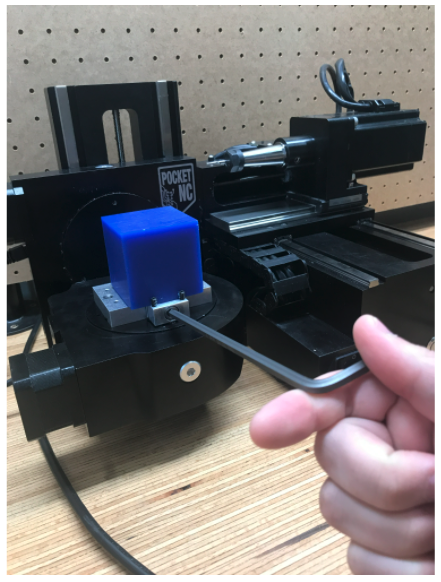
With the stock centered in the vise, press down on the top of the stock and tighten the front 5 mm screw with the long leg of the hex key until the gripper screws start to bite into the stock. The vise does not need to be exceedingly tight to secure the stock - the long leg of the hex inserted in the screw with the short leg as leverage should be plenty for all materials. Check that the workpiece is tight by trying to rock it back and forth in the vise and ensuring there is no movement.
Section 6.4: Locate the Stock with Work Offsets
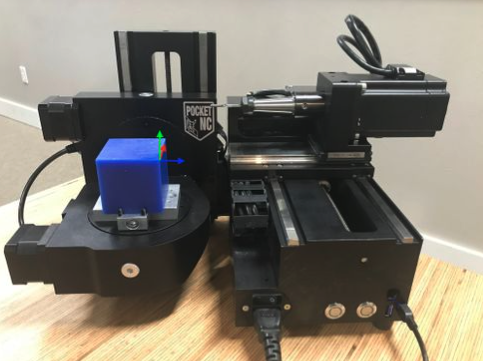
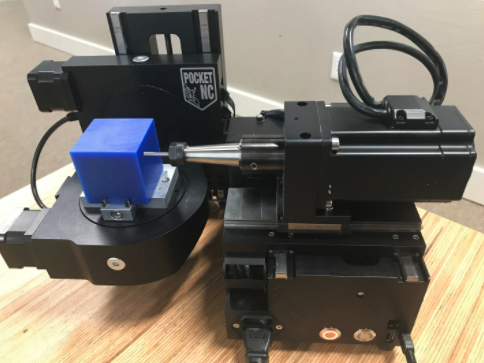
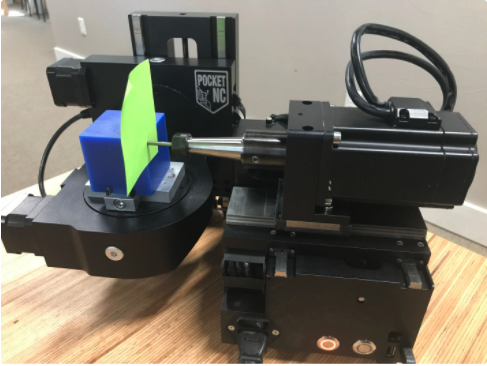
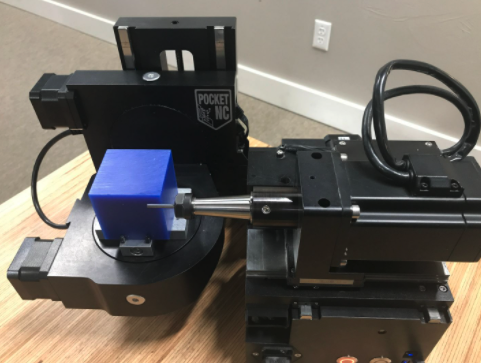
With the stock mounted, we are now ready to locate the stock with respect to the machine. Once the machine knows where the physical origin is located, it can then accurately cut the part from the stock. When we created our CAM program, we set the origin to the front, top corner facing the spindle. We will want the machine origin to match our CAM:
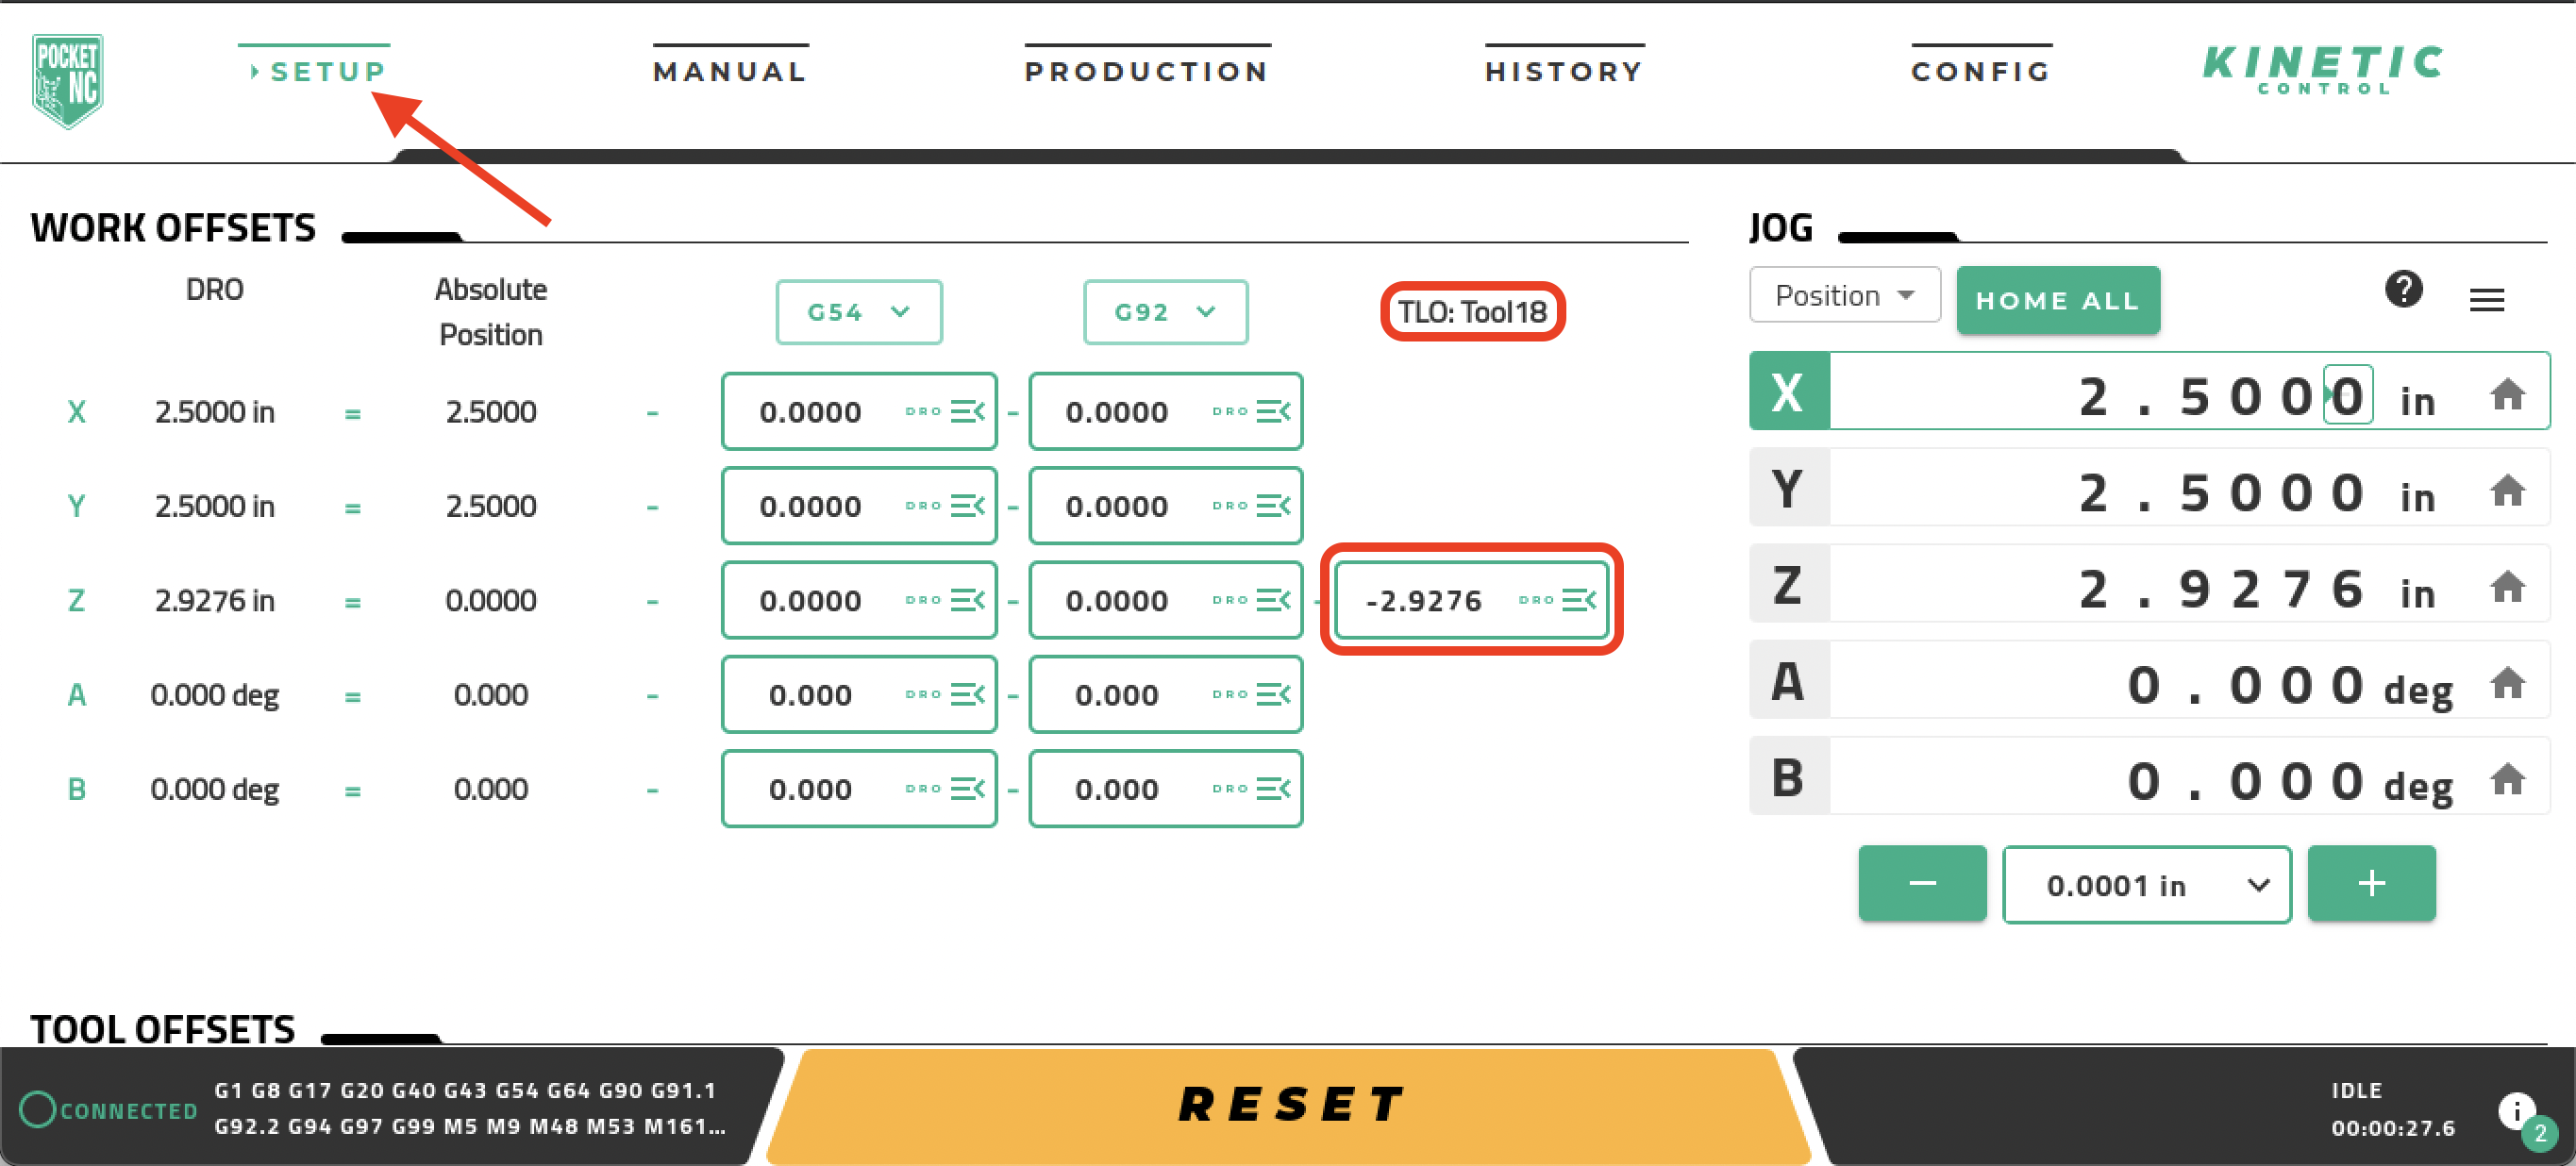
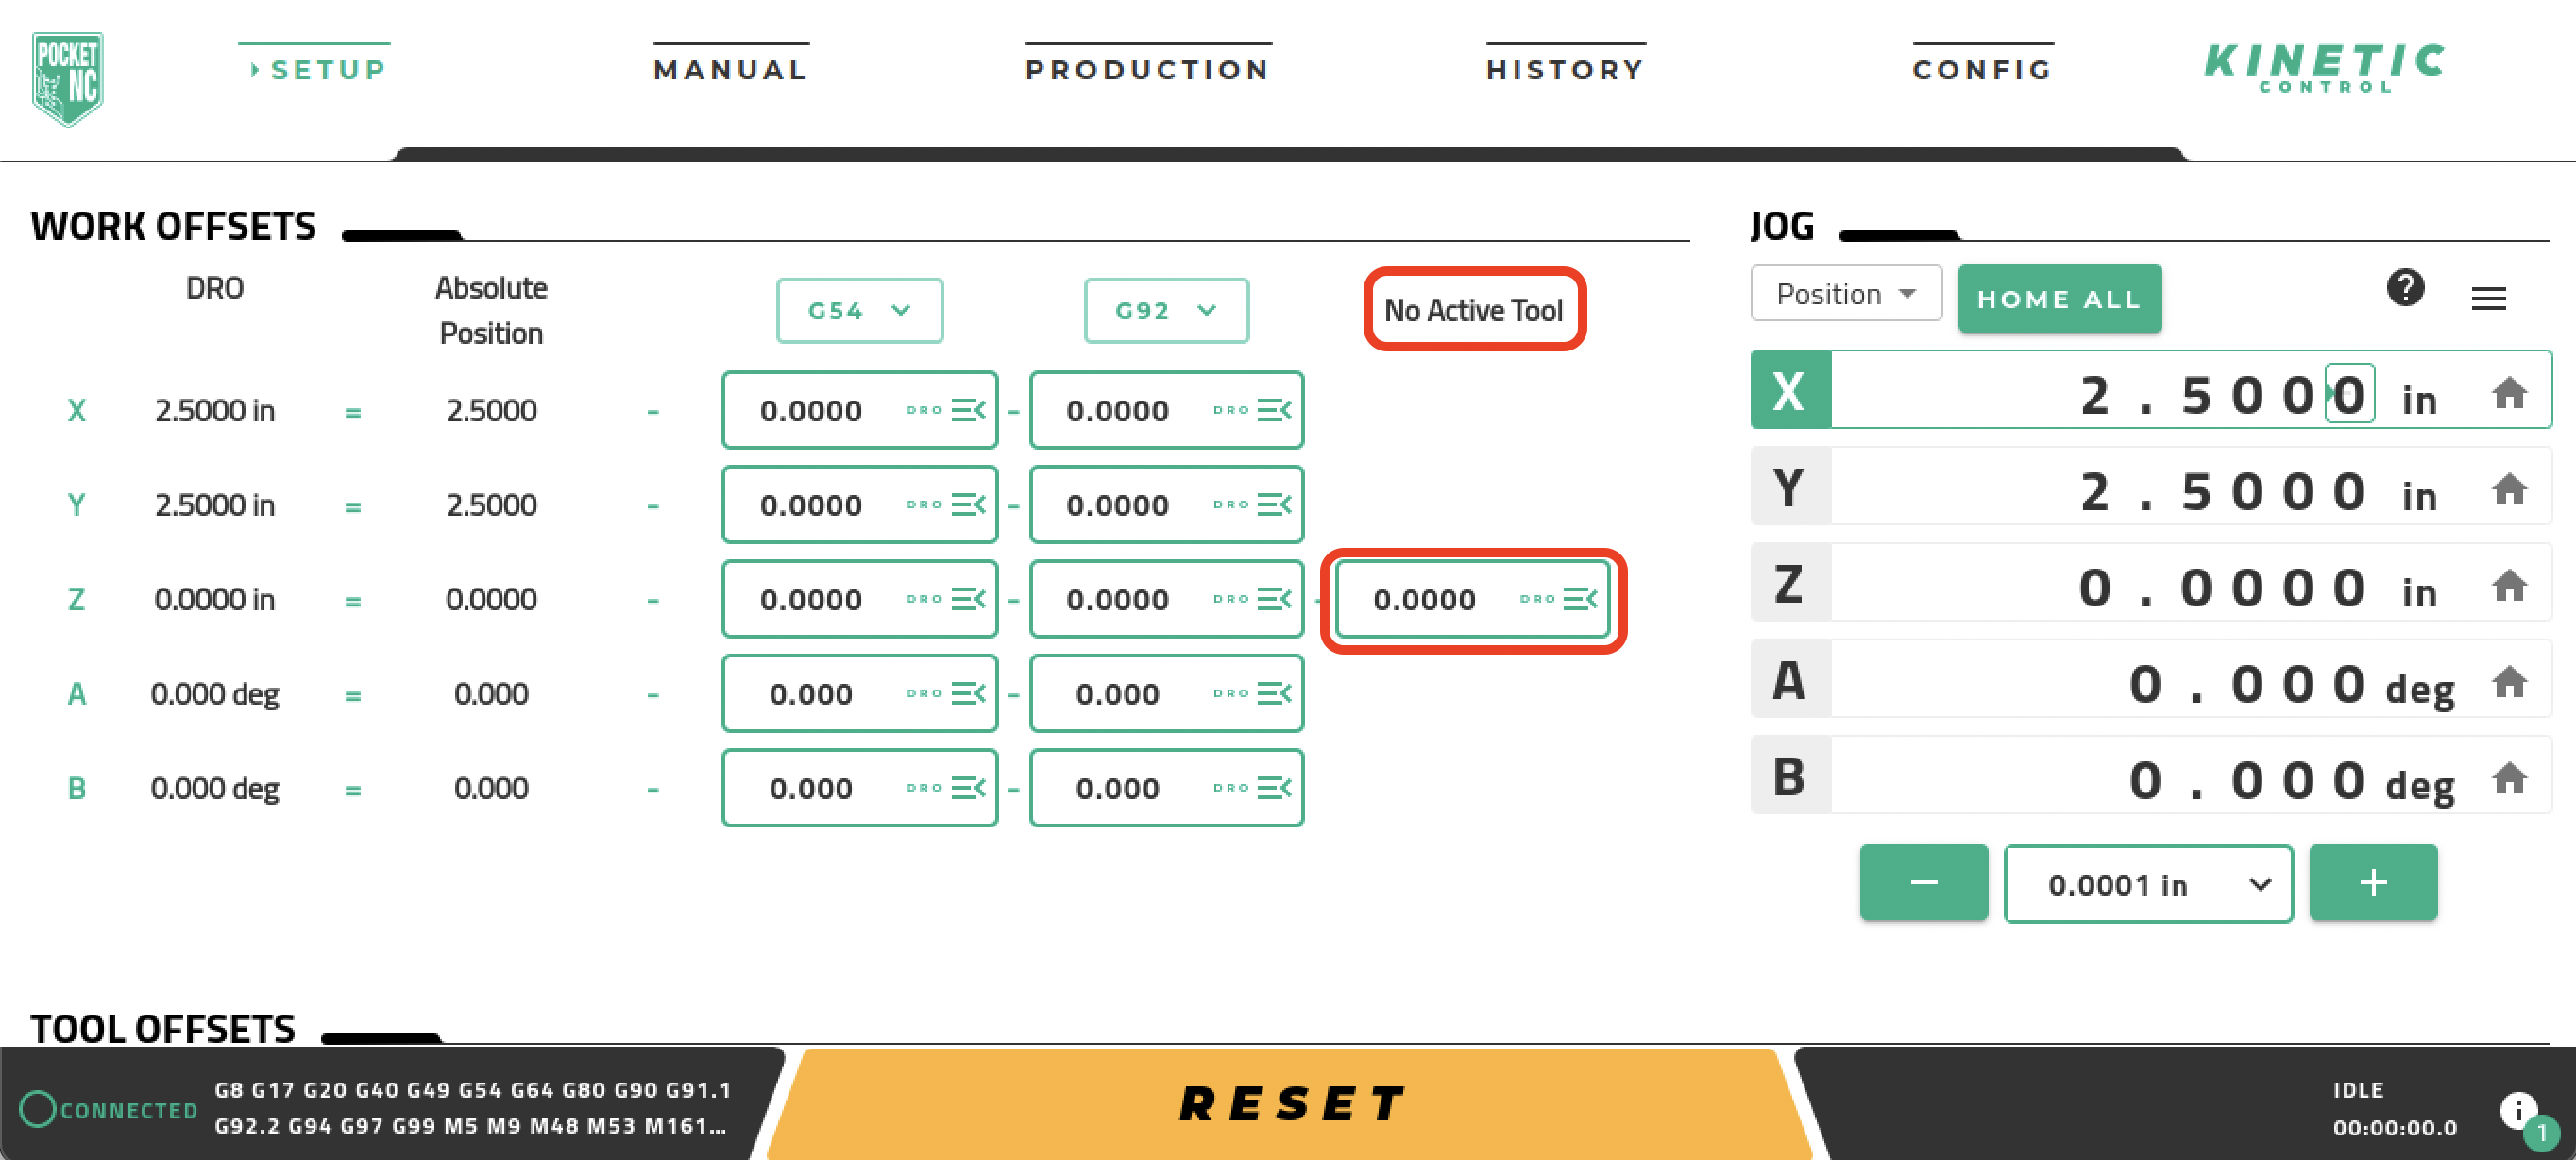
There are several ways to locate the origin but in this example we are going to use the simple touch-off/paper method. If you did not do so in Section 6.1, measure the tool that will be used for this program on the “Setup” tab of the User Interface (UI). With the tool measured, we want to make sure that it is active. Under the “Work Offsets” section at the top of the Setup tab, the tool you are using and just measured should be listed as active and the tool length offset should be listed below it:
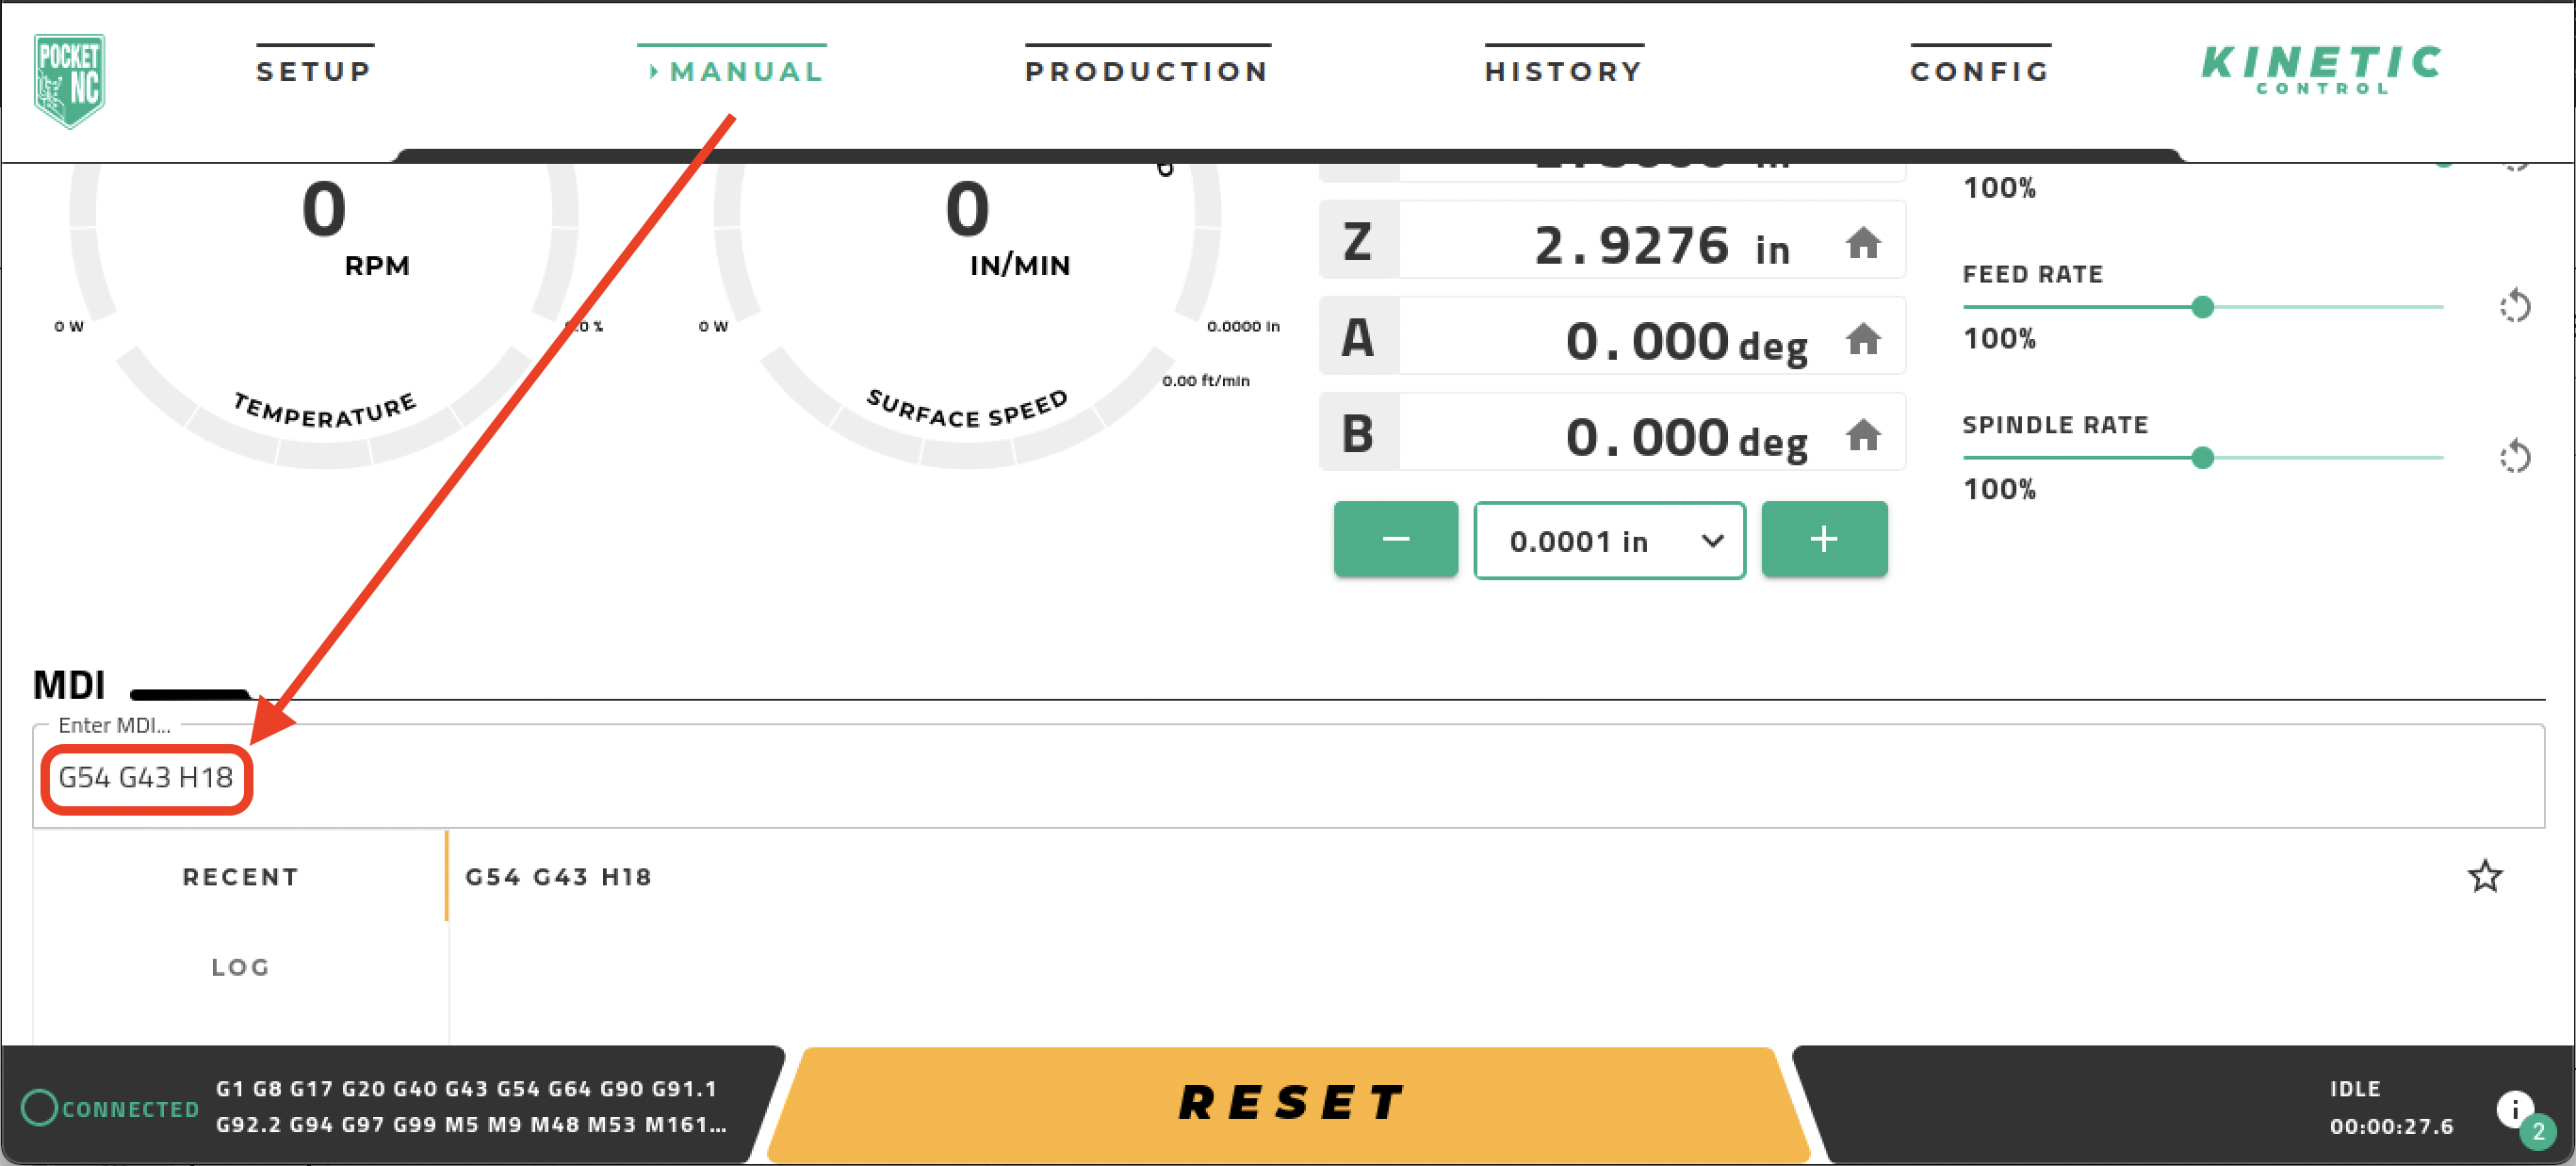
If the tool is not active, we will need to navigate to the “Manual” tab and type “G54 G43 H18” into the MDI command bar and press enter on the keyboard (use “H18” if you are using tool #18; use “H10” is using tool #10). After this, return to the “Setup” tab and confirm the tool is active.
Now that our correct tool is active, we will begin to “touch-off” the tool on three sides of our origin corner and figure out its position. We will start with the Z-axis.
Setting Z Work Offset
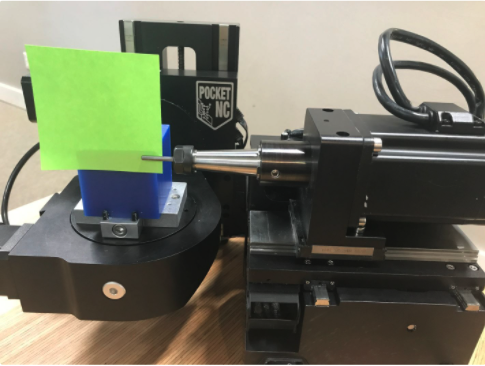
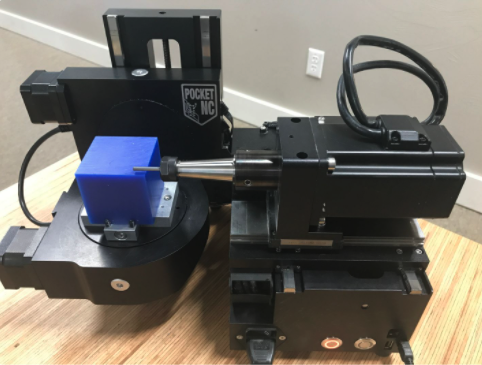
Begin by using the jogging controls in the user interface to position the touch-off tool near the right side of the stock, inside the front face and below the top of the stock.
Then, using .01” steps, jog the tool towards the stock in the Z negative direction. Be careful not to go too far and collide the tool with the stock. Once the tool is as close to the stock as it can be using .01” steps, insert and hold a thin piece of paper between the tool and the stock. Now switch to .001” steps and continue to move the tool in the Z negative direction until the paper has been pinched.
Note: Using a step size of .0001” to move towards the stock and pinch the paper could be done for a more accurate touch-off.
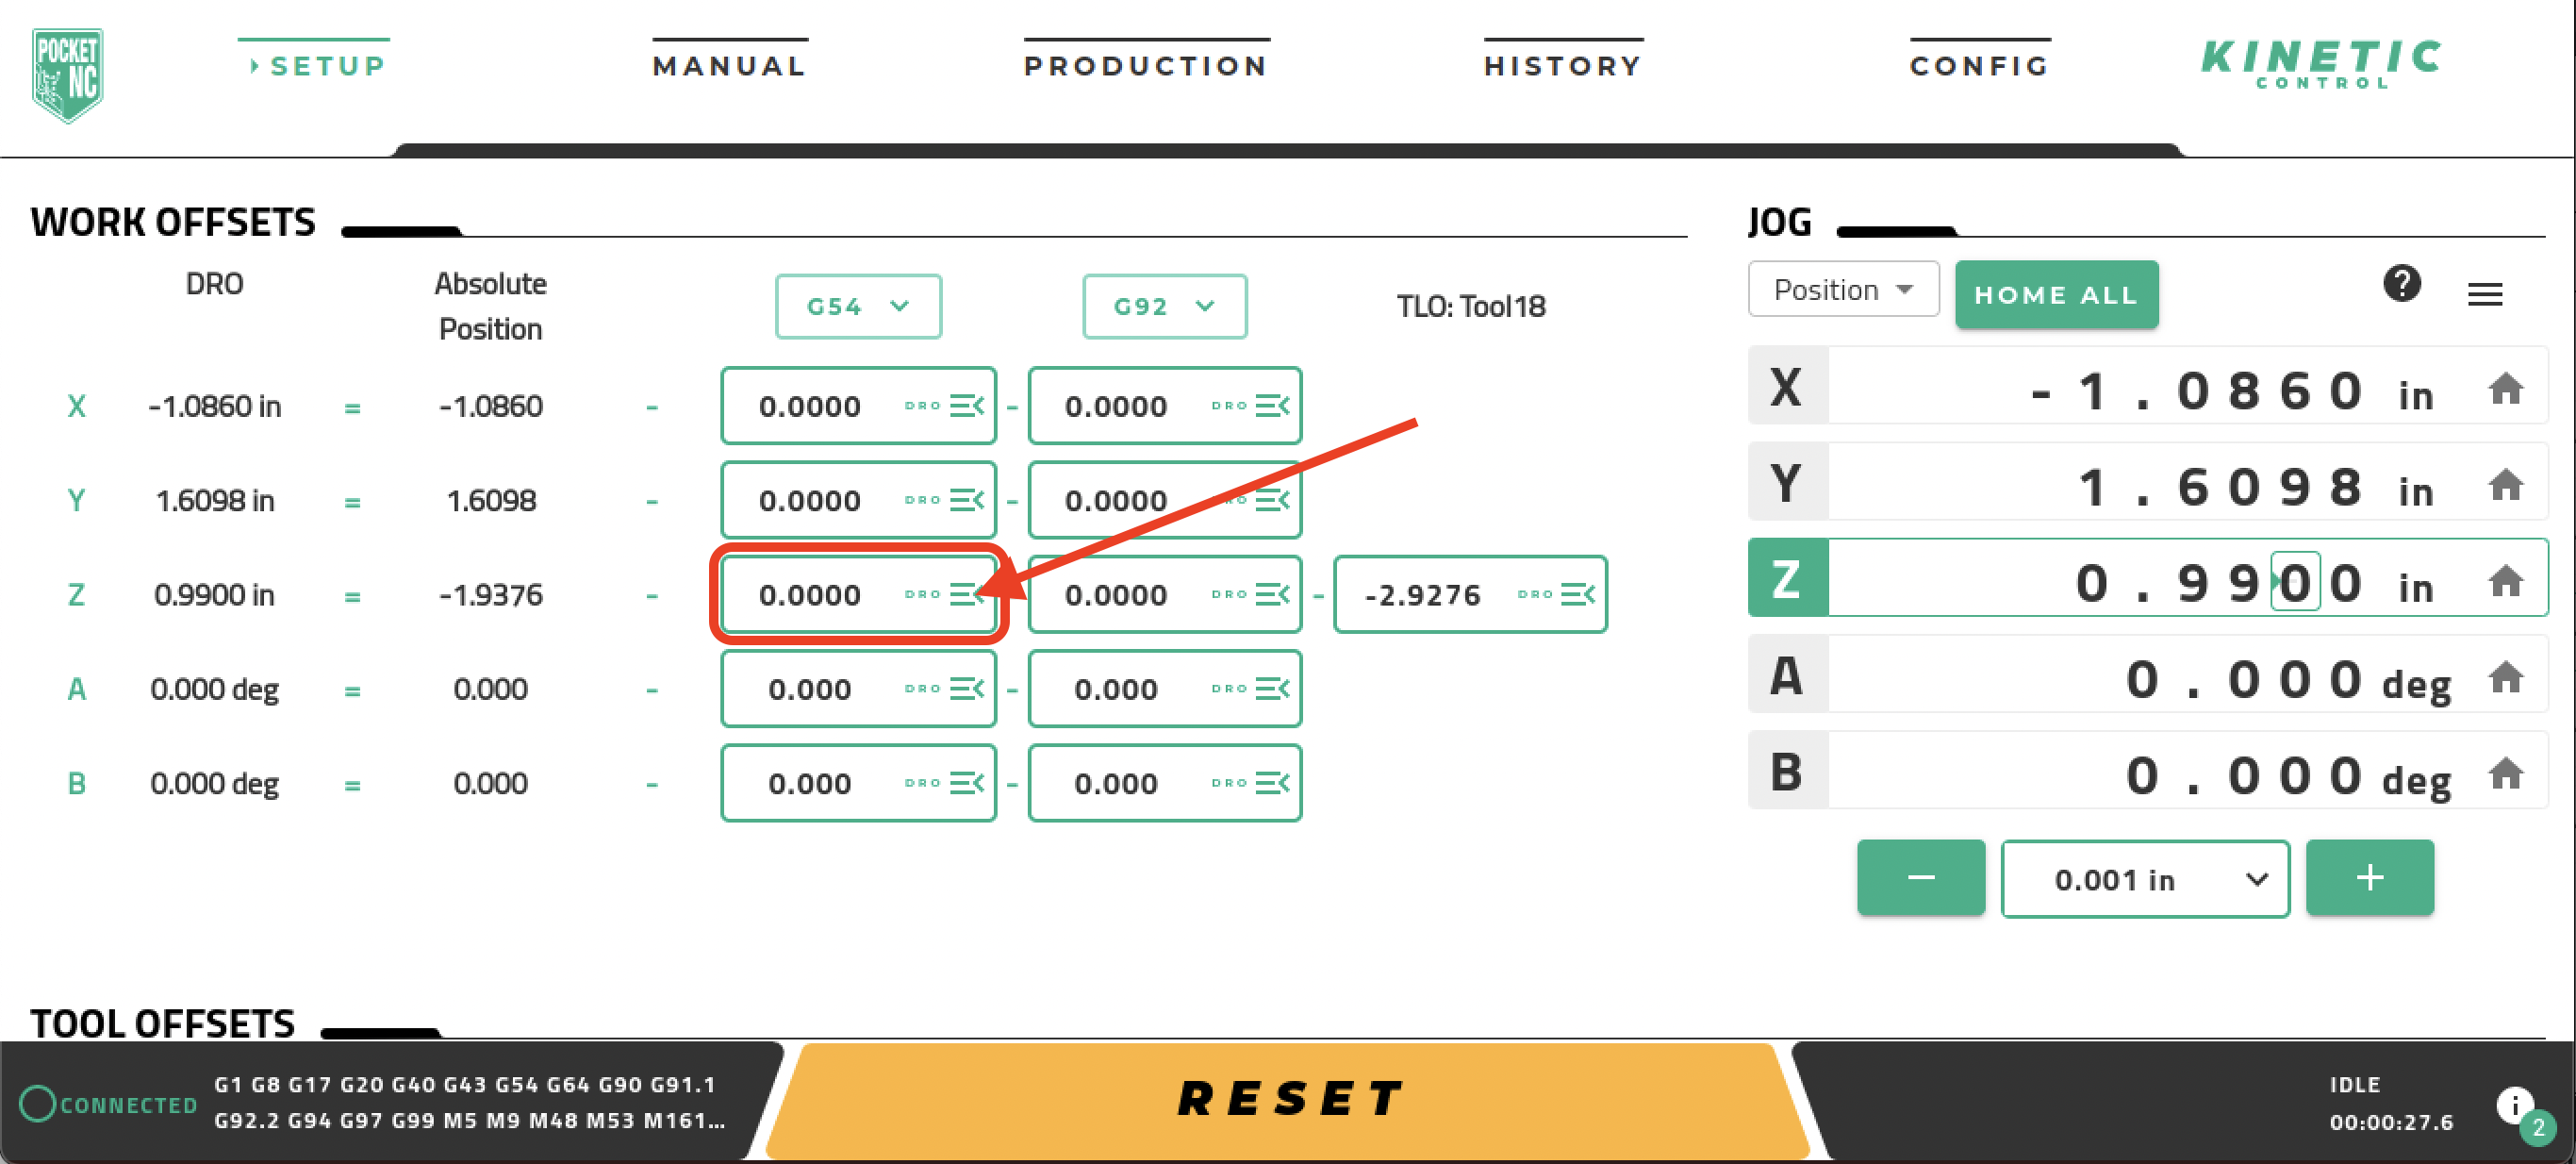
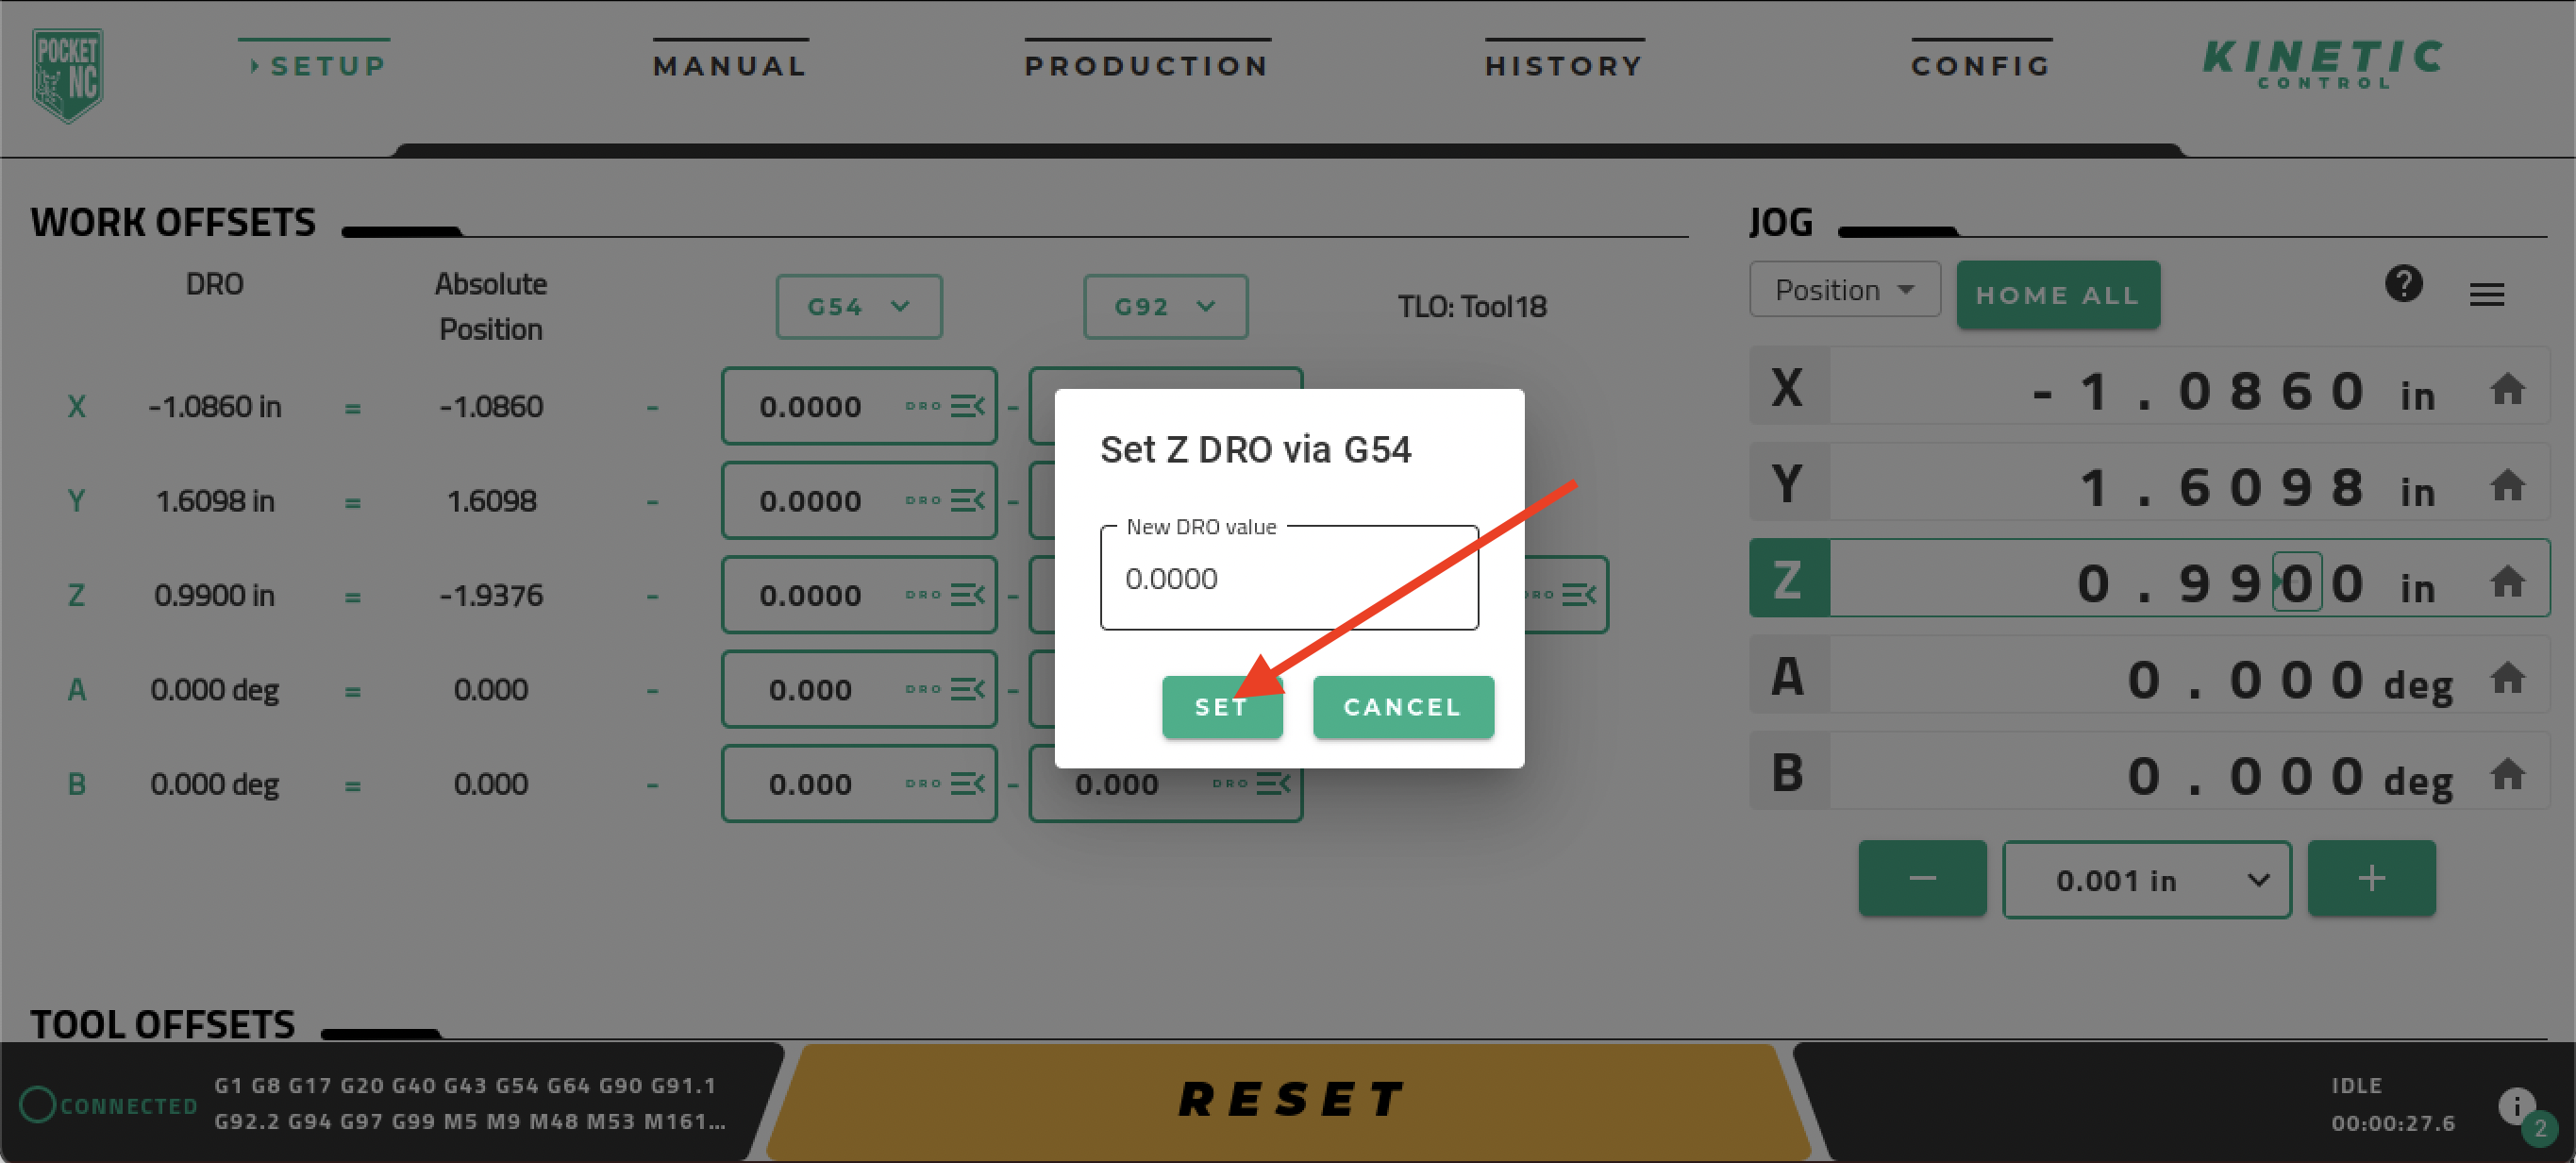
Lastly, set the Z work offset by navigating to the “Work Offsets” section of the of the “Setup” tab in the user interface and clicking on the input box in the Z row and G54 column.
A pop-up window will appear that allows you to set a value for the current position. Leave this as the default of 0.000in and click the “Set” button.
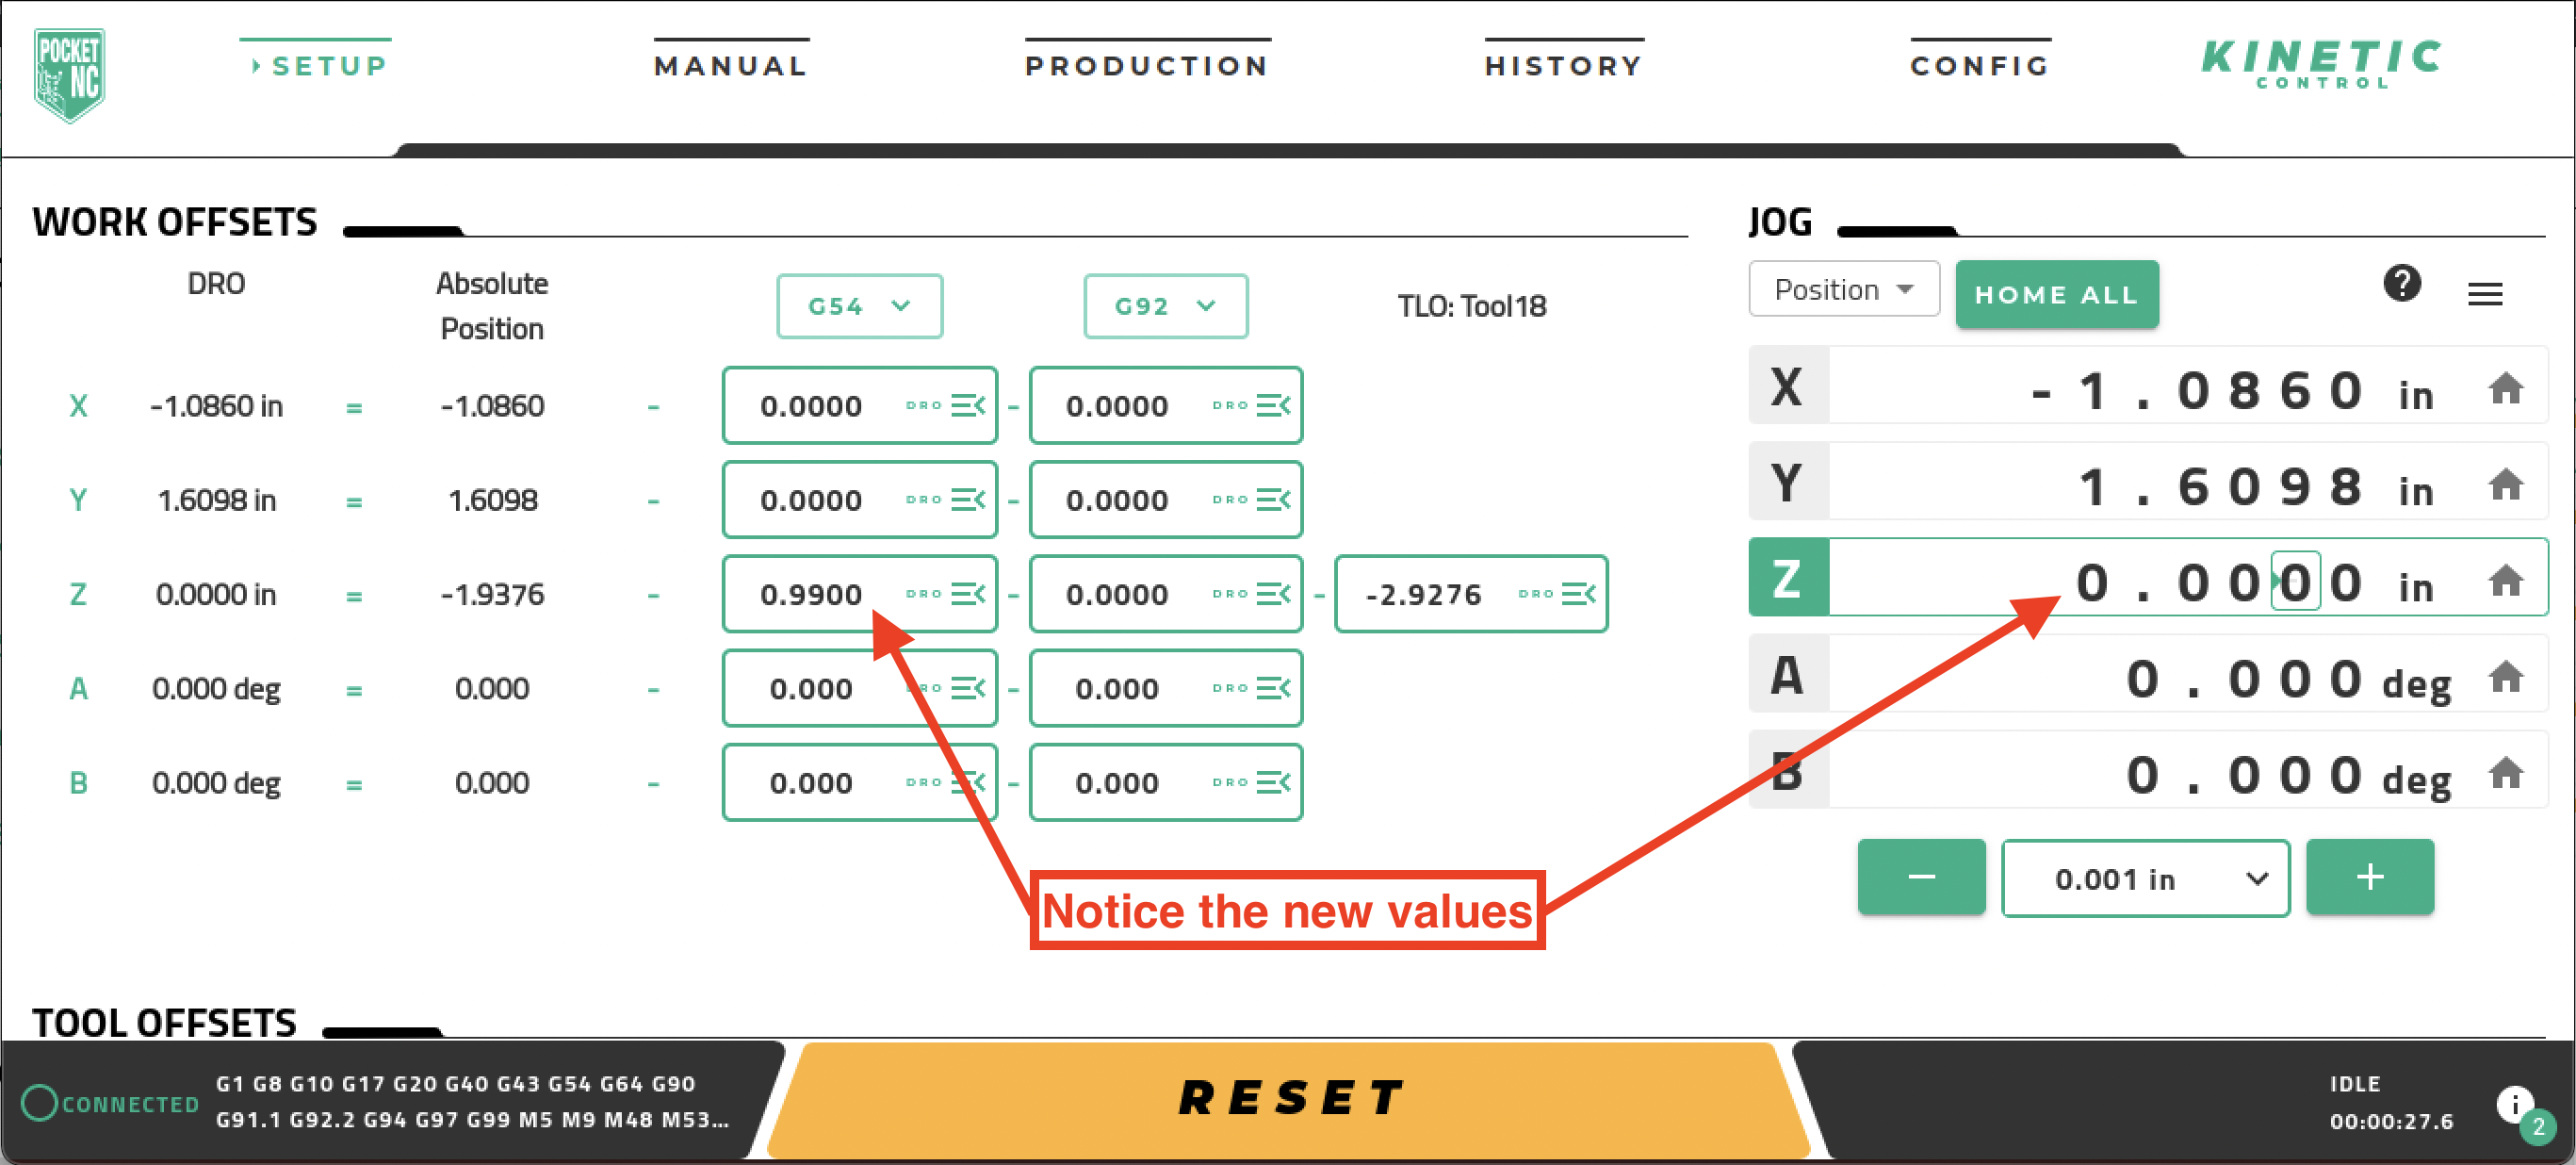
In this example, Z made contact at 0.9900in - your value will differ due to stock size, stock placement, and tool stickout. Note that after setting the Z DRO value to 0.0000, the G54 offset value became our 0.9900in touch-off location and the current Z position is now the value 0.0000in. This means we have set our Z origin to that face, just like we had done in the CAM portion.
Setting X Work Offset
Begin by using the jogging controls in the Pocket NC user interface to position the touch-off tool in front of the stock and just below the top of the stock.
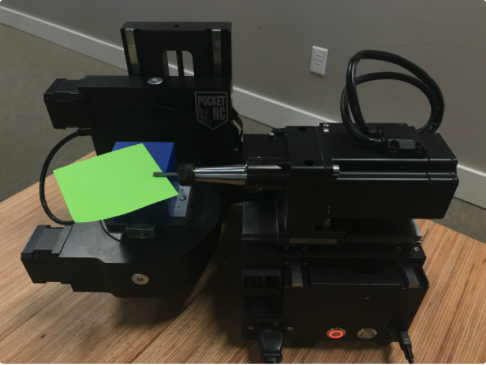
Then, using .01” steps, jog the tool towards the stock in the X positive direction. Be careful not to go too far and collide the tool with the stock. Once the tool is as close to the stock as it can be using .01” steps, insert and hold a thin piece of paper between the tool and the stock. Now switch to .001” steps and continue to move the tool in the X positive direction until the paper has been pinched.
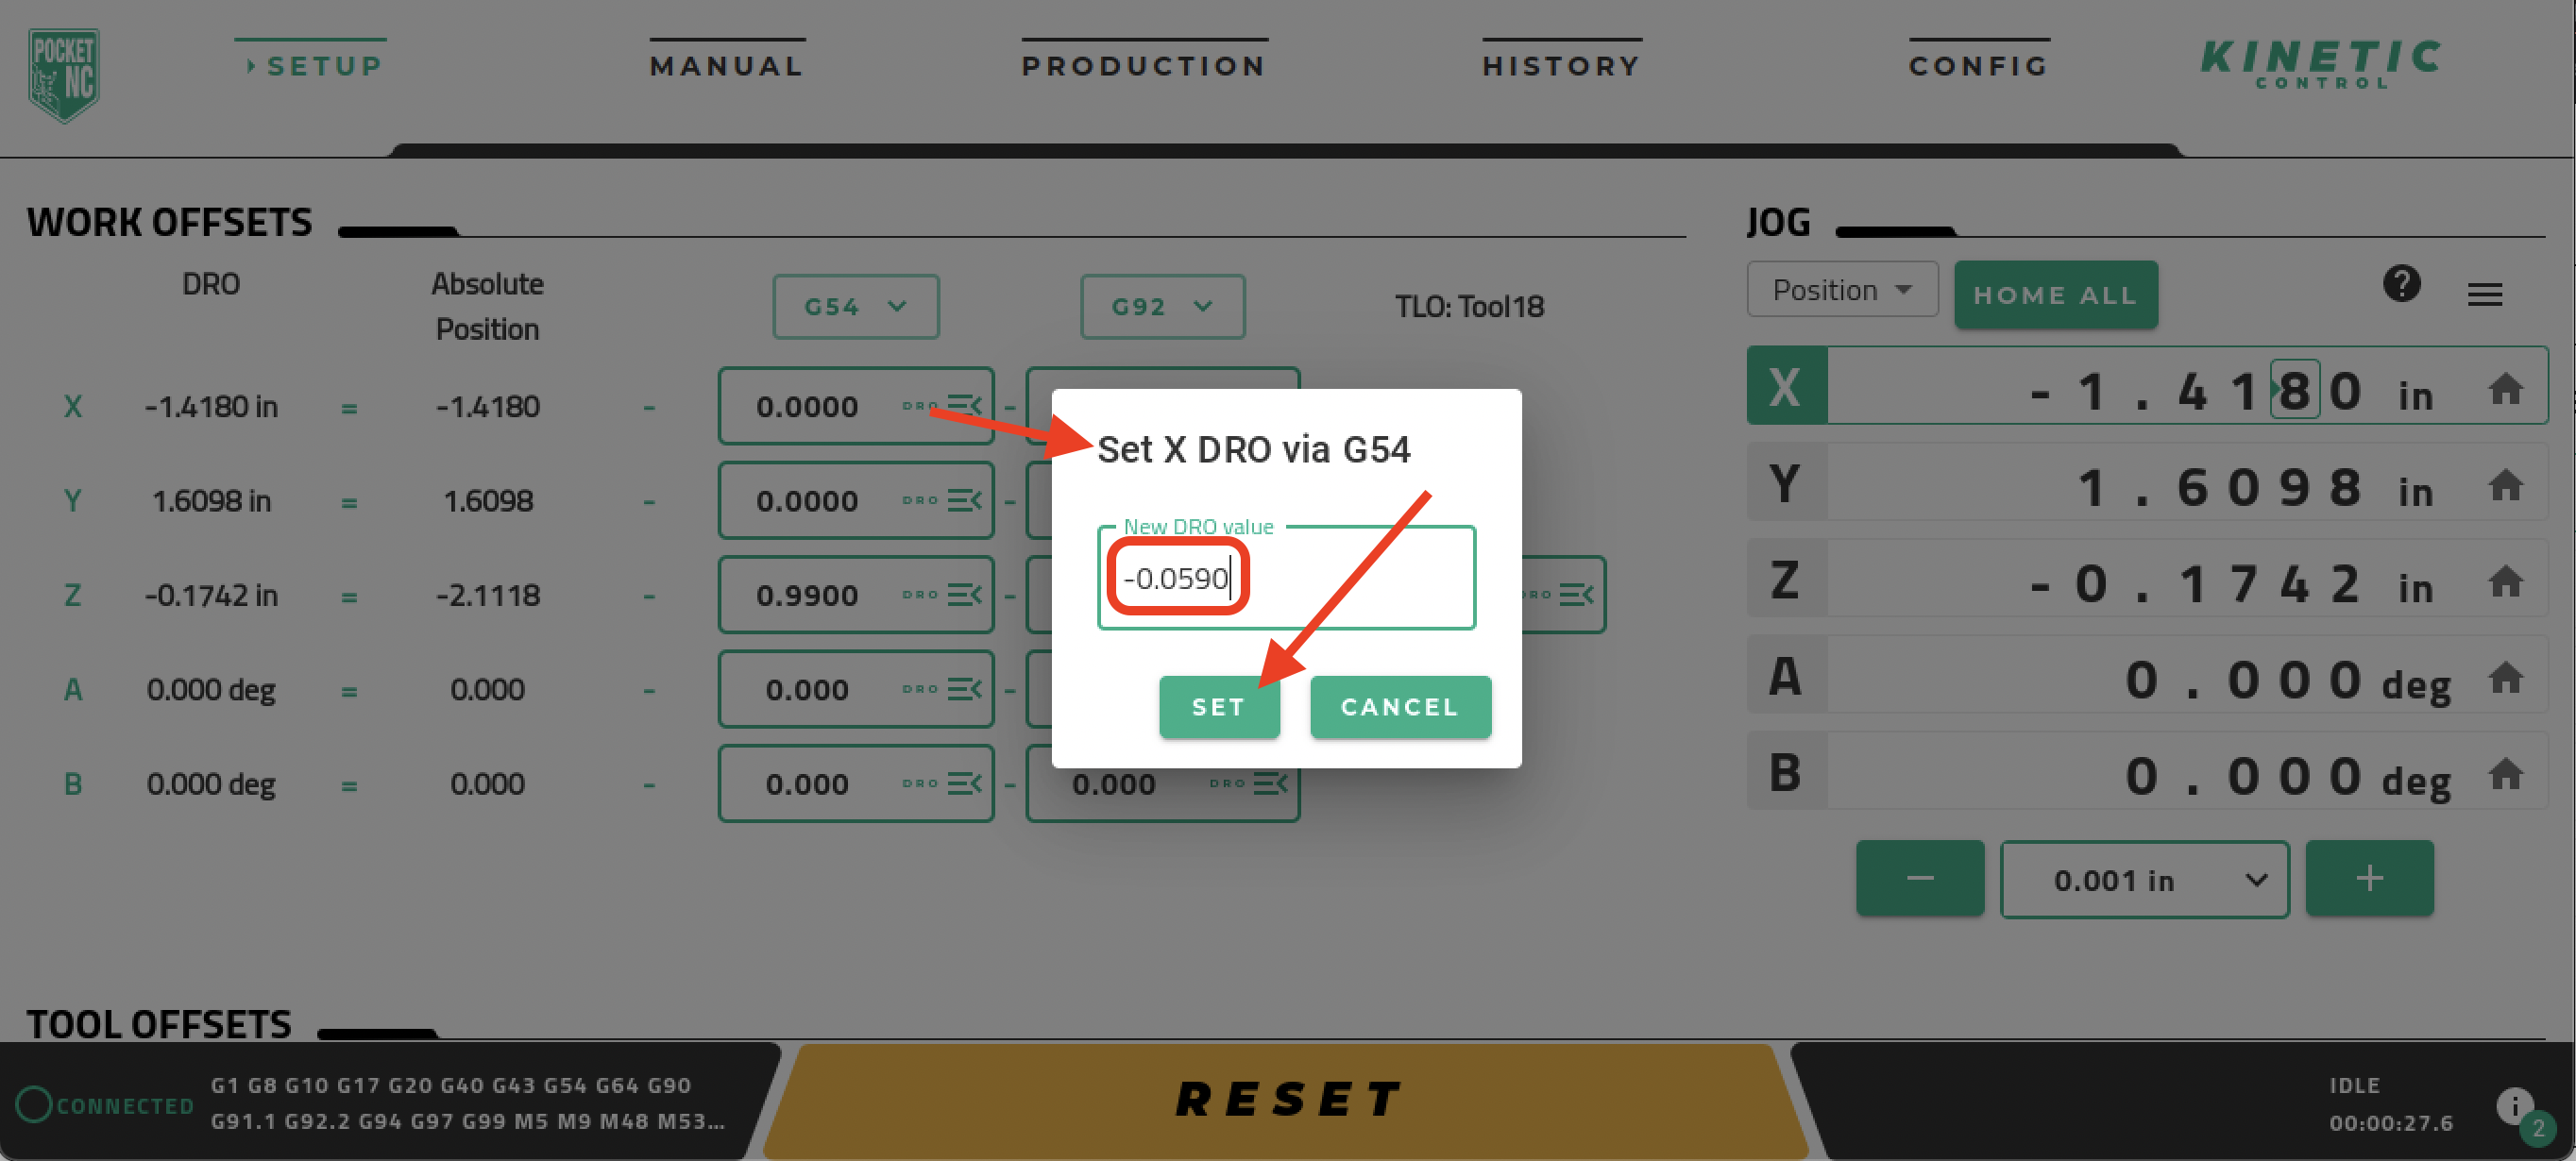
Lastly, set the X work offset by navigating to the “Work Offsets” section of the of the “Setup” tab in the user interface and clicking on the input box in the X row and G54 column. A pop-up window will appear that allows you to set a value for the current position. Since we want to find the true location of this side, using the center axis of the tool, we will need to enter a value to account for the radius of our tool (the centerline of our tool is currently a tool-radius’s distance from the edge of the stock). For the 3mm Datron Tool #18, enter a value of -0.0590in to account for the tool radius (enter -0.0625in if using the 1/8” Tool #10) because that is how far the center of the tool is offset from the face of the stock in the negative direction and click the “Set” button.
Setting Y Work Offset
Begin by using the jogging controls in the Pocket NC user interface to position the touch-off tool on top of the stock near the front corner of the stock.
Then, using .01” steps, jog the tool towards the stock in the Y negative direction. Be careful not to go too far and collide the tool with the stock. Once the tool is as close to the stock as it can be using .01” steps, insert and hold a thin piece of paper between the tool and the stock. Now switch to .001” steps and continue to move the tool in the Y negative direction until the paper has been pinched.
Note: Using a step size of .0001” to move towards the stock and pinch the paper could be done for a more accurate touch-off.
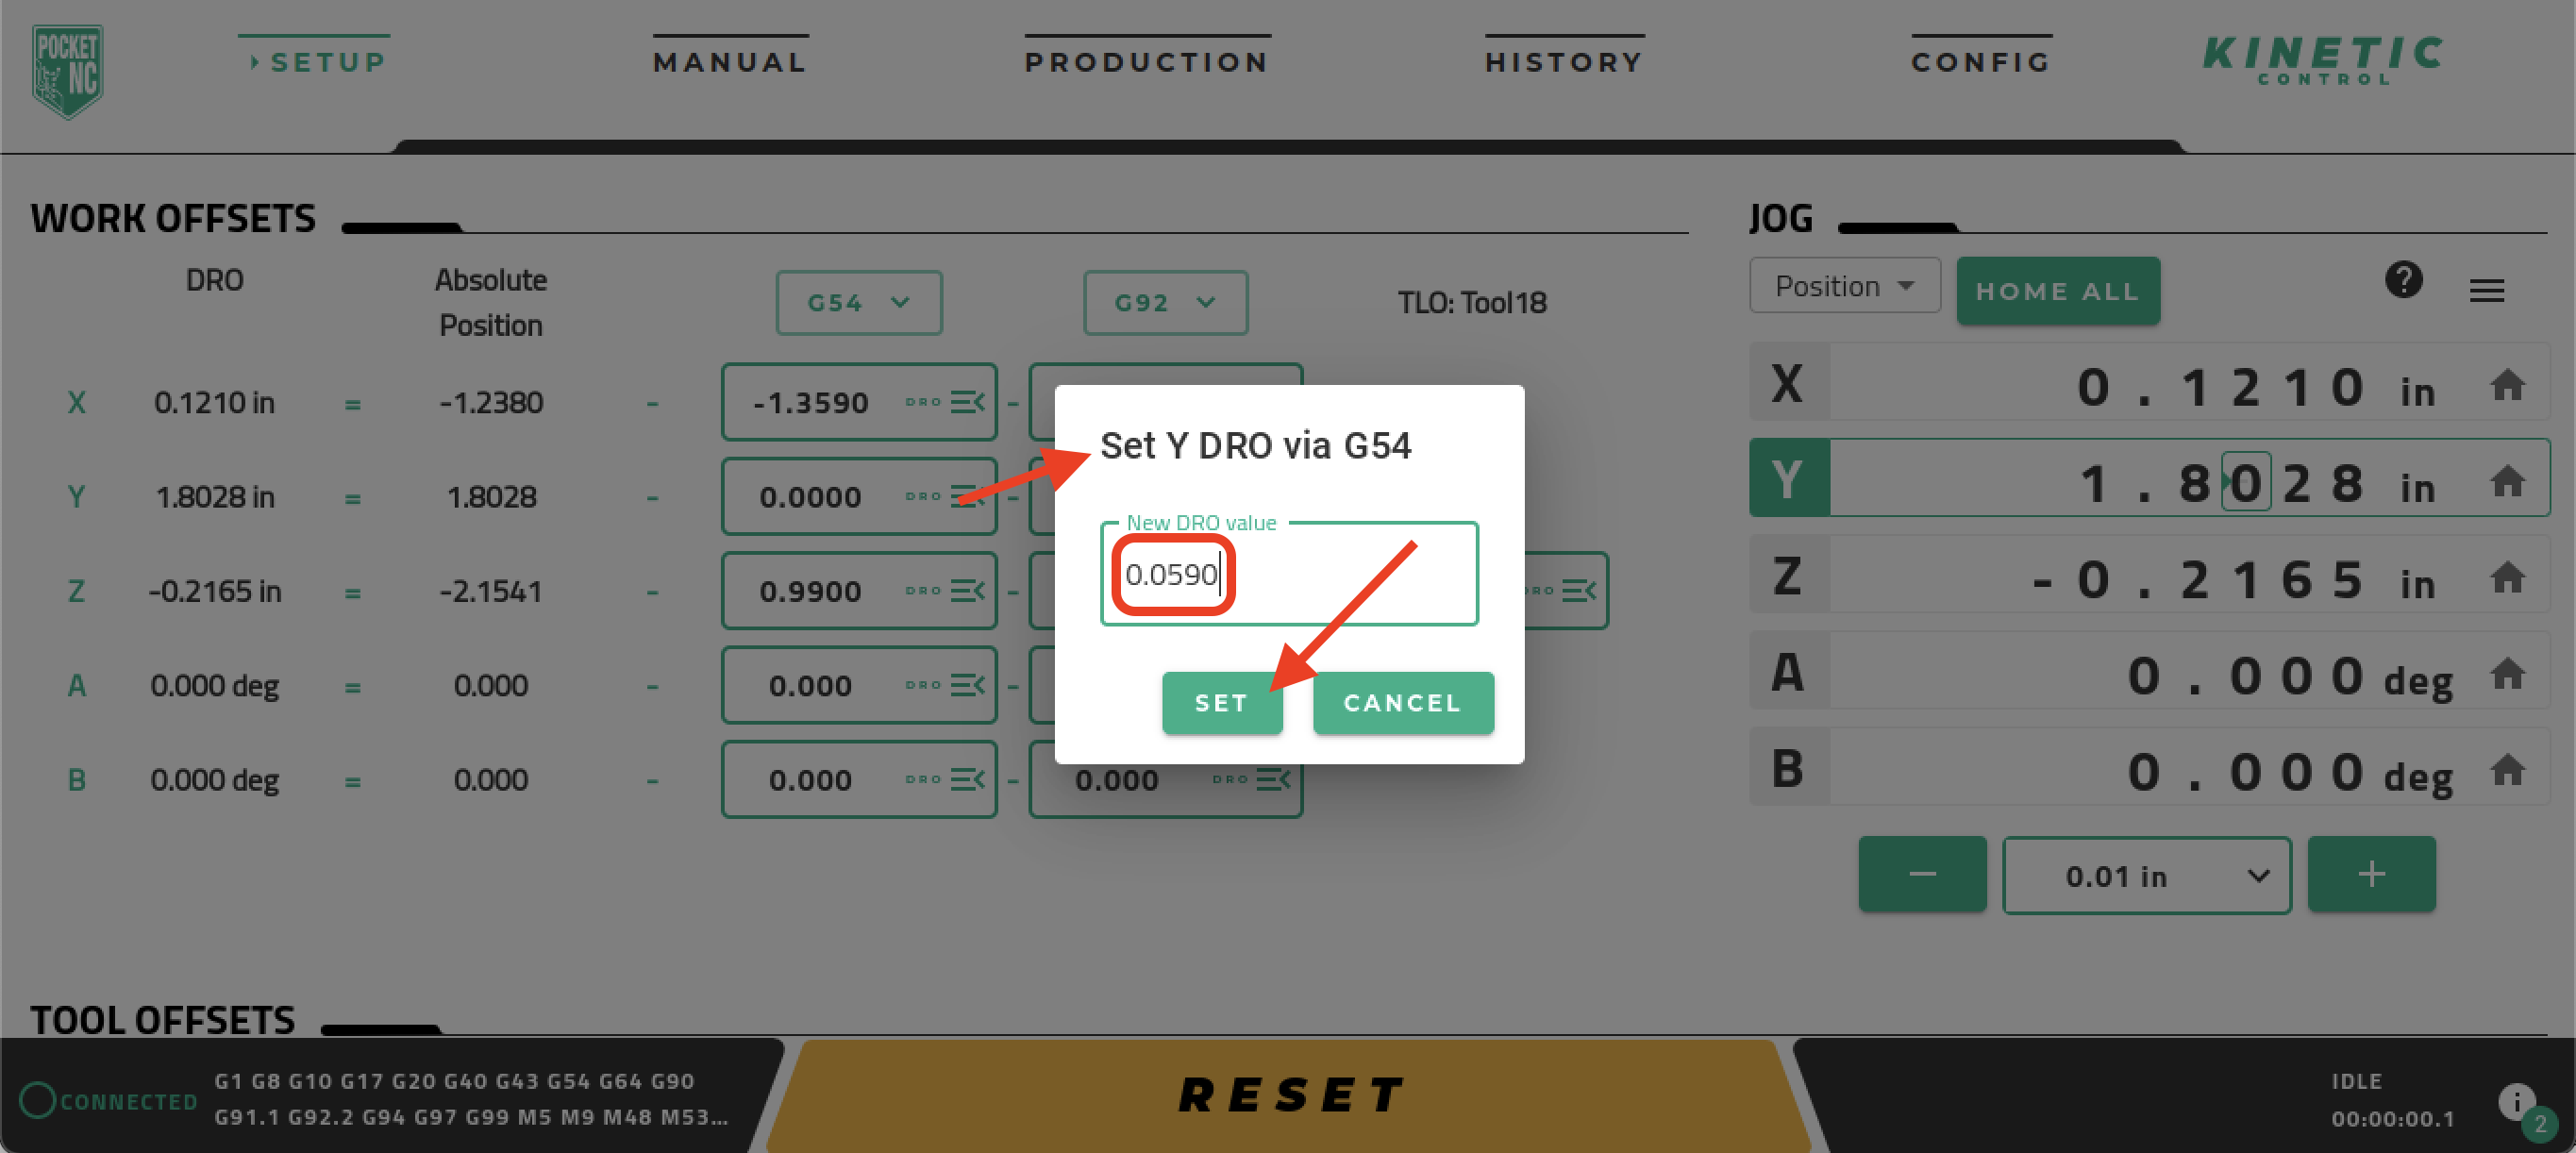
Lastly, set the Y work offset by navigating to the “Work Offsets” section of the of the “Setup” tab in the user interface and clicking on the input box in the Y row and G54 column. A pop-up window will appear that allows you to set a value for the current position. The value used in this example will be +0.0590in for tool #18 (+0.0625 for tool #10) because that is the radius of the tool we are using, which means that is how far the center of the tool is offset from the face of the stock in positive direction.
Note: Including the thickness of the paper in the new DRO value could be done for a more accurate offset.
It is always good to verify that your offsets are in the correct direction and the origin is in the correct location. To do this, retract Z away from the stock, then carefully jog X and Y to their 0.000 positions. After that, slowly jog Z to its 0.000 position. If everything axis is correct, the 0,0,0 position will put the end of the tool centered on the origin corner and just touching it.
Section 6.5: Simulate the program
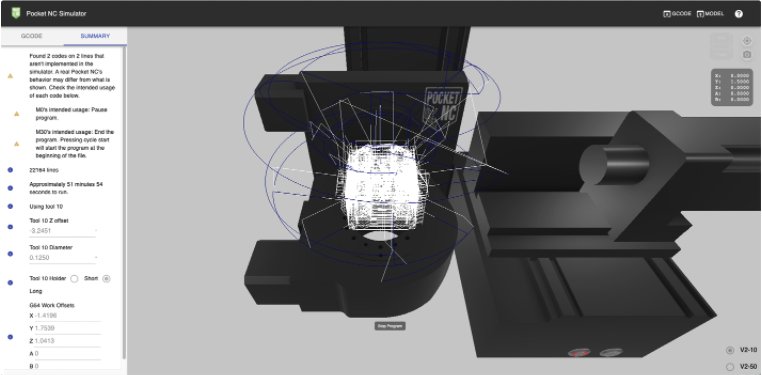
Tip: Now that you have a measured Tool Length Offset and Work Offsets, it is a great time to check out the Pocket NC Simulator and simulate your G-code on the actual Pocket NC! You can simulate your program in the newly updated Pocket NC Simulator by uploading the g-code, pressing the stop button and then inputting your TLO and Work Offset values in the summary tab. More details on how to use the Pocket NC Simulator can be found in this video.
Section 6.6: Load and Run the Program
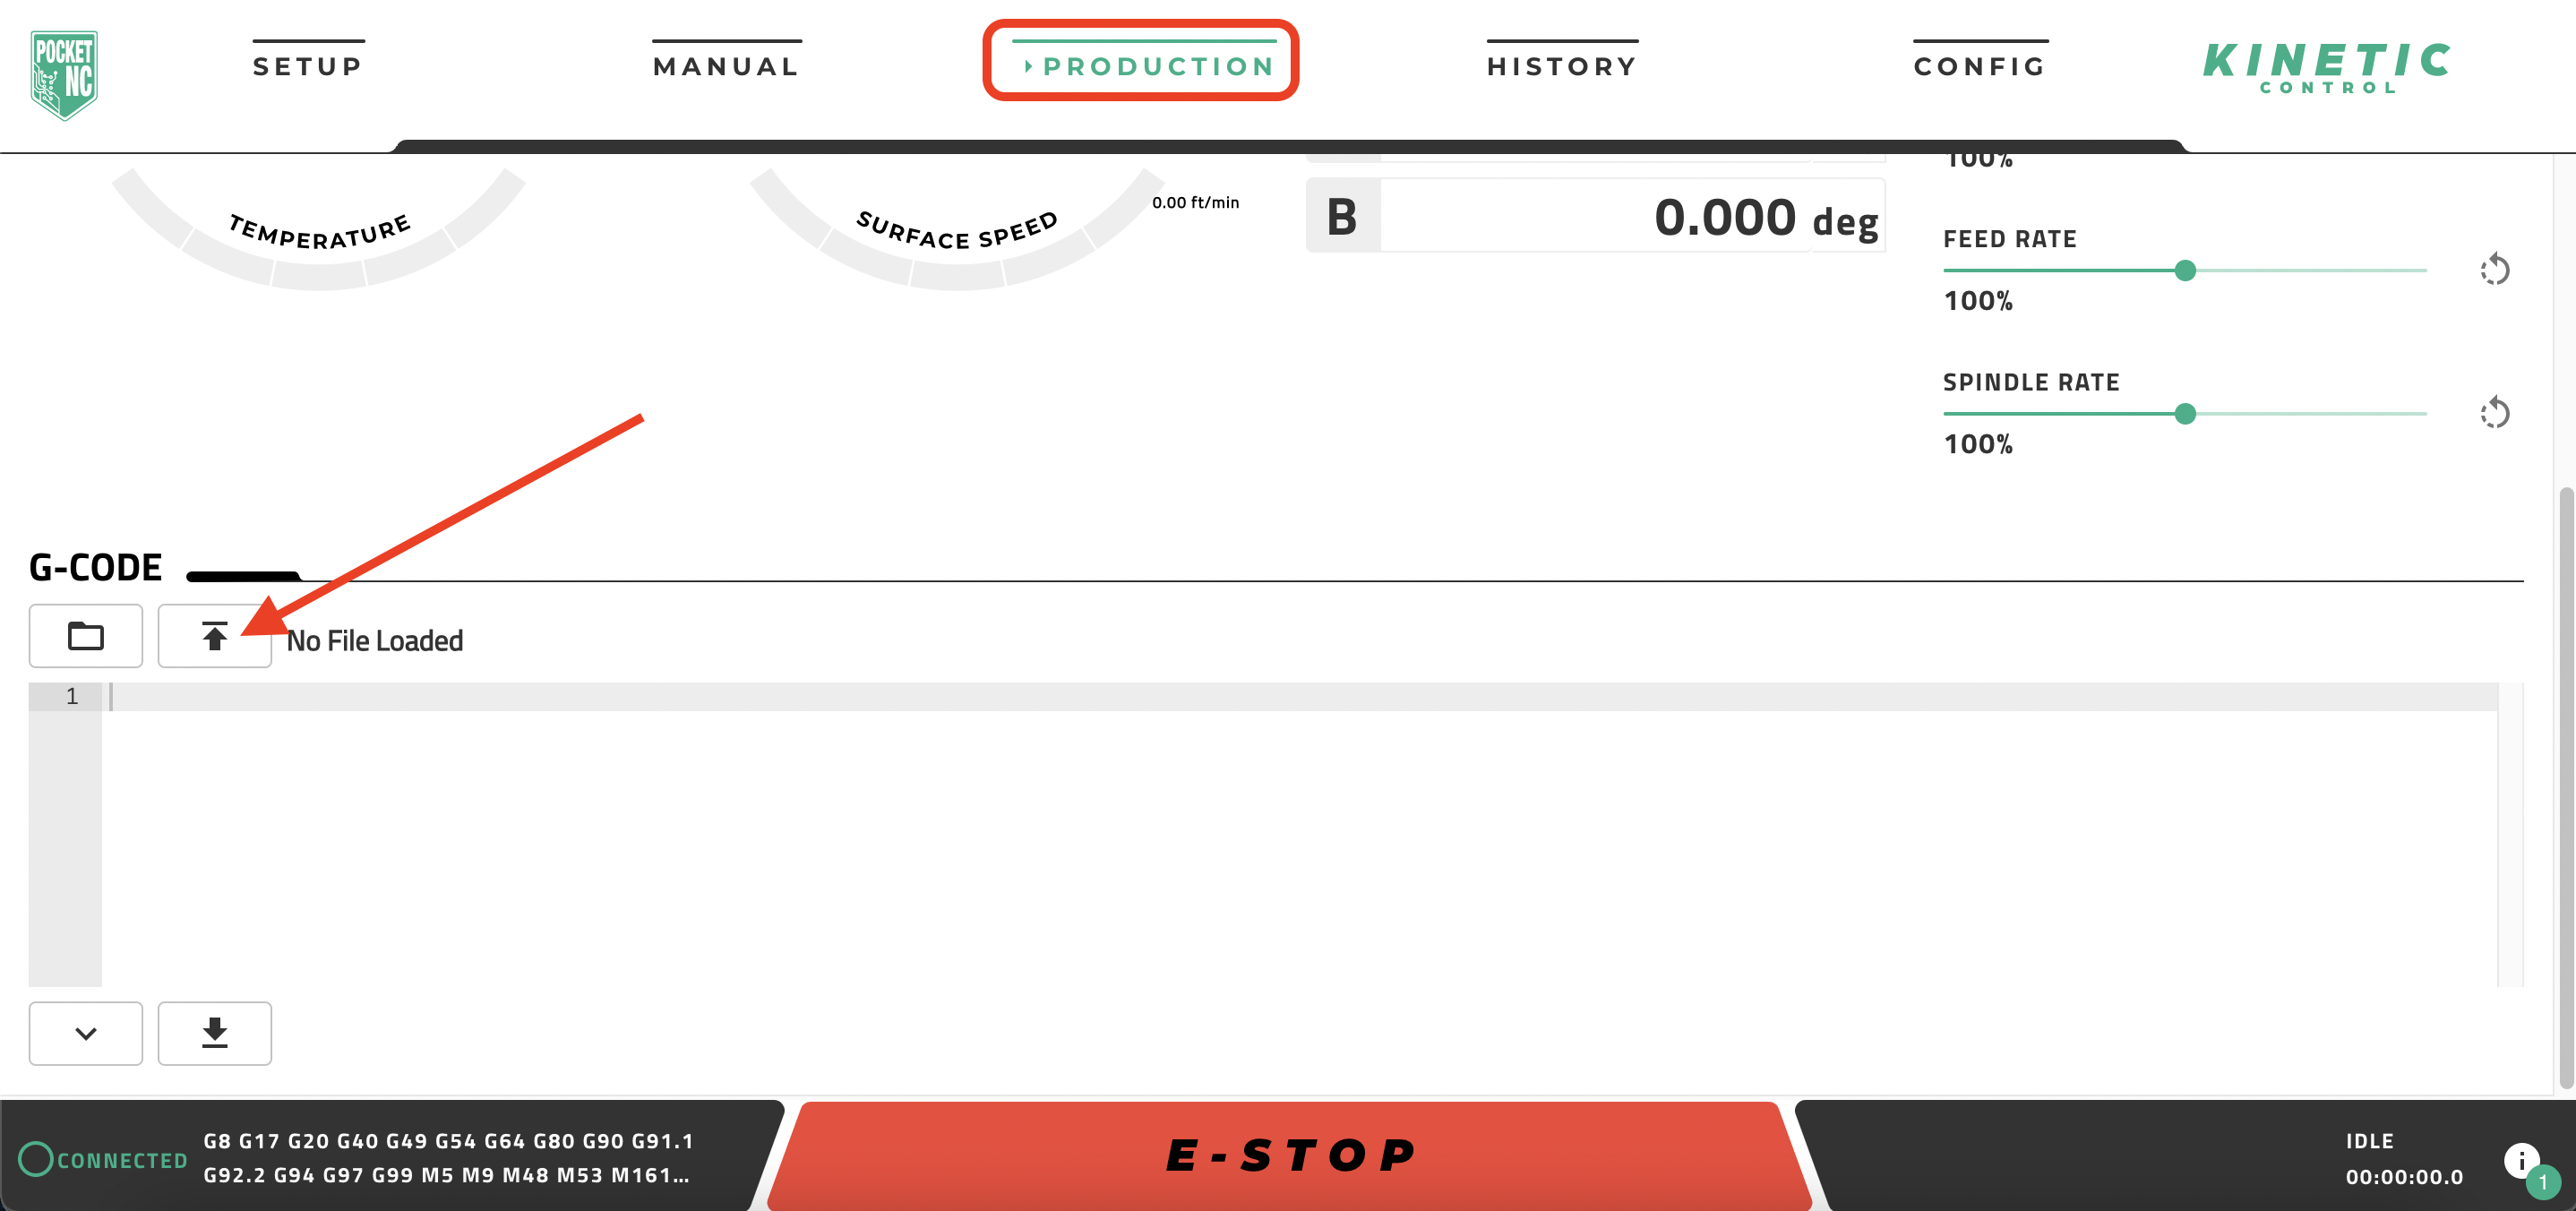
To upload your machining file (G-code file) to the machine, navigate to the “Production” tab of the user interface. Next, scroll down to the section titled “G-CODE” and click the upload icon to navigate to your file. Select your file and click “Open”.
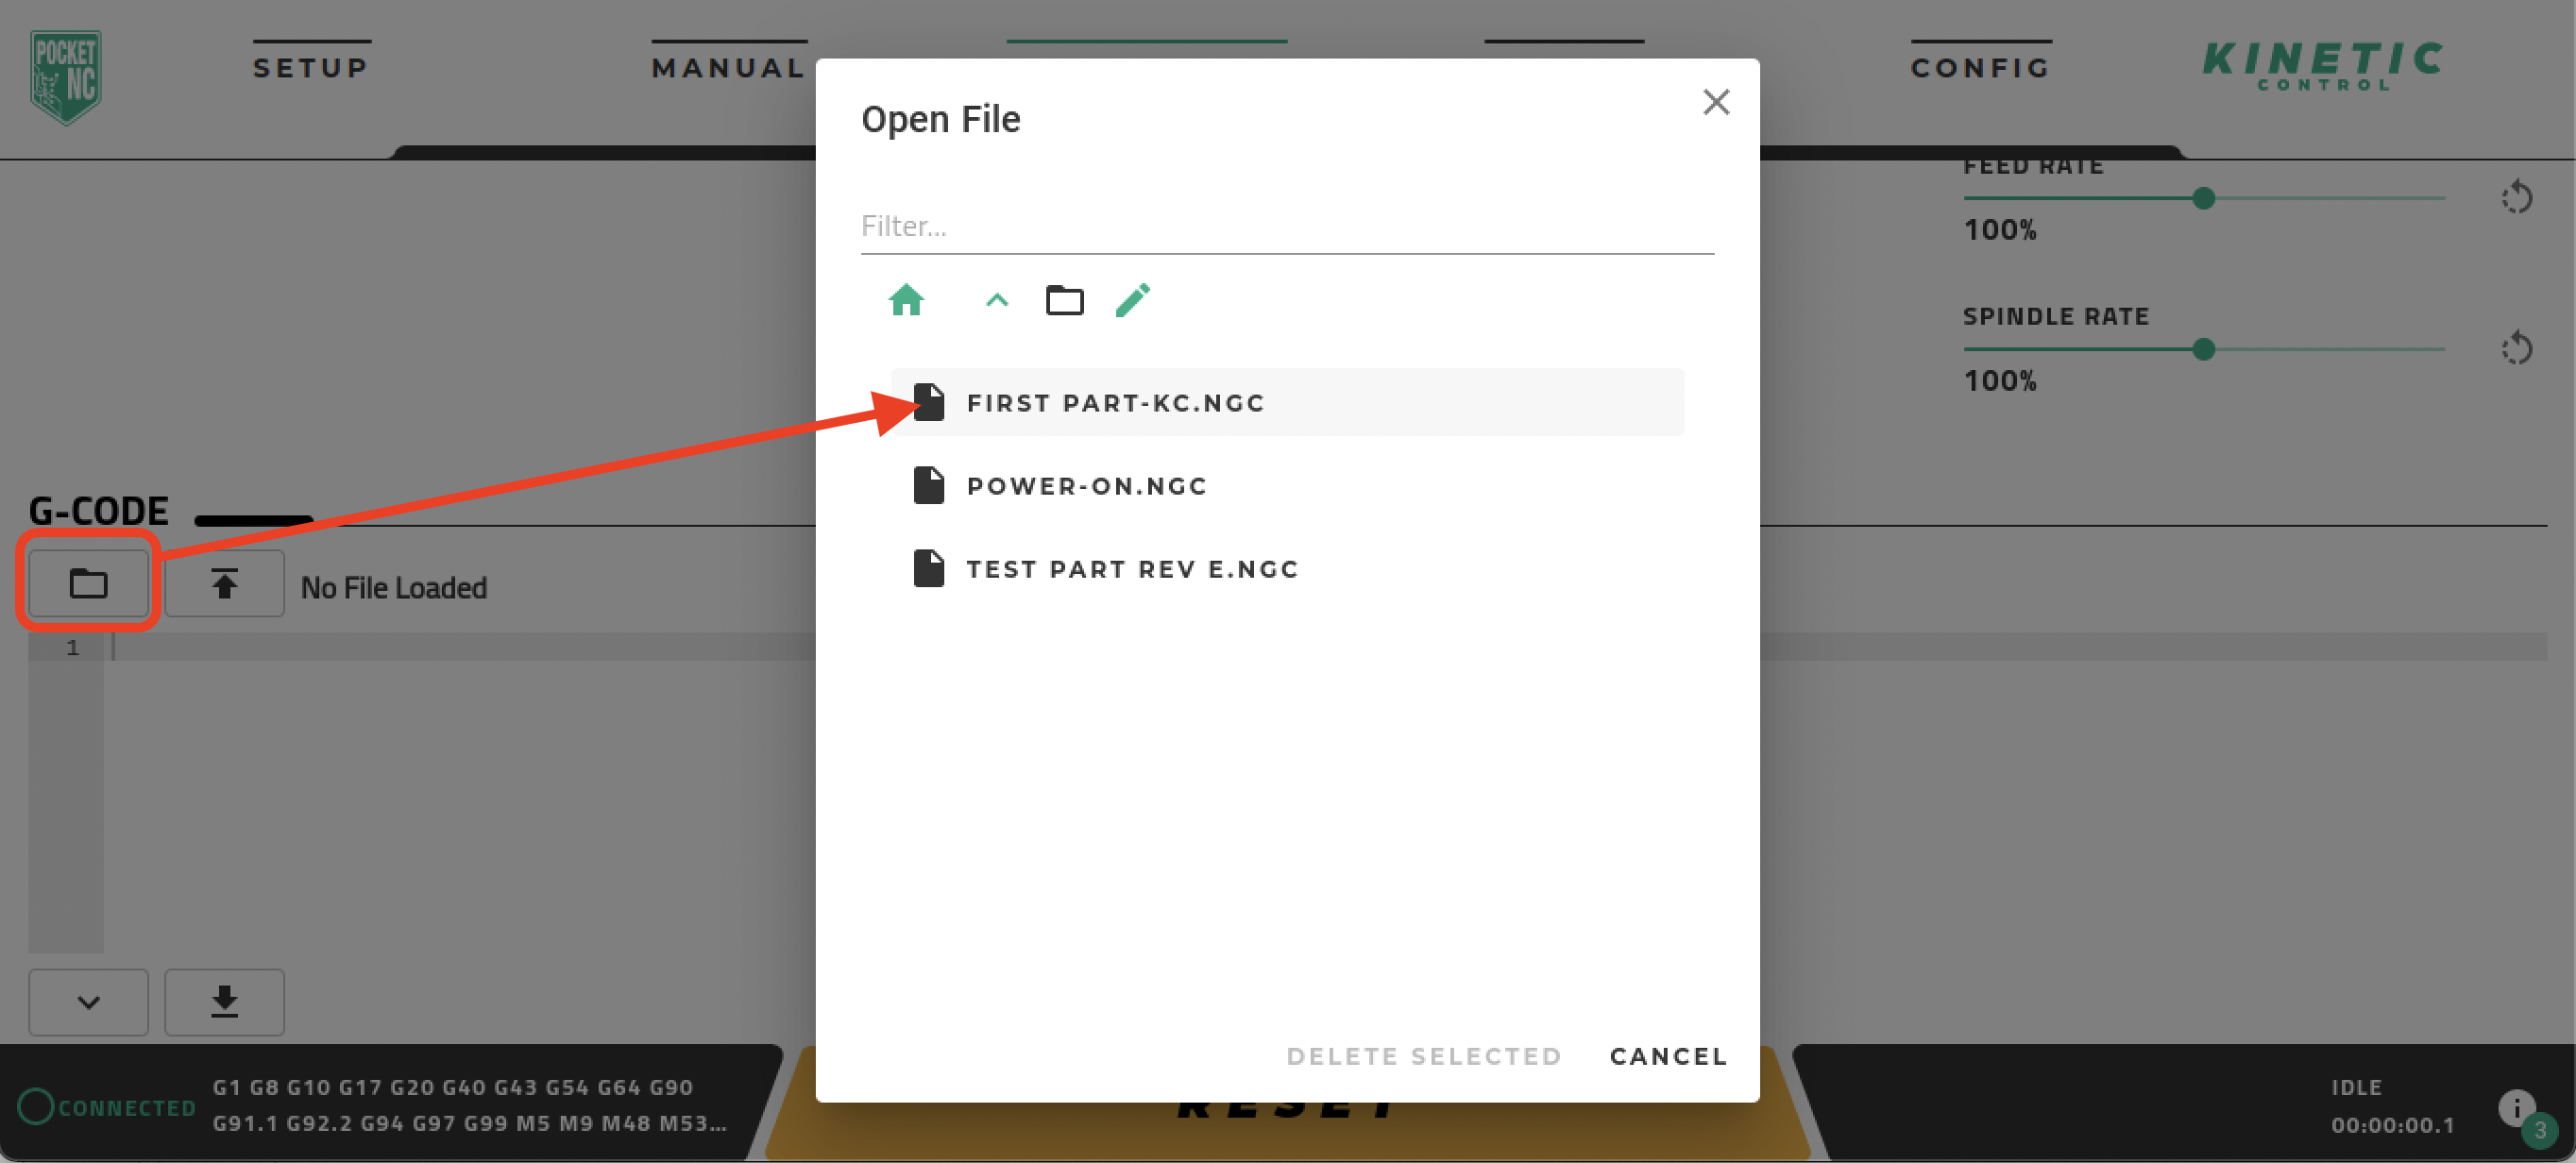
When the file is completely uploaded to the UI, you will see a green pop-up notification saying that the upload was successful. Next, we need to make the file active in the UI. To do this, click the folder icon and then select the G-code file for the First Part. (Over time, all of your loaded programs can be found here and selected to run. You can also remove them as needed).
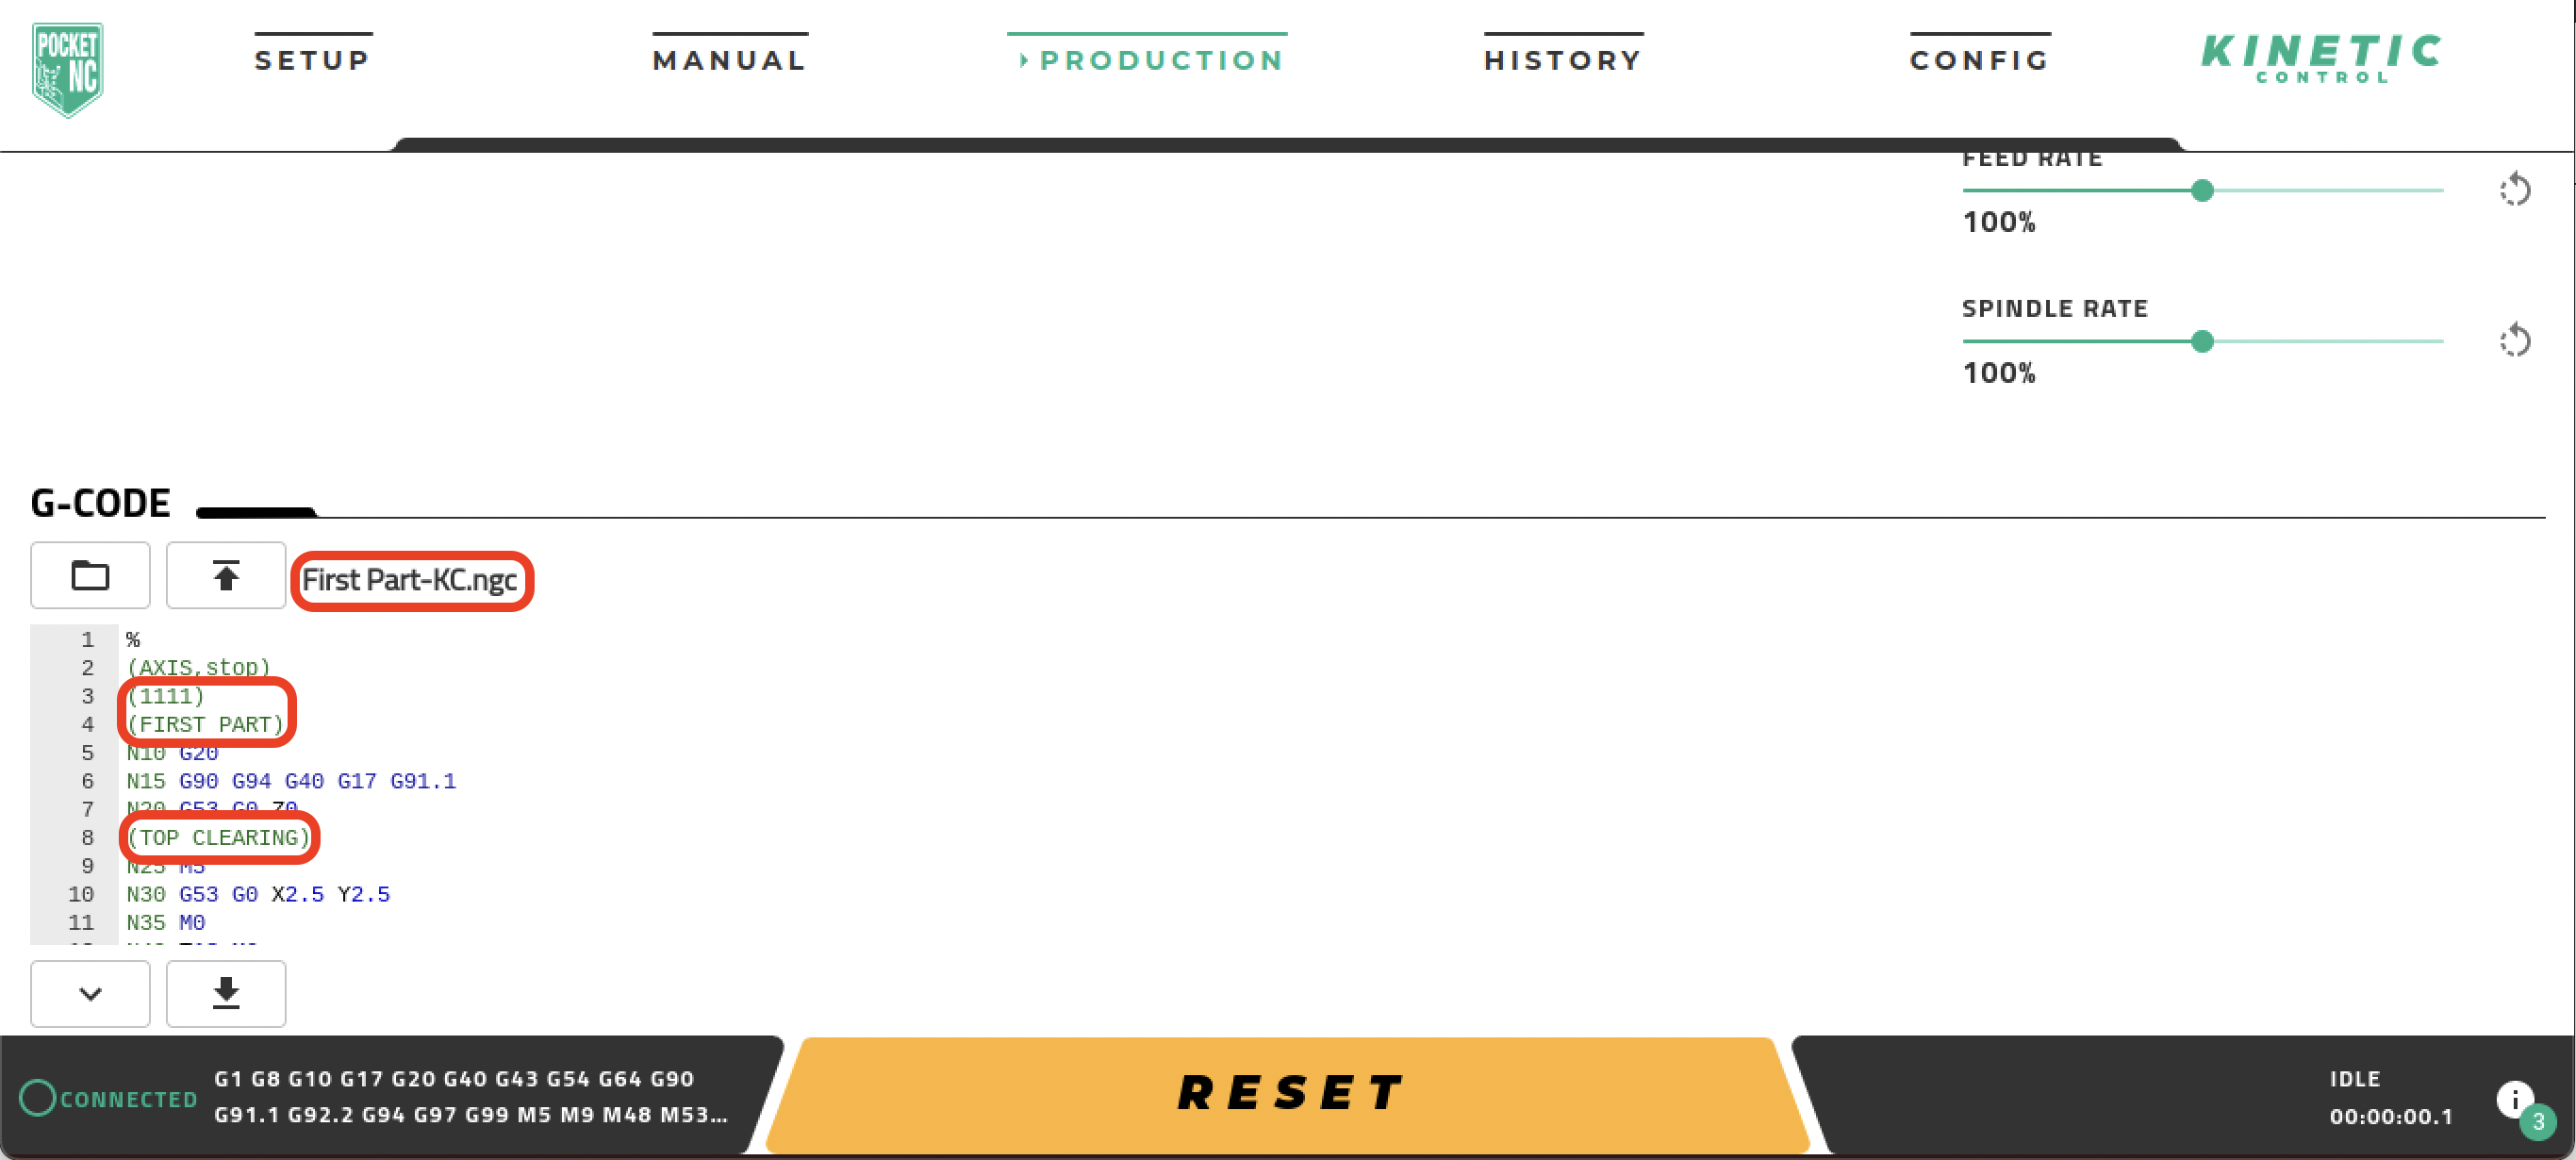
You will now see that your G-code file name is listed at the top of the “G-CODE” section (called “First Part-KC in this example) and the full code is displayed. You can scroll through the full program when your mouse is hovering over this section to view the code before running it and while it runs using this interface. (Note that the program number and comments are listed towards the top, the first toolpath is slightly lower, and then the required tool is a bit below that):
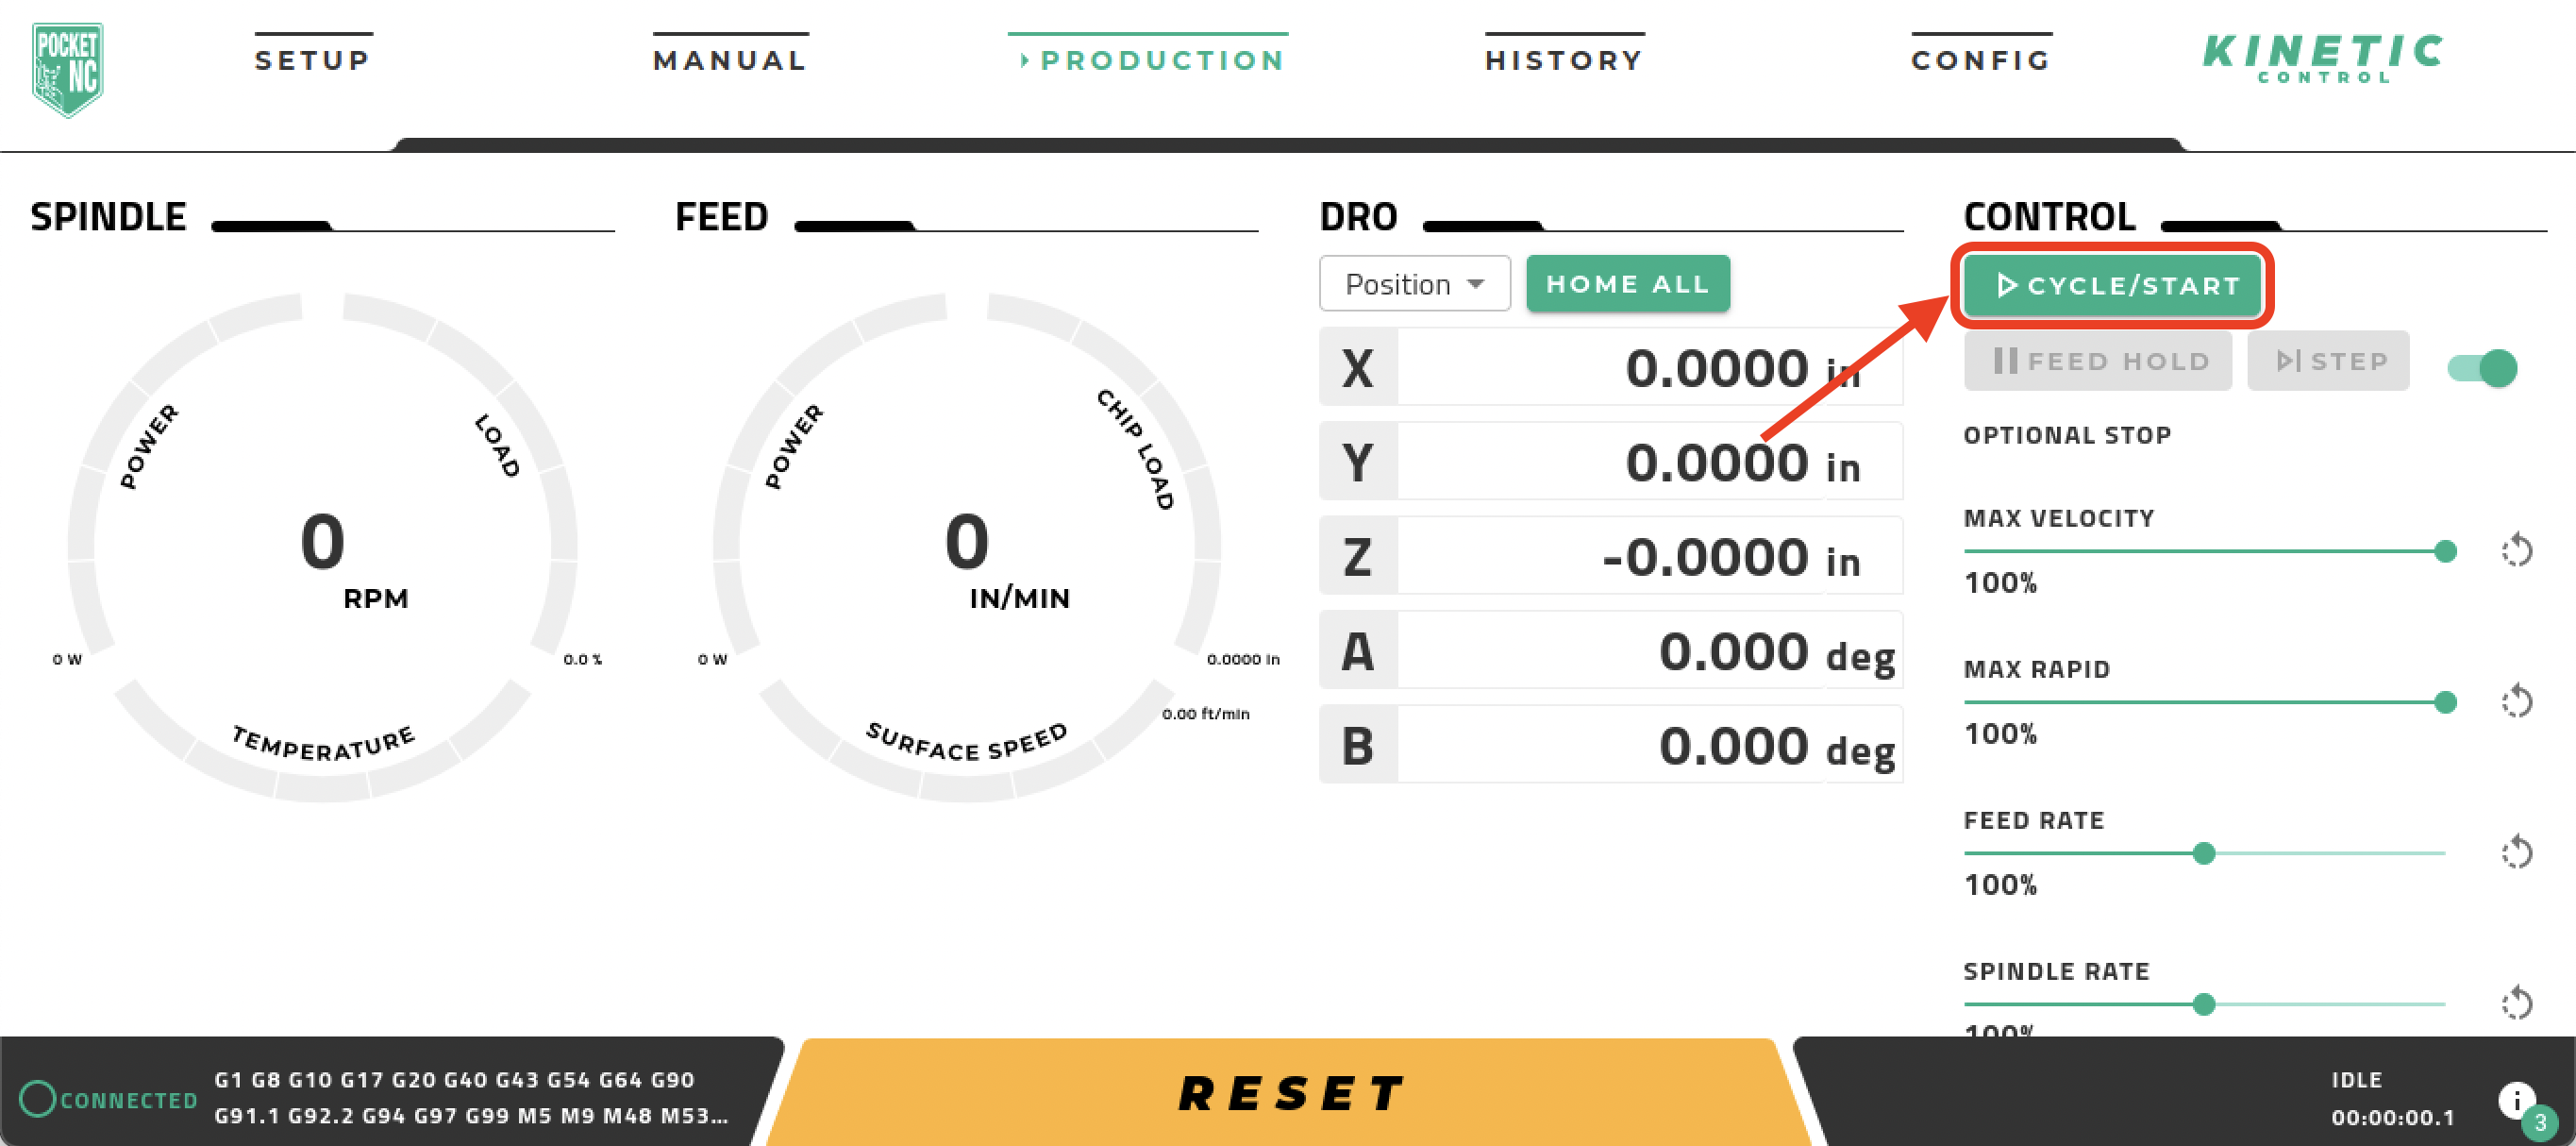
When you are ready, run the program by scrolling to the top of the “Production” page and clicking the green “CYCLE/START” button. The program will take roughly 40 minutes to complete.
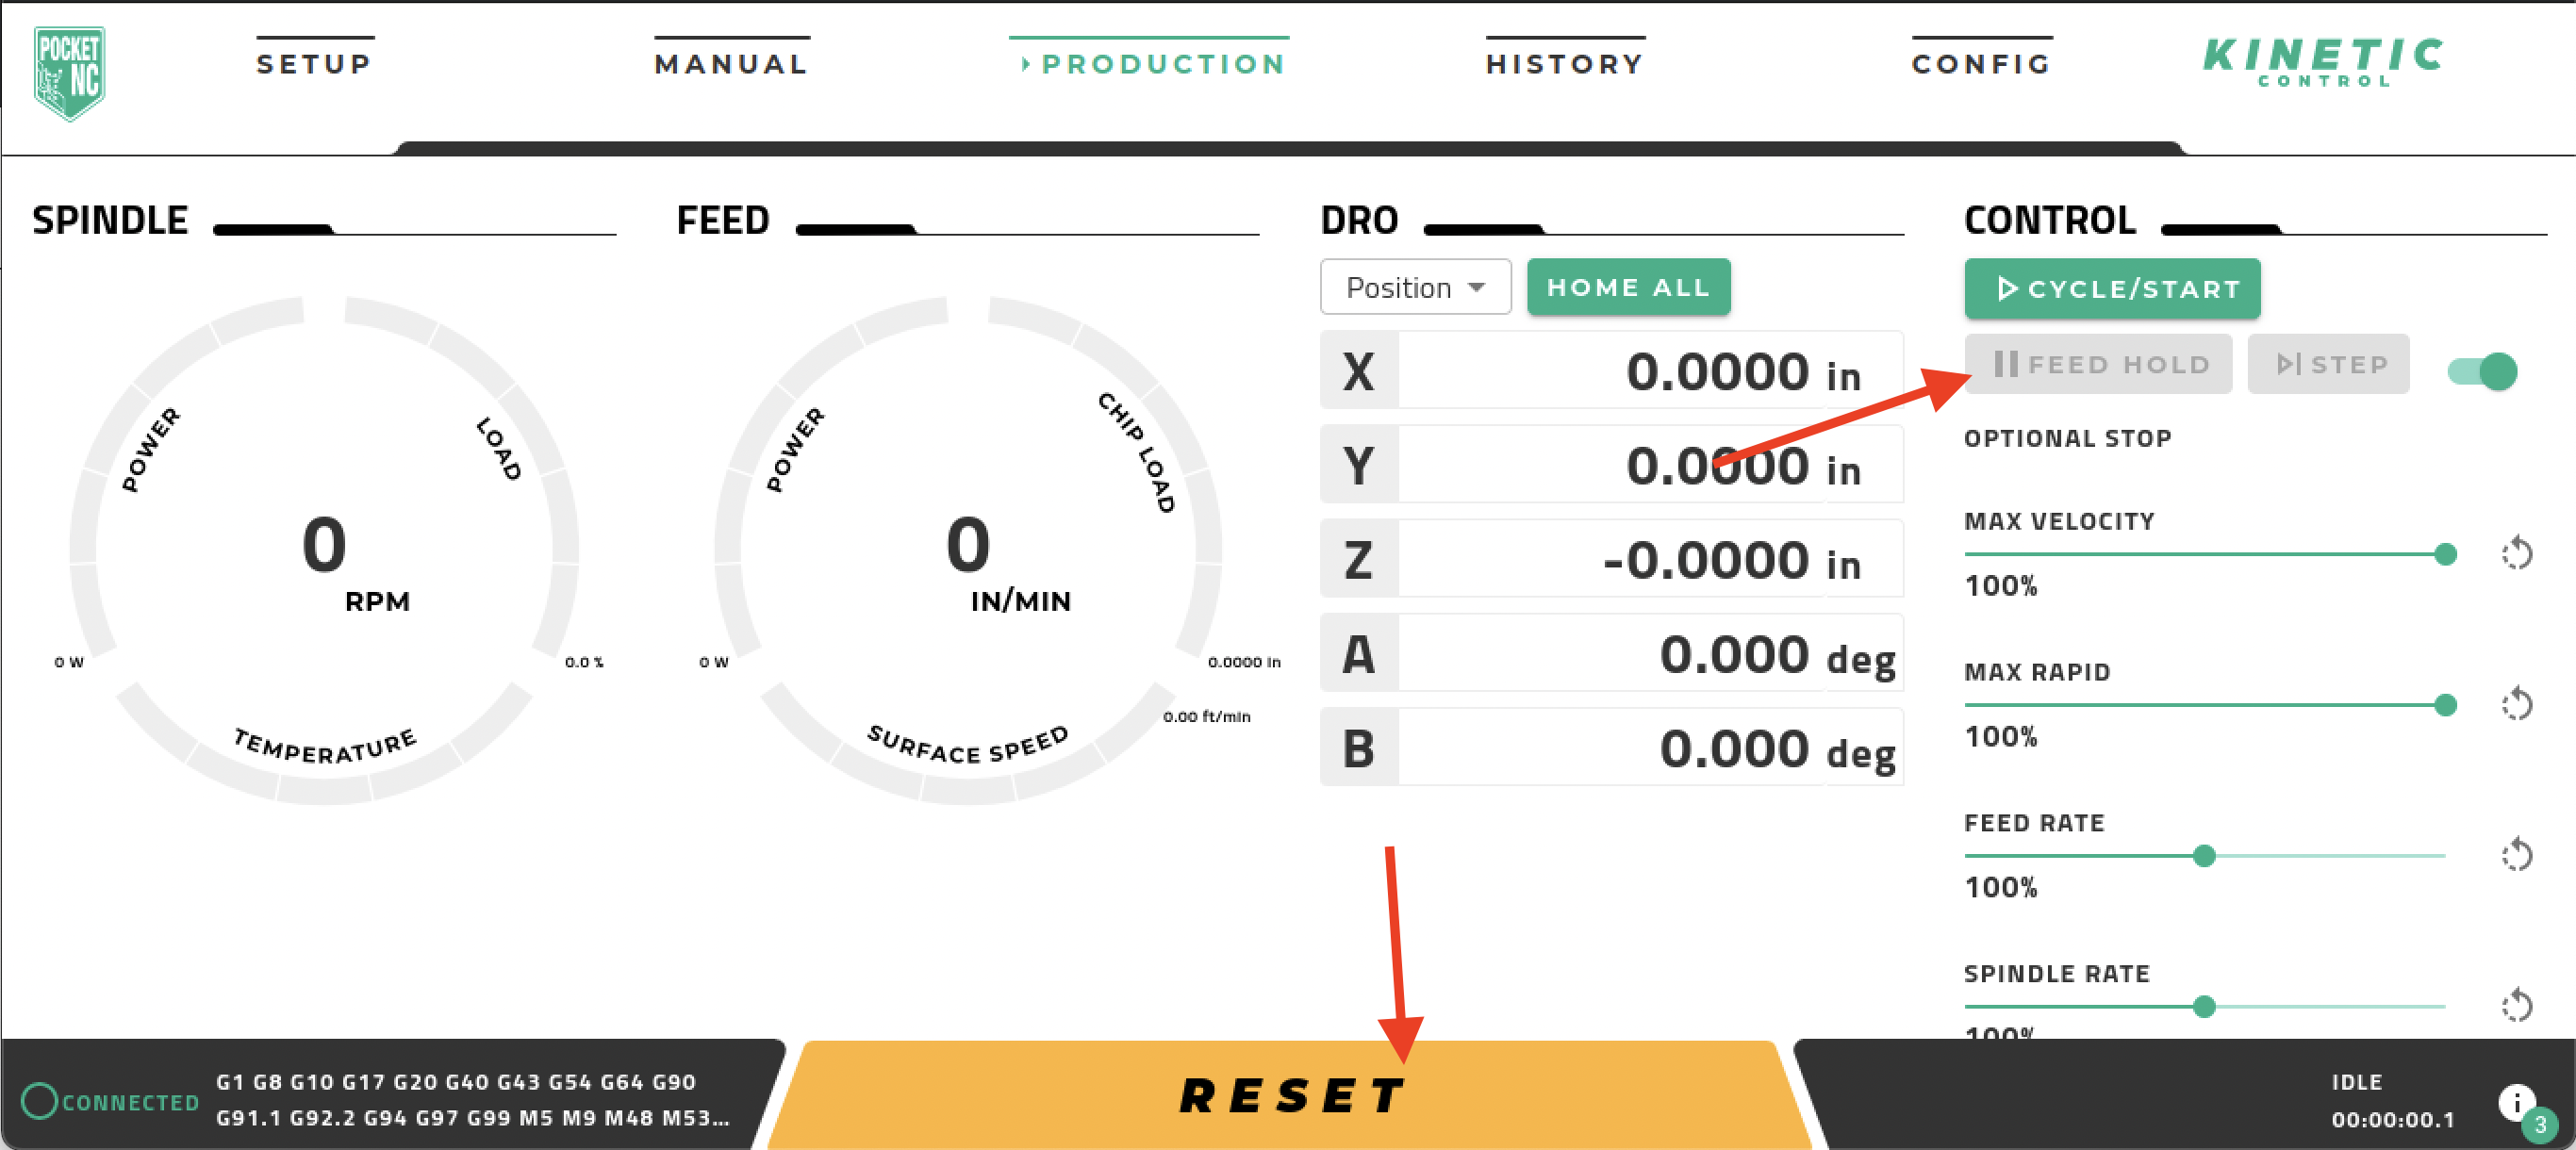
If you have a M0 or M1 command at the start of your code, the program will be paused. Click the green ”CYCLE/START” button or push the green Pause/Go button on the front of machine in order to start the program. The user may pause the program at any point by clicking the “|| FEED HOLD” button or pushing the green button on the machine. The user can stop the program by clicking the “Reset” button or pushing the red, emergency stop button on the machine (by doing so, your program will need to be restarted from the beginning).
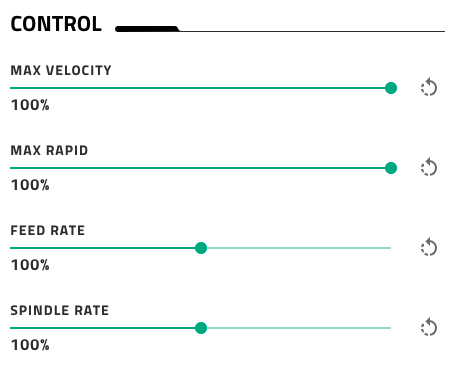
The CONTROL section of the PRODUCTION page allows users to override the velocity of commanded moves as well as the spindle speed while the machine is in motion.
The CONTROL section is made up of four override sliders. Each slider allows users to override the nominal or commanded value of that particular parameter. The percent by which the value has been changed is displayed below the slider and the refresh button to the right of each slider resets it back to 100%. The sliders can be adjusted in 1% increments. Max Velocity controls the maximum speed at which the tip of the tool can move. Max Rapid refers to how fast the tool can move during G0 commands specifically. Feed Rate is how fast the machine is moving the tool during feed rate moves (F values). Finally, Spindle Rate is the speed at which the spindle is rotating.
This completes the First Part Tutorial, good luck and happy machining! Remember that if you get stuck anywhere or need additional information, we have a wide variety of information in the Pocket NC User Resources database. If you can’t find what you need there, please reach out to us at service@pocketnc.com!
Section 7: File Downloads
Part FileFiles:
.f3d
| View file | ||
|---|---|---|
|
.step
| View file | ||
|---|---|---|
|
Tool Library:
| View file | ||
|---|---|---|
|
